• ×
    Information
    Windows update impacting certain printer icons and names. Microsoft is working on a solution.
    Click here to learn more
    Information
    Need Windows 11 help?
    Check documents on compatibility, FAQs, upgrade information and available fixes.
    Windows 11 Support Center.
  • post a message
  • ×
    Information
    Windows update impacting certain printer icons and names. Microsoft is working on a solution.
    Click here to learn more
    Information
    Need Windows 11 help?
    Check documents on compatibility, FAQs, upgrade information and available fixes.
    Windows 11 Support Center.
  • post a message
Guidelines
Experiencing 'Printer Blocked' or 'Printer Error' message? Click here for more information.
Check some of the most frequent questions about Instant Ink: HP INSTANT INK, HP+ PLANS: INK AND TONER.


Check out our Black or Color Ink Not Printing, Other Print Quality Issues info about: Print quality and Cartridge Issues.
HP Recommended
HP
Microsoft Windows 10 (64-bit)

Did everything that HP support had online but the problem is persisting. does that mean I need to go and buy a new printerhead?

1 REPLY 1
HP Recommended

@neile9


Welcome to the HP support community.


Make sure the printhead is installed correctly

  1. Press the Power button to turn on the printer, if it is not already on.

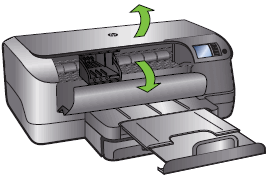
  2. Open the ink cartridge access door and the printer lid. The carriage moves to the center of the printer. Wait until the carriage stops in the center of the printer before you proceed.

    Figure : Open the ink cartridge access door and the printer lid

    Image: Open the ink cartridge access door and the printer lid.
  3. Disconnect the power cord from the rear of the printer.

  4. Unplug the power cord from the wall outlet.

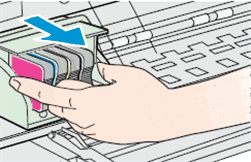
  5. Remove the printhead. You can leave the ink cartridges in the printhead. Lift the lever on the back right corner of the printhead assembly, and then lift out the printhead.

    Figure : Remove the printhead

    Image: Remove the printhead.
       CAUTION: 

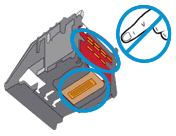
    Do not touch the electrical contacts or the nozzles on the printhead with your hand or fingers. Touching these areas can cause electrical failures or print quality problems. Do not leave the printhead out of the printer for more than a few minutes.


    Figure : Do not touch the electrical contacts or nozzles on the printhead 

    Image: Do not touch the electrical contacts or nozzles on the printhead.
  6. Clean the printhead contacts with a cotton swab.

    Figure : Clean the printhead contacts

    1. Contacts: Clean

    2. Nozzle: Do NOT clean

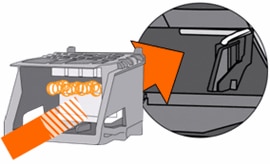
  7. Grasp the printhead on both sides with the electrical contacts facing the rear of the printer, and then insert the printhead into the carriage.

    Figure : Reinsert the printhead

    Image: Reinsert the printhead.
  8. Carefully lower the latch handle on the carriage to secure the printhead.

  9. Close the printer lid and ink cartridge access door.

  10. Reconnect the power cord to the rear of the printer.

  11. Plug the cord back into the wall outlet.

  12. Press the Power button to turn on the printer.

You can refer this HP document for more assistance:- Click here


I hope that helps.

To thank me for my efforts to help you, please mark my post as an accepted solution so that it benefits several others.

Cheers.

Sandytechy20
I am an HP Employee

† The opinions expressed above are the personal opinions of the authors, not of HP. By using this site, you accept the <a href="https://www8.hp.com/us/en/terms-of-use.html" class="udrlinesmall">Terms of Use</a> and <a href="/t5/custom/page/page-id/hp.rulespage" class="udrlinesmall"> Rules of Participation</a>.