-
×InformationNeed Windows 11 help?Check documents on compatibility, FAQs, upgrade information and available fixes.
Windows 11 Support Center. -
-
×InformationNeed Windows 11 help?Check documents on compatibility, FAQs, upgrade information and available fixes.
Windows 11 Support Center. -
- HP Community
- Printers
- Printing Errors or Lights & Stuck Print Jobs
- How do I manually align print cartridges on deskjet 3050A

Create an account on the HP Community to personalize your profile and ask a question
11-13-2018 08:32 AM
I’ve installed HP cartridges from a non-functioning (sudden USB incompatibility issue) 2050 into a 3050 and cannot re-align from computer prompts, so need to try manual re-aligning. I also tried to instal an hp xl cartridge (full) and it was rejected as incompatible. This is costing me a lot of money in cartridges which the printer won’t accept. Please help!
11-14-2018 05:15 PM
Welcome to HP Forums,
This is a great place to get support, find answers and tips to your technical queries.
To provide you with an accurate solution, I'll need a few more details:
Are you using genuine HP Ink cartridge?
Did you try with the different set of cartridges?
Clean the electrical contacts
Follow these steps to clean the electrical contacts on the cartridges.
-
Gather the following materials:
-
Dry foam-rubber swabs, lint-free cloth, or any soft material that will not come apart or leave fibers (coffee filters work well)
-
Distilled, filtered, or bottled water (tap water might contain contaminants that can damage the cartridges)
caution:
Do not use platen cleaners or alcohol to clean the cartridge contacts. These can damage the cartridge or the product.
-
-
Press the Power button (
) to turn on the product.
-
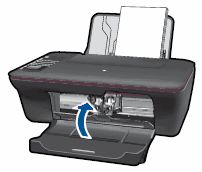
Open the cartridge access door. The carriage moves to the center of the product. Wait until the carriage is idle and silent before continuing.
Figure : Open the cartridge access door
-
Press down on the cartridge to release it, and then pull the cartridge out to remove it from its slot.
Figure : Remove the cartridge
caution:
Do not remove both cartridges at the same time. Remove and clean each cartridge one at a time. Do not leave a cartridge outside the product for more than 30 minutes.
-
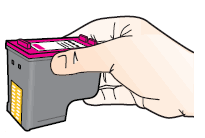
Hold the cartridge by its sides.
Figure : Hold the cartridge by its sides
-
Inspect the ink cartridge contacts for ink and debris buildup.
-
Dip a clean foam-rubber swab or lint-free cloth into distilled water, and then squeeze any excess water from it.
-
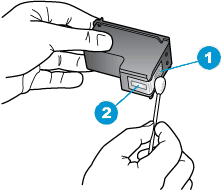
Clean only the copper-colored contacts, and then allow the cartridge to dry for approximately 10 minutes.
Figure : Clean the contacts
-
Copper-colored contacts
-
Ink nozzles (do not clean)
-
-
Lightly moisten another cotton swab with distilled water, and then squeeze any excess water from the swab.
-
Use the swab to clean the electrical contacts in the carriage, located inside the product. Allow the contacts to dry for approximately 10 minutes.
-
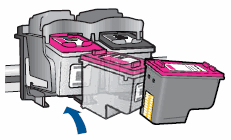
Hold the cartridge by its sides with the nozzles toward the product, and then insert the cartridge into its slot. Make sure that the icon on the cartridge matches the icon on the slot.
Figure : Insert the cartridge into its slot
-
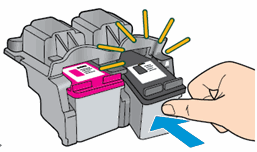
Push the cartridge forward into its slot until it snaps into place.
Figure : Snap the cartridge into place
-
Repeat these steps for the other cartridge.
-
Close the cartridge access door.
Figure : Close the cartridge access door
Then, Use the following steps to align the cartridges.
IMPORTANT: To complete the alignment process, the product must successfully print and scan the alignment page. After the alignment page prints, make sure you complete the steps to scan the page.
-
Open the HP product software:
-
Windows XP: Click Start (
), click All Programs, click HP, click the folder for your HP product, and then click the icon for your HP product (
).
-
Windows Vista or Windows 7: Click the Windows icon (
), click All Programs, click HP, click the folder for your HP product, and then click the icon for your HP product (
).
note:
You can also open the HP product software from your computer desktop: double-click the icon for your HP product (
).
The product software opens.
-
-
In the product software, double-click Printer Actions (
).
-
Double-click Maintenance Tasks (
). The HP Toolbox opens.
-
Click the Device Services tab, and then click Align Ink Cartridges, and then follow the on-screen instructions to print the alignment page. The product prints the page.
-
Lift the scanner lid.
-
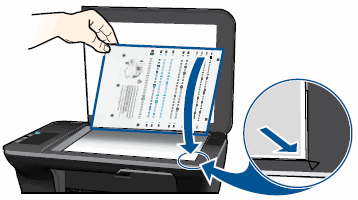
Place the alignment page with the printed-side down on the right-front corner of the scanner glass. See the engraved guide next to the scanner glass for help loading the alignment page.
Figure : Place the alignment page on the scanner glass
-
Close the scanner lid.
-
Press the button next to OK on the product control panel (
). The product scans the alignment page.
-
When the Alignment successful message displays on the control panel screen, press the button next to OK on the control panel (
) to complete the alignment.
Keep me posted, how it goes!
If the information I've provided was helpful, give us some reinforcement by clicking the Accepted Solution and Kudos buttons, that'll help us and others see that we've got the answers!
Have a great day!
Cheers:)
Raj1788
I am an HP Employee