-
×InformationNeed Windows 11 help?Check documents on compatibility, FAQs, upgrade information and available fixes.
Windows 11 Support Center. -
-
×InformationNeed Windows 11 help?Check documents on compatibility, FAQs, upgrade information and available fixes.
Windows 11 Support Center. -
- HP Community
- Printers
- Printing Errors or Lights & Stuck Print Jobs
- I have paper jam error message with no paper in tray and no ...

Create an account on the HP Community to personalize your profile and ask a question
Your account also allows you to connect with HP support faster, access a personal dashboard to manage all of your devices in one place, view warranty information, case status and more.
Check some of the most frequent questions about Instant Ink: HP INSTANT INK, HP+ PLANS: INK AND TONER.
Check out our Black or Color Ink Not Printing, Other Print Quality Issues info about: Print quality and Cartridge Issues.

It has been a while since anyone has replied. Simply ask a new question if you would like to start the discussion again.
06-26-2018 05:11 PM
 HP Recommended
Product: HP Officejet 4500 All-in-One Printer Series - G510
Operating System: Microsoft Windows 10 (64-bit)
I recently changed both ink cartriges because the print was faded and level showed low. Since then, the printer has been working great, until today. I started printing some medication schedules from a .jpg file. After three or four pages it started to print smudged areas which progressed until the whole page was smudged (About 3 pages). I took the ink cartriges out and cleaned them with filter paper and distilled water as instructed in the help section after canceling the print job. It then printed random numbers and letters with color and black bands spaced between.
I changed the file to open with Microsoft Office 10 because the Pictures app didn't show the print options. It printed two pages right and then started with the smudges again. Now it shows an error "Ink cartrige problem" and also "Paper Jam" error. I checked for a jam and there is none. I also checked the cartriges and saw nothing wrong there. Whats causing the false error notifications and not printing? Now error shows Ink cartrige is missing or not detected.
Solved! Go to Solution.
1 ACCEPTED SOLUTION
Accepted Solutions
06-27-2018 04:58 PM
HP Recommended
Thank you for posting on HP Forums,
Riddle_Decipher, is at your service (Like a Genie, however, without magic powers) 😉
As I understand there's a false paper jam error and also, an ink cartridge error on the printer,
No worries, as I'll be glad to help you, that said, I'll need a few more details to dissect your concern & provide an accurate solution:
- Have you performed a hard reset or restart the printer?
- Did you check for paper jam on the front and back of the printer? just to be sure!
While you respond to that, here's what you need to do:
Solution one: Turn the All-in-One off and then on again
-
Press the Power button (
 ) to turn off the product.
 -
Wait 60 seconds.
-
Press the Power button (
) to turn on the product.NOTE:
The product might go through a warm-up period. The product lights might flash and the carriage might move. Wait until the warm-up period finishes before proceeding.
-
Try to print a self-test report. See the steps on how to print a self-test report at the top of this document.
-
If these steps resolved the issue, and the test page prints, there is no need to continue troubleshooting. Reconnect the USB cable, and then try to print again.
-
If the issue persists, continue with the next solution.
-
If the test page does not print, continue with the next solution.
Solution two: Clear any jammed paper
Jammed paper can cause the carriage to stall. Follow these steps to clear any jammed paper.
NOTE:
The Automatic Document Feeder (ADF) is not included with all Officejet 4500 All-in-One products.
Step one: Remove any loose paper
Remove any loose sheets of paper from the input tray and the output tray.
CAUTION:
Do not remove jammed paper at this stage. Trying to clear jammed paper from the front of the product can damage the print mechanism.
Step two: Clear the jam from the back of the All-in-One
-
Press the Power button (
) to turn off the product. -
Disconnect the USB cable from the back of the product.
-
Disconnect the power cord from the back of the product.
-
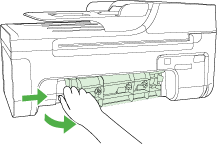
On the back of the product, press in the tab on the left side of the rear access door to release the door. Pull the door away from the product to remove it.
Figure : Remove the rear access door
-
Gently pull the paper out of the rollers.
CAUTION:
If the paper tears when removing it from the rollers, check the rollers for torn pieces of paper that might remain inside the product. If any torn pieces of paper remain inside the product, more paper jams are likely to occur.
-
Reattach the rear access door. Gently push the door forward until it snaps into place.
Step three: Clear the paper jam from the front of the All-in-One
If you cannot remove the paper jam from the back of the product, follow these steps to remove the paper jam from the front.
-
Open the front access door. The carriage might try to move into the access area. If so, allow it to move to that position.
Figure : Open the front access door

-
Gently pull the paper out of the rollers.
NOTE:
Remove paper from the front of the product as carefully as possible. If any torn pieces of paper remain inside the product, more paper jams are likely to occur, and this could damage the print mechanism.
-
Close the front access door.
-
Reconnect the power cord to the back of the product.
-
Press the Power button (
) to turn on the product. -
Try to print a self-test report. See the steps on how to print a self-test report at the top of this document.
-
If these steps resolved the issue, and the test page prints, there is no need to continue troubleshooting. Reconnect the USB cable, and then try to print again.
-
If the issue persists, continue with the next solution.
-
If the test page does not print, continue with the next solution.
CLICK HERE FOR DETAILS & FURTHER INSTRUCTIONS - SOLUTION THREE ONWARD
(By the end of this article all the issues should be resolved)
Let me know how that pans out
I will have a colleague follow-up on this to ensure it's taken care off,
as I need to know if the issue has been resolved, to get proper sleep at night.
feel free to give me a virtual high-five by clicking the 'Thumbs Up' icon,
followed by clicking on 'Accepted as Solution' as it would help the community gain more knowledge,
And Have a great day Ahead!
Riddle_Decipher
I am an HP Employee
Learning is a journey, not a destination.
Let's keep asking questions and growing together.
3 REPLIES 3
06-27-2018 04:58 PM
HP Recommended
Thank you for posting on HP Forums,
Riddle_Decipher, is at your service (Like a Genie, however, without magic powers) 😉
As I understand there's a false paper jam error and also, an ink cartridge error on the printer,
No worries, as I'll be glad to help you, that said, I'll need a few more details to dissect your concern & provide an accurate solution:
- Have you performed a hard reset or restart the printer?
- Did you check for paper jam on the front and back of the printer? just to be sure!
While you respond to that, here's what you need to do:
Solution one: Turn the All-in-One off and then on again
-
Press the Power button (
) to turn off the product. -
Wait 60 seconds.
-
Press the Power button (
) to turn on the product.NOTE:
The product might go through a warm-up period. The product lights might flash and the carriage might move. Wait until the warm-up period finishes before proceeding.
-
Try to print a self-test report. See the steps on how to print a self-test report at the top of this document.
-
If these steps resolved the issue, and the test page prints, there is no need to continue troubleshooting. Reconnect the USB cable, and then try to print again.
-
If the issue persists, continue with the next solution.
-
If the test page does not print, continue with the next solution.
Solution two: Clear any jammed paper
Jammed paper can cause the carriage to stall. Follow these steps to clear any jammed paper.
NOTE:
The Automatic Document Feeder (ADF) is not included with all Officejet 4500 All-in-One products.
Step one: Remove any loose paper
Remove any loose sheets of paper from the input tray and the output tray.
CAUTION:
Do not remove jammed paper at this stage. Trying to clear jammed paper from the front of the product can damage the print mechanism.
Step two: Clear the jam from the back of the All-in-One
-
Press the Power button (
) to turn off the product. -
Disconnect the USB cable from the back of the product.
-
Disconnect the power cord from the back of the product.
-
On the back of the product, press in the tab on the left side of the rear access door to release the door. Pull the door away from the product to remove it.
Figure : Remove the rear access door
-
Gently pull the paper out of the rollers.
CAUTION:
If the paper tears when removing it from the rollers, check the rollers for torn pieces of paper that might remain inside the product. If any torn pieces of paper remain inside the product, more paper jams are likely to occur.
-
Reattach the rear access door. Gently push the door forward until it snaps into place.
Step three: Clear the paper jam from the front of the All-in-One
If you cannot remove the paper jam from the back of the product, follow these steps to remove the paper jam from the front.
-
Open the front access door. The carriage might try to move into the access area. If so, allow it to move to that position.
Figure : Open the front access door
-
Gently pull the paper out of the rollers.
NOTE:
Remove paper from the front of the product as carefully as possible. If any torn pieces of paper remain inside the product, more paper jams are likely to occur, and this could damage the print mechanism.
-
Close the front access door.
-
Reconnect the power cord to the back of the product.
-
Press the Power button (
) to turn on the product. -
Try to print a self-test report. See the steps on how to print a self-test report at the top of this document.
-
If these steps resolved the issue, and the test page prints, there is no need to continue troubleshooting. Reconnect the USB cable, and then try to print again.
-
If the issue persists, continue with the next solution.
-
If the test page does not print, continue with the next solution.
CLICK HERE FOR DETAILS & FURTHER INSTRUCTIONS - SOLUTION THREE ONWARD
(By the end of this article all the issues should be resolved)
Let me know how that pans out
I will have a colleague follow-up on this to ensure it's taken care off,
as I need to know if the issue has been resolved, to get proper sleep at night.
feel free to give me a virtual high-five by clicking the 'Thumbs Up' icon,
followed by clicking on 'Accepted as Solution' as it would help the community gain more knowledge,
And Have a great day Ahead!
Riddle_Decipher
I am an HP Employee
Learning is a journey, not a destination.
Let's keep asking questions and growing together.
06-28-2018 12:13 PM
HP Recommended
Before receiving your email I had restarted the printer, restarted the computer, checked for paper jam, unplugged the power cord, tried another copy of the driver software, researched the troubleshooting instructions, cleaned the nozzles, cleaned the cartridges and left the power cord unplugged overnight. Then yesterday when I powered up the same error message to clear the paper jam and check the ink cartridges came up. After disconnecting all cords I picked the printer up and turned so I could use a flashlight to look into the back to see if I was missing any paper jam. No paper there. When I put it back down and looked at the cartridges I noticed that the color cartridge was loose.
I looked in the help files for ink cartridges and found a picture of installed cartridges and realized I had installed the color cartridge incorrectly. That I had recently replaced the cartridges should have been my first clue! I didn't understand how it could print correctly with cartridges installed wrong or what that had to do with a paper jam. ( I changed them over a week ago.) It printed 15 pages correctly before starting to smudge. After that it progressed til the third page was all smudges. But I guess there's a lot about technical equipment that dummies like me don't understand!
Long story short, I got it to print the flip side of the 15 pages correctly with no error messages and no smudges after installing the cartridges correctly and aligning them. Hopefully we've got this thing whipped and this can remind others to pay close attention when replacing ink cartridges.
Thanks for your help.
06-28-2018 02:45 PM
HP Recommended
Thank you for the update,
I appreciate your time and efforts,
I'm glad I could contribute towards identifying and leading you towards the solution for this concern.
If you have any queries or the issue requires further support, please feel free to respond and we'll be glad to help!
You've been great to work with and it has been a genuine pleasure interacting with you.
I hope both you and your product works great and remain healthy for a long time 😉
To simply say thanks for my efforts to assist you, please click the "Thumbs Up" button to give me a Kudos.
And select Accepted as solution to help others find the same solution as you have.
Take care now and do have a fabulous week ahead. 🙂
Riddle_Decipher
I am an HP Employee
Learning is a journey, not a destination.
Let's keep asking questions and growing together.
Be alert for scammers posting fake support phone numbers and/or email addresses on the community.
If you think you have received a fake HP Support message, please report it to us by clicking on "Flag Post".
† The opinions expressed above are the personal opinions of the authors, not of HP. By using this site, you accept the Terms of Use and Rules of Participation.


Didn't find what you were looking for?
Ask the community
† The opinions expressed above are the personal opinions of the authors, not of HP. By using this site, you accept the <a href="https://www8.hp.com/us/en/terms-of-use.html" class="udrlinesmall">Terms of Use</a> and <a href="/t5/custom/page/page-id/hp.rulespage" class="udrlinesmall"> Rules of Participation</a>.