-
×InformationNeed Windows 11 help?Check documents on compatibility, FAQs, upgrade information and available fixes.
Windows 11 Support Center. -
-
×InformationNeed Windows 11 help?Check documents on compatibility, FAQs, upgrade information and available fixes.
Windows 11 Support Center. -
- HP Community
- Printers
- Printing Errors or Lights & Stuck Print Jobs
- Inserting ink cartridges

Create an account on the HP Community to personalize your profile and ask a question
12-13-2018 11:51 AM
I'm setting up my printer for the first time - a DeskJet 2630. I'm having difficulty in understanding how the ink cartridges slot into the body of the printer. I would be very grateful for any help...I'm a 90+ male
Solved! Go to Solution.
Accepted Solutions
12-14-2018 01:08 PM
Good Day. A warm welcome to the HP community.
I reviewed the case regarding the cartridges. I will be delighted to assist you here.
-
Remove the new ink cartridge from its package. Be careful to only touch the black plastic on the ink cartridge.
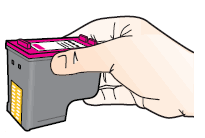
-
Remove the plastic tape.
CAUTION:
Do not touch the copper-colored contacts or the ink nozzles. Do not replace the protective tape on the contacts. Handling these parts can result in clogs, ink failure, and bad electrical connections.
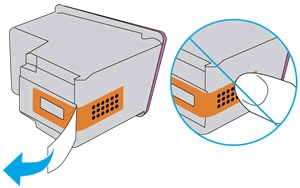
-
Hold the ink cartridge by its sides with the contacts toward the printer, insert the ink cartridge into its slot, and then gently push the ink cartridge until it snaps into place.
NOTE:
Install the color ink cartridge on the left and the black ink cartridge on the right.
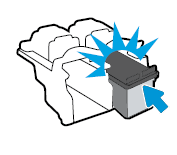
-
Repeat these steps to install the other ink cartridge, if necessary.
-
Close the ink cartridge access door.
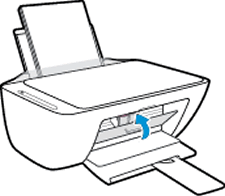
Align the ink cartridges
To achieve the best print quality, it is necessary to align the ink cartridges.
-
After installing new ink cartridges, the printer automatically prints an alignment page.
-
Lift the scanner lid.
-
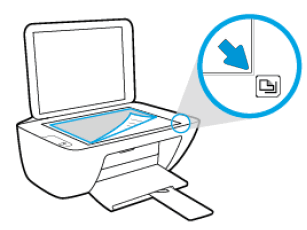
Place the alignment page with the print side down on the scanner glass, and then position it according to the engraved guides around the glass.
Figure : Placing the alignment page on the scanner glass
-
Close the scanner lid.
-
Press the Start Copy Black button
 or the Start Copy Color button
  on the printer control panel.
The printer aligns the ink cartridges.
This should do the trick for you.Please perform all these steps patiently as it is critical to resolving the issue.
Hope this helps. Let me know how it goes. 😉
Barachiel
I am an HP Employee
12-14-2018 01:08 PM
Good Day. A warm welcome to the HP community.
I reviewed the case regarding the cartridges. I will be delighted to assist you here.
-
Remove the new ink cartridge from its package. Be careful to only touch the black plastic on the ink cartridge.

-
Remove the plastic tape.
CAUTION:
Do not touch the copper-colored contacts or the ink nozzles. Do not replace the protective tape on the contacts. Handling these parts can result in clogs, ink failure, and bad electrical connections.

-
Hold the ink cartridge by its sides with the contacts toward the printer, insert the ink cartridge into its slot, and then gently push the ink cartridge until it snaps into place.
NOTE:
Install the color ink cartridge on the left and the black ink cartridge on the right.

-
Repeat these steps to install the other ink cartridge, if necessary.
-
Close the ink cartridge access door.

Align the ink cartridges
To achieve the best print quality, it is necessary to align the ink cartridges.
-
After installing new ink cartridges, the printer automatically prints an alignment page.
-
Lift the scanner lid.
-
Place the alignment page with the print side down on the scanner glass, and then position it according to the engraved guides around the glass.
Figure : Placing the alignment page on the scanner glass

-
Close the scanner lid.
-
Press the Start Copy Black button
 or the Start Copy Color button
  on the printer control panel.
The printer aligns the ink cartridges.
This should do the trick for you.Please perform all these steps patiently as it is critical to resolving the issue.
Hope this helps. Let me know how it goes. 😉
Barachiel
I am an HP Employee
12-15-2018 09:51 AM
Hurray!!! I'm delighted to hear that it's working!
Feel free to post your query for any other assistance as well,
It's been a pleasure interacting with you and I hope you have a good day ahead.
You've been great to work with and it has been a genuine pleasure interacting with you.
I hope both you and your product works great and remain healthy for a long time 😉
Barachiel
I am an HP Employee
