-
×InformationNeed Windows 11 help?Check documents on compatibility, FAQs, upgrade information and available fixes.
Windows 11 Support Center. -
-
×InformationNeed Windows 11 help?Check documents on compatibility, FAQs, upgrade information and available fixes.
Windows 11 Support Center. -
- HP Community
- Printers
- Printing Errors or Lights & Stuck Print Jobs
- Loud squeak HP5540 inkjet

Create an account on the HP Community to personalize your profile and ask a question
07-10-2020 12:43 AM
My HP5540 inkjet has a very loud squeak when printing. Not sure if this is the guide rod when the toner cartridges move or something else. Any ideas on how to grease up the guide rod or what else could be squeaking so loudly?
thanks
07-12-2020 09:38 AM
Hi @Icecube23
Welcome to the HP Support Community.
Please check for jams and broken parts inside the printer
Remove any jammed paper from the ink cartridge access area from inside the printer.
-
Turn on the printer, if it is not already on.
-
Open the ink cartridge access door.
CAUTION:
Do not touch the cable attached to the print carriage.
The carriage moves to the center of the printer.
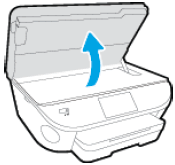
-
Wait until the printer is idle and silent before you continue.
-
While the printer is still on, disconnect the power cord from the rear of the printer, and then unplug the power cord from the power source or electrical outlet.
WARNING:
You must disconnect the power cord before reaching inside the printer to avoid the risk of injuries or electric shock.
-
Disconnect the USB cable from the rear of the printer, if you have a cable connection to the printer.
-
Gently remove any jammed paper from inside the printer. To avoid tearing any whole sheets of paper, pull the paper firmly with both hands.
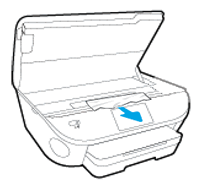
-
Use a flashlight to inspect the carriage area, located toward the front of the printer, and then check for and remove any jammed paper or objects that might restrict the carriage.
-
Locate the paper path cover, grasp the handle, and then lift up to remove it.
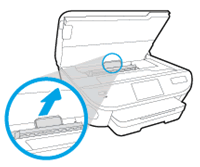
-
Use a flashlight to thoroughly check the paper path for any torn pieces of paper that might remain inside the printer, and then remove any jammed paper that might remain inside the cleanout area.

-
Replace the paper path cover until it clicks into place.
-
Close the ink cartridge access door.
To make sure the ink cartridge access door is securely closed, check that the 'Door Open' message clears and that the Home screen displays on the printer control panel.
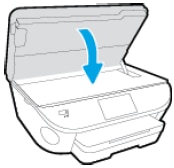
-
Reconnect the power cord to the rear of the printer, and then turn on the printer.
-
Reconnect the USB or Ethernet cable, unless your printer is connected to a wireless network.
Clear jammed paper from underneath the printer
Remove any jammed paper from underneath the printer.
-
Turn off the printer.
-
Disconnect the USB cable from the rear of the printer, if you have a cable connection to the printer.
-
Push in the output tray extender, if necessary.
-
Grasp the output tray, and then pull it toward you to remove it.
-
Pull out the input tray to its outermost position.
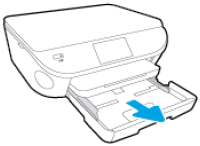
-
Turn the printer on its right so you can access its underside (base).
CAUTION:
Before turning the printer, use your hands to hold the scanner lid and the paper input tray.
-
Use a flashlight to check the gap where the input tray was. Grasp any jammed paper, and then pull the paper slowly but firmly toward you to remove it.
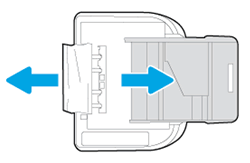
CAUTION:
Remove paper from underneath the printer as carefully as possible. If any torn pieces of paper remain inside the printer, more paper jams might occur, which could damage the print mechanism.
-
Push in the input tray, and then turn the printer over to its normal position.
-
Open the ink cartridge access door, and then look inside the printer for any loose objects that might have shifted when the printer was turned over.
-
Slide the output tray back onto the input tray.
-
Reconnect the power cord to the rear of the printer, and then plug in the power cord to an electrical outlet.
-
Reconnect the USB or Ethernet cable, unless your printer is connected to a wireless network.
-
Turn on the printer.
The printer might go through a warm-up period and the carriage might move. Wait until the warm-up period finishes before you proceed.
Clear jammed paper from the output and input tray
Remove any loose paper that is accessible from the output and input tray.
-
Remove any loose paper from the output tray.
-
Push in the output tray extender.
-
Grasp the output tray, and then pull the output tray towards you to remove it.
-
Pull out the input tray to its outermost position.

-
Remove all paper from the input tray.
-
Gently remove any jammed paper or bits of torn paper from the output rollers. To avoid tearing whole sheets of paper, pull the paper with both hands.
-
Use a flashlight to thoroughly check the rollers for torn pieces of paper that might remain inside the output tray. If any torn pieces of paper remain inside the printer, more jams are likely to occur.
-
To replace the output tray, slide the output tray back onto the input tray.
Reset the product
- With the printer turned on, disconnect the power cord from the rear of the printer.
- Unplug the power cord from the wall outlet.
- Wait at least 60 seconds.
- Plug the power cord back into the wall outlet.
- Reconnect the power cord to the printer.
- Turn the printer on. HP recommends plugging the printer directly into a wall outlet.
Hope this helps! Keep me posted.
Please click “Accept as Solution” if you feel my post solved your issue, it will help others find the solution.
Click the “Kudos, Thumbs Up" on the bottom right to say “Thanks” for helping
