• ×
    Information
    Need Windows 11 help?
    Check documents on compatibility, FAQs, upgrade information and available fixes.
    Windows 11 Support Center.
  • post a message
  • ×
    Information
    Need Windows 11 help?
    Check documents on compatibility, FAQs, upgrade information and available fixes.
    Windows 11 Support Center.
  • post a message
Guidelines
Experiencing 'Printer Blocked' or 'Printer Error' message? Click here for more information.
Check some of the most frequent questions about Instant Ink: HP INSTANT INK, HP+ PLANS: INK AND TONER.


Check out our Black or Color Ink Not Printing, Other Print Quality Issues info about: Print quality and Cartridge Issues.
HP Recommended
HP Photosmart 7525
Microsoft Windows 7 (64-bit)

After I changed out all of my ink cartridges, my HP Photosmart displays message saying There is a problem with the ink system or printer. Turn off/on and if problem persists contact HP support.  Ink cartridges have been installed correctly.  Printer returned to factory settings.  Powered off and unplugged printer.  Still wont print.

1 REPLY 1
HP Recommended

@Bob_Martin-AZ1

Welcome to HP Forums!

I have a few steps to help you out:


Solution one: Clean the printhead

Follow these steps in the order presented until you resolve the issue.

Step 1: Remove the cartridges and printhead

  1. Press the Power button to turn on the printer, if it is not already turned on. Wait until the carriage is idle and silent before continuing.

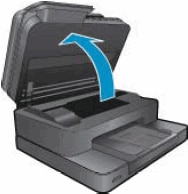
  2. Open the cartridge access door. The carriage moves to the center of the printer. Wait until the carriage is idle and silent before continuing.

    Figure : Open the cartridge access door

    Image: Open the cartridge access door.
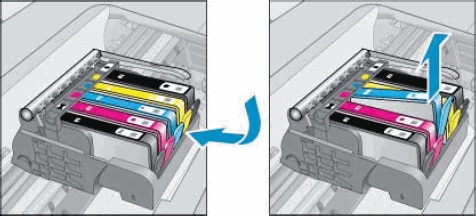
  3. Remove all of the cartridges, and then place them on a piece of paper with the ink nozzles pointing up.

       CAUTION: 

    Do not leave the cartridges outside of the printer longer than 30 minutes. This could result in damage to both the printer and the cartridges.

    To remove a cartridge, press the tab on the front of the cartridge and then pull it up to remove it from its slot.

    Figure : Remove each cartridge

    Image: Remove each cartridge.
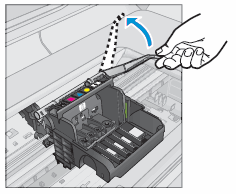
  4. Lift the latch handle on the carriage until it stops.

    Figure : Lift the latch handle

    Image: Lift  the latch handle.
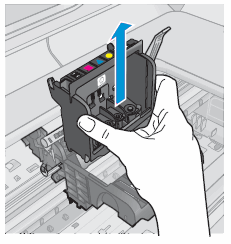
  5. Lift the printhead to remove it from the carriage.

    Figure : Remove the printhead

    Image: Remove the  printhead.

Step 2: Clean the printhead

There are three areas on the printhead that need to be cleaned: the plastic ramps on both sides of the ink nozzles, the edge between the ink nozzles and the electrical contacts, and the electrical contacts.

Figure : The three areas on the printhead that need to be cleaned

  1. Plastic ramps on the sides of the nozzles

  2. Edge between nozzles and contacts

  3. Electrical contacts

   CAUTION: 

Do not touch the ink nozzles. Do not touch the electrical contacts with your finger.


Figure : Do not touch the contact area with your fingers 

Image: Do not touch the contact area with your fingers.

Follow these steps to clean the printhead.

  1. Gather the following cleaning materials:

    • Several clean, lint-free cloths or papers. Coffee filters and glass-cleaning cloths work well.

    • Distilled or bottled water. Do not use tap water. Tap water can contain contaminants that can damage the printhead.

  2. Lightly dampen a clean, lint-free cloth.

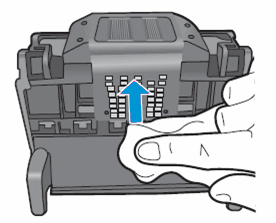
  3. Use the damp cloth to wipe the electrical contacts from the bottom to the top. Do not go past the edge between the electrical contacts and the ink nozzles. Repeat this motion until no ink appears on the cloth.

    Figure : Clean the electrical contacts

    Image: Clean the electrical contacts.
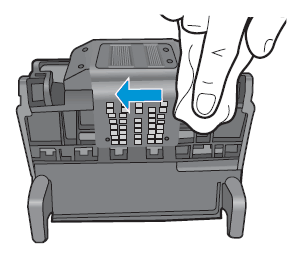
  4. Use a fresh, lightly dampened, lint-free cloth to wipe any accumulated ink and debris from the edge between the ink nozzles and the electrical contacts.

    Figure : Clean the edge between the ink nozzles and the electrical contacts

    Image: Clean the edge between the ink nozzles and the electrical contacts.
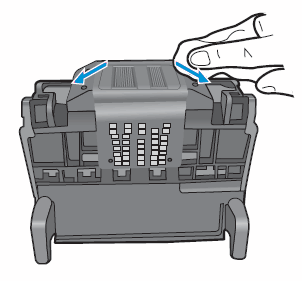
  5. Use a fresh, lightly dampened, lint-free cloth to wipe the plastic ramps on both sides of the ink nozzles. Wipe away from the nozzles only.

    Figure : Clean the ramps

    Image: Clean the ramps.
  6. Dry the previously cleaned areas with a clean, dry, lint-free cloth.

  7. Lightly dampen a fresh, clean, lint-free cloth with bottled or distilled water.

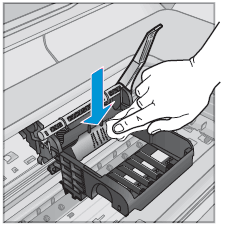
  8. Clean the electrical contacts inside the printer by wiping them from top to bottom. Repeat this motion until no ink appears on the cloth.

    Figure : Clean the electrical contacts inside the printer

    Image: Clean the electrical contacts inside the printer.
  9. Dry the area with a clean, dry, lint-free cloth.

FOR DETAILS & FURTHER INSTRUCTIONS, USE THIS LINK: CLICK HERE & FOLLOW STEP 3 ONWARD.

(By the end of this article all the issues should be resolved)


Keep me posted, as I (Or a trusted colleague) shall follow-up on this case to ensure the concern has been addressed, 

And your device is up and running again, only in case you don't get back to us, first! 

That said, If the information I've provided was helpful, give us some reinforcement by clicking the solution and kudos buttons, 

That'll help us, and others see that we've got the answers!

Good Luck.


Riddle_Decipher
I am an HP Employee


Learning is a journey, not a destination.
Let's keep asking questions and growing together.
† The opinions expressed above are the personal opinions of the authors, not of HP. By using this site, you accept the <a href="https://www8.hp.com/us/en/terms-of-use.html" class="udrlinesmall">Terms of Use</a> and <a href="/t5/custom/page/page-id/hp.rulespage" class="udrlinesmall"> Rules of Participation</a>.