-
×InformationNeed Windows 11 help?Check documents on compatibility, FAQs, upgrade information and available fixes.
Windows 11 Support Center. -
-
×InformationNeed Windows 11 help?Check documents on compatibility, FAQs, upgrade information and available fixes.
Windows 11 Support Center. -
- HP Community
- Printers
- Printing Errors or Lights & Stuck Print Jobs
- My spreadsheets print offset.

Create an account on the HP Community to personalize your profile and ask a question
Your account also allows you to connect with HP support faster, access a personal dashboard to manage all of your devices in one place, view warranty information, case status and more.
Check some of the most frequent questions about Instant Ink: HP INSTANT INK, HP+ PLANS: INK AND TONER.
Check out our Black or Color Ink Not Printing, Other Print Quality Issues info about: Print quality and Cartridge Issues.

It has been a while since anyone has replied. Simply ask a new question if you would like to start the discussion again.
03-12-2019 09:12 AM
 HP Recommended
Product: HP ENVY 5640e All In One Printer
Operating System: Microsoft Windows 10 (32-bit)
My spreadsheets print offset,
The print preview shows it centred.
I have looked at page setup and ticked the boxes for "centre on page horizontally and vertically".
My printed diagnostics page is also offset to the right.
Solved! Go to Solution.
1 ACCEPTED SOLUTION
Accepted Solutions
03-15-2019 08:51 AM
HP Recommended
Create a custom paper size from Windows Devices and Printers. Below are the steps:
Step 1: Create the new custom paper size
To set up the new custom paper size, create the new size option in the printer properties.
-
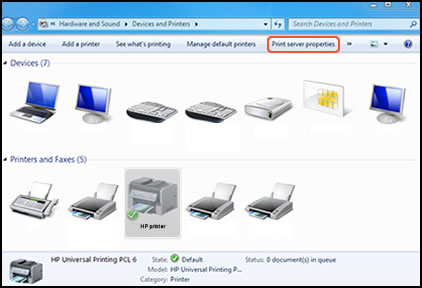
Search Windows for the control panel, select Control Panel from the list of results and then click View devices and printers.
-
Click the icon for your printer, and then click Print server properties.
-
If the User Account Control window displays, click Continue.
-
On the Forms tab, select the Create a new form check box, and then type a name for the new paper size in the Form name text box.
NOTE:
You must choose a different, unique name for the new custom paper size. Do not use an existing paper size name.
-
Create a new form
-
Form name
-
-
Select Metric or English, and then type the dimensions of your custom paper in the Width and Height text boxes.
NOTE:
Leave the Printer area margins set at 0.00.
-
Metric or English
-
Width and Height
-
-
Click Save Form, and then click OK or Close.
Step 2: Select the new custom paper size
To begin printing on the custom paper size, select the new size for the print job.
-
Load the custom-size paper into the paper input tray.
-
Open the item you want to print.
-
Click File, and then click Print.
-
In the Print window, click Preferences, Properties, or Printer Properties.
-
Click the Paper/Quality tab.
-
If Paper Size displays, select the new custom paper size in the Paper Size drop-down menu.
-
If Paper Size does not display, click Advanced, and then select the new custom paper size in the Paper Size drop-down menu.
-
-
Click OK to close the Properties dialog box, and then click OK or Print to print the document.
Let me know if this helps.
Cheers 🙂
Please click “Accepted Solution” if you feel my post solved your issue, it will help others find the solution. Click the “Kudos/Thumbs Up" on the bottom right to say “Thanks” for helping!
TEJ1602
I am an HP Employee
5 REPLIES 5
03-13-2019 01:21 PM
HP Recommended
@Leslieshort406, Welcome to HP Support Community!
You can try cleaning the ink cartridges first. Below are the steps:
-
Load U.S. letter or A4 size, unused, plain white paper into the input tray.
-
On the printer control panel, swipe the display to the left, and then touch Setup
 .
.The Setup menu displays.
-
Swipe the display up, and then touch Printer Maintenance.
-
Touch Clean Cartridges.
A Print Quality Diagnostic report prints.
-
Examine the Print Quality Diagnostic report.
-
If the print quality is unacceptable, touch Proceed when prompted to continue the next level of cleaning. Repeat these steps for the third cleaning stage, if necessary.
-
If the print quality is acceptable, touch Done when prompted to continue the next level of cleaning. You do not need to continue troubleshooting.
-
- Examine the print quality on the Print Diagnostic report.
If the issue persists, try aligning the printer.
-
Load U.S. letter or A4 size, unused, plain white paper into the input tray.
-
On the printer control panel, swipe the display to the left, and then touch Setup
.The Setup menu displays.
-
Swipe the display down, and then touch Printer Maintenance.
-
Touch Align Printer.
-
After the printer prints the alignment page, touch OK, and then recycle or discard the alignment page.
-
Try to print.
Also, replace any low or empty ink cartridges.
Let me know if this helps.
Cheers 🙂
Please click “Accept as Solution” if you feel my post solved your issue, it will help others find the solution. Click the “Kudos/Thumbs Up" on the bottom right to say “Thanks” for helping!
TEJ1602
I am an HP Employee
03-15-2019 07:10 AM
HP Recommended
Hi, Thanks for looking at my problem.
I have done everything that you suggest.
The print quality is perfect.
It is an alignment problem not a print quality problem.
Although the print preview always shows my work centred, it doesn't print centred.
I'm guessing the printer can't tell the difference between A4 and letter paper. The default always seems to be letter and I always have to change that in page setup and settings
My printer is out of warranty. I am fed up with my documents looking amateurish.
I think I will ditch it and purchase another with an extended warranty.
03-15-2019 08:51 AM
HP Recommended
Create a custom paper size from Windows Devices and Printers. Below are the steps:
Step 1: Create the new custom paper size
To set up the new custom paper size, create the new size option in the printer properties.
-
Search Windows for the control panel, select Control Panel from the list of results and then click View devices and printers.
-
Click the icon for your printer, and then click Print server properties.
-
If the User Account Control window displays, click Continue.
-
On the Forms tab, select the Create a new form check box, and then type a name for the new paper size in the Form name text box.
NOTE:
You must choose a different, unique name for the new custom paper size. Do not use an existing paper size name.
-
Create a new form
-
Form name
-
-
Select Metric or English, and then type the dimensions of your custom paper in the Width and Height text boxes.
NOTE:
Leave the Printer area margins set at 0.00.
-
Metric or English
-
Width and Height
-
-
Click Save Form, and then click OK or Close.
Step 2: Select the new custom paper size
To begin printing on the custom paper size, select the new size for the print job.
-
Load the custom-size paper into the paper input tray.
-
Open the item you want to print.
-
Click File, and then click Print.
-
In the Print window, click Preferences, Properties, or Printer Properties.
-
Click the Paper/Quality tab.
-
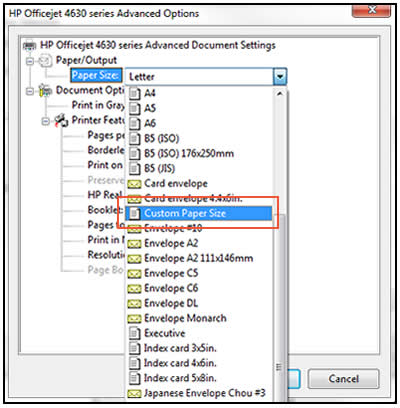
If Paper Size displays, select the new custom paper size in the Paper Size drop-down menu.
-
If Paper Size does not display, click Advanced, and then select the new custom paper size in the Paper Size drop-down menu.
-
-
Click OK to close the Properties dialog box, and then click OK or Print to print the document.
Let me know if this helps.
Cheers 🙂
Please click “Accepted Solution” if you feel my post solved your issue, it will help others find the solution. Click the “Kudos/Thumbs Up" on the bottom right to say “Thanks” for helping!
TEJ1602
I am an HP Employee
03-17-2019 05:18 AM
HP Recommended
Well done you!
I don't understand why I had to do that with a printer that uses A4 paper as a default, but It worked.
I created a new paper size which I called "test piece", used metric sizes 21.0cm x 29.8cm.
My documents are now perfectly centred and I won't need to replace my printer.
Thank you very much.
03-18-2019 08:23 AM
HP Recommended
I am glad everything is up and running.
Do get back to us in the future for any further assistance.
Thanks 🙂
TEJ1602
I am an HP Employee
Be alert for scammers posting fake support phone numbers and/or email addresses on the community.
If you think you have received a fake HP Support message, please report it to us by clicking on "Flag Post".
† The opinions expressed above are the personal opinions of the authors, not of HP. By using this site, you accept the Terms of Use and Rules of Participation.


Didn't find what you were looking for?
Ask the community
† The opinions expressed above are the personal opinions of the authors, not of HP. By using this site, you accept the <a href="https://www8.hp.com/us/en/terms-of-use.html" class="udrlinesmall">Terms of Use</a> and <a href="/t5/custom/page/page-id/hp.rulespage" class="udrlinesmall"> Rules of Participation</a>.