-
×InformationNeed Windows 11 help?Check documents on compatibility, FAQs, upgrade information and available fixes.
Windows 11 Support Center. -
-
×InformationNeed Windows 11 help?Check documents on compatibility, FAQs, upgrade information and available fixes.
Windows 11 Support Center. -
- HP Community
- Printers
- Printing Errors or Lights & Stuck Print Jobs
- NEW INK CARTRIDGE SHOW EMPTY

Create an account on the HP Community to personalize your profile and ask a question
01-17-2018 06:52 AM
Bought new HP3758 printer in October 2017. When the initial cartriges were replaced by new genuine HP 65 cartridges (expire date 2019), the tri color cartridge showed empty and could not print anything. I re-seated the cartridge, cleaned the contacts numereous times without success. I exchanged the cartridge for another one at the supplier and same problem, The printer has had very little use with only the initial cartridge used for printing, The black cartridge was replaced, no problem. To my surprise, the warranty was only valid for 1 month from purchase.
Any help would be appreciated.
JC
01-18-2018 04:40 PM
Welcome to the HP Forums, this is a great location to get assistance! I read your post and see that you are getting low ink error on HP Deskjet 3758 Printer. I would like to help you resolve this issue.
Make sure the ink cartridges are correctly installed
-
Turn on the printer.
-
Open the ink cartridge access door.
The carriage moves to the center of the printer.
Figure : Opening the ink cartridge access door
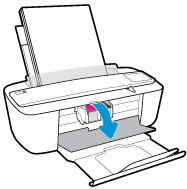
-
Wait until the printer is idle and silent before you continue.
-
Gently press down on the ink cartridge to release it, and then pull the ink cartridge out of its slot.
Figure : Removing the ink cartridge

CAUTION:
Do not touch the copper-colored contacts or the ink nozzles. Touching these parts can result in clogs, ink failure, and bad electrical connections.
Figure : Do not touch the contacts or nozzles

-
Inspect for and remove any protective tape from the contacts.
CAUTION:
Do not try to remove the copper electrical strip.
Figure : Removing the plastic tape
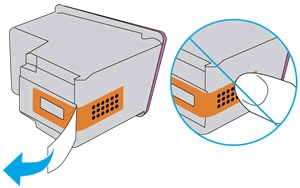
-
Hold the ink cartridge by its sides with the contacts toward the printer, insert the ink cartridge into its slot, and then gently push the ink cartridge until it snaps into place.
NOTE:
Install the color ink cartridge on the left and the black ink cartridge on the right.
Figure : Snapping the ink cartridge into place
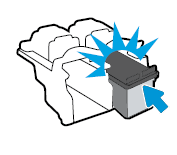
-
Repeat these steps for the other ink cartridge, if necessary.
-
Close the ink cartridge access door.
Figure : Closing the ink cartridge access door
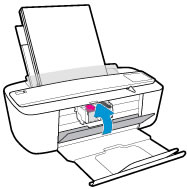
Try to print.
Clean the electrical contacts
-
Gather the following materials:
-
Clean, dry foam-rubber swabs or a clean, lint-free cloth
-
Distilled or bottled water (tap water might damage the ink cartridge or the printer)
-
-
Open the ink cartridge access door.
The carriage moves to the center of the printer.
Figure : Opening the ink cartridge access door

-
Wait until the printer is idle and silent before you continue.
-
Disconnect any cords connected to the printer, such as the power cord and USB cable.
-
Press down on the ink cartridge to release it, and then pull the ink cartridge toward you to remove it from its slot.
Figure : Removing the ink cartridge

CAUTION:
Do not remove both ink cartridges at the same time. Remove and then clean each ink cartridge one at a time. Do not leave an ink cartridge outside the printer for more than 30 minutes.
-
Hold the ink cartridge by its sides.
Figure : Holding the ink cartridge by its sides
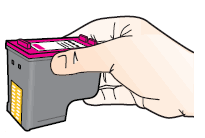
-
Inspect the copper-colored contacts for ink and debris buildup.
-
Gently wipe the contacts with a dry swab or lint-free cloth until they are free of debris.
CAUTION:
Be careful to wipe only the contacts. Do not smear any ink or debris elsewhere on the ink cartridge.
Figure : Cleaning the contacts
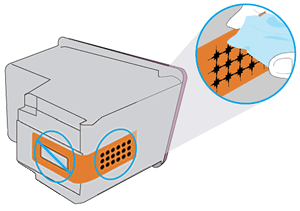
-
Lightly dampen a clean foam-rubber swab or lint-free cloth with distilled water, and then clean the contacts.
-
Lightly dampen another clean foam-rubber swab or lint-free cloth with distilled water, and then clean the electrical contacts in the carriage, located inside the printer.
Figure : Cleaning the carriage contacts
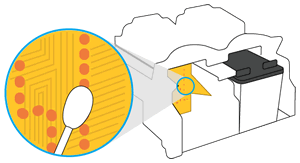
-
Wait for the ink cartridge and carriage contacts to dry before you continue (approximately 10 minutes).
-
Hold the ink cartridge by its sides with the contacts toward the printer, insert the ink cartridge into its slot, and then gently push the ink cartridge until it snaps into place.
Figure : Snapping the ink cartridge into place

-
Repeat these steps to clean and then reinsert the other ink cartridge.
-
Close the ink cartridge access door.
Figure : Closing the ink cartridge access door

-
Reconnect the power cord or USB cable to the printer, if needed.
-
Turn on the printer if it does not turn on automatically.
Try to print.
Click here and refer the HP Document for more assistance.
Let me know how it goes.
Cheers.
Sandytechy20
I am an HP Employee
01-19-2018 07:11 AM
Thank you for the tips Sandy. I have followed the cleaning procedures with the two brand new color ink cartridges without success. The screen still display the color ink cartridge as empty. I thought about buying and trying a third cartridge but what are the chances that two new cartridges would be defective? The printer is almost new. It only printed as much as the setup cartridges will allow.
JC
01-20-2018 09:25 AM
Hi @JC2000 ,
Thank you for responding,
It's great to have you back 😉
It looks like you were interacting with @sandytechy20 , but he is out for the day & I'll be glad to help you out,
I'm the Barachiel & I'm at your service.
If that's the case, I'd request you to contact HP's phone support team for further assistance.
HP Support can be reached by clicking on the following link: Open link: www.hp.com/contacthp/ Enter Product number or select to auto detect.Scroll down to "Still need help?
Complete the form to select your contact options". Scroll down and click on HP contact options - click on Get a Case & phone number.
They will be happy to assist you immediately. If the unit is under warranty repair services under the manufacturer's warranty will be free of charge.
Best regards,
Barachiel
I am an HP Employee
