-
×InformationNeed Windows 11 help?Check documents on compatibility, FAQs, upgrade information and available fixes.
Windows 11 Support Center. -
-
×InformationNeed Windows 11 help?Check documents on compatibility, FAQs, upgrade information and available fixes.
Windows 11 Support Center. -
- HP Community
- Printers
- Printing Errors or Lights & Stuck Print Jobs
- Not printing all lines of text

Create an account on the HP Community to personalize your profile and ask a question
07-17-2018 08:12 PM
My printer is missing part of the top of the test then prints fine then prints less of the top of the text then prints fine then prints even less of the top of the text. I have cleaned the printer cartridge and done an alignment and still the same problem. The cleaning page did not print correct text but the alignment page did print correct.
07-18-2018 02:22 PM
Thank you for joining HP Forums.
This is a great place to get support, find answers to your technical queries.
I understand that you are facing print quality issue with the printer, need not worry I'll be glad to assist you.
To provide you with an accurate solution, I'll need a few more details:
Are you using genuine HP ink cartridge?
Have you done any hardware changes in the printer?
Did you try with the different cartridge?
I suggest you do a Hard Reset
(1) Turn the printer on, if it is not already on.
(2) Wait until the printer is idle and silent before you continue.
(3) With the printer turned on, disconnect the power cord from the rear of the printer.
(4) Unplug the power cord from the wall outlet.
(5) Wait at least 60 seconds.
(6) Plug the power cord back into the wall outlet.NOTE: HP recommends connecting the printer power cord directly to the wall outlet.
(7) Reconnect the power cord to the rear of the printer.
(8) Turn on the printer, if it does not automatically turn on.
The printer might go through a warm-up period. The printer lights might flash, and the carriage might move.
Wait until the warm-up period finishes and your printer is idle and silent before you proceed.
Then, follow the below steps
Step 1: Run the clean cartridges utility
To clean the cartridges from the device control panel, use the following steps.
-
Make sure letter, A4, or legal sized, unused white paper is loaded in the main tray.
-
Press the Setup button (
 ) on the control panel of the product.
 -
Press the right arrow button (
 ) to select Tools, and then press OK.
 -
Press the right arrow button (
 ) to select Clean Cartridge, and then press OK.
 -
The product prints a page that can be recycled or discarded.
Step 2: Clean the contacts
-
Gather the following items to clean the ink cartridge and carriage:
-
Clean distilled water. Use bottled or filtered water if distilled water is not available. Tap water can contain contaminants that damage the ink cartridge.
-
Clean cotton swabs or any soft, lint-free material that will not stick to the ink cartridges (coffee filters work well).
-
Sheets of paper or a paper towel to rest the ink cartridge on during cleaning.
-
-
Open the ink cartridge access door and wait until the carriage is idle and silent.
-
Disconnect the power cord from the back of the printer.
-
Remove the ink cartridge and place it on a piece of paper with the nozzle plate facing up.
NOTE:
Do not leave the ink cartridges outside of the printer for more than 30 minutes. If the ink cartridge is outside of the printer for too long, the ink can dry and clog the nozzles.
-
Dip a clean foam-rubber swab or lint-free cloth into distilled water, and then squeeze any excess water from it.
-
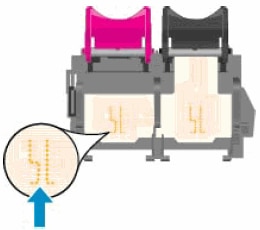
Clean only the copper-colored contacts
-
Copper-colored contacts
-
Ink nozzles (do not clean)
-
-
Repeat these steps for the other ink cartridge.
-
Lightly moisten another cotton swab with distilled water, and then squeeze any excess water from the swab.
-
Use the swab to clean the electrical contacts in the carriage, located inside the printer on the carriage slots.

-
Wait 10 minutes to allow the ink cartridge and carriage electrical contacts to dry.
-
Reinstall the ink cartridges.
-
Close the ink cartridge access door.
-
Reconnect the power cord to the back of the printer.
-
Press the Power button to turn on the printer.
-
Try to print a page.
-
If you are still unable to print, repeat these steps to clean and reseat the ink cartridges. Multiple cleanings might be necessary to restore printing.
Try to print.
Keep me posted, how it goes!
If the information I've provided was helpful, give us some reinforcement by clicking the Accepted Solution and Kudos buttons, that'll help us and others see that we've got the answers!
Have a great day!
Cheers:)
Raj1788
I am an HP Employee
07-19-2018 05:18 PM
Thanks for the reply,
Try all the steps on your free time and Keep me posted, how it goes!
Have a great day!
Cheers:)
Raj1788
I am an HP Employee
