-
×InformationNeed Windows 11 help?Check documents on compatibility, FAQs, upgrade information and available fixes.
Windows 11 Support Center. -
-
×InformationNeed Windows 11 help?Check documents on compatibility, FAQs, upgrade information and available fixes.
Windows 11 Support Center. -
- HP Community
- Printers
- Printing Errors or Lights & Stuck Print Jobs
- Officejet 5740 will not connect

Create an account on the HP Community to personalize your profile and ask a question
01-09-2018 01:59 PM
Having trouble connecting to my officejet 5740. It is connected through teh wireless network. The wireless network is fine. The printer shows the wireless connection to be fine. The printered showed "offline"
I cycled the power on the printer and wireless router and for one attempt the PC could find teh printer. I then tried to install teh drivers and teh software cannot find teh printer. My current status is Driver unavailable and I can't install teh driver.
Any help would be appreciated.
01-10-2018 05:42 PM
Welcome to the HP Forums, this is a great location to get assistance! I read your post and see that you are getting printer offline issue on HP Officejet 5740 Printer. I would like to help you resolve this issue.
However, I will need a few details to provide an accurate solution,
- When did this issue start?
- Did you do any hardware or software changes?
Meanwhile
Use HP Print and Scan Doctor to check connectivity
-
From the computer you are trying to print from, download and run HP Print and Scan Doctor. When this link is clicked, HP Print and Scan Doctor is downloaded using your Internet browser's download capabilities.
-
After opening Print and Scan Doctor, read and respond to the screens to resolve the problem.
Set the default printer and unpause printing
-
Turn the printer off and on, and then make sure it is in a ready state.
-
Search Windows for devices, and then click Devices and Printers in the list of results.
-
Find the icon for the printer you originally installed.
-
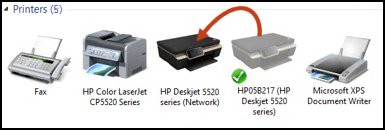
If a color or grey icon displays with a green checkmark, continue to the next step.
-
If a color or a grey icon displays without a green checkmark, right-click the icon, select Set as Default Printer, and then continue to the next step.
-
If one color and one grey icon displays for your printer, right-click the color icon, select Set as Default Printer, and then continue to the next step.
Figure : Changing the default printer from the gray (offline) printer icon to the colored (online) icon
-
-
Right-click the icon for the default printer, and then select See what's printing.
The print queue window opens.
-
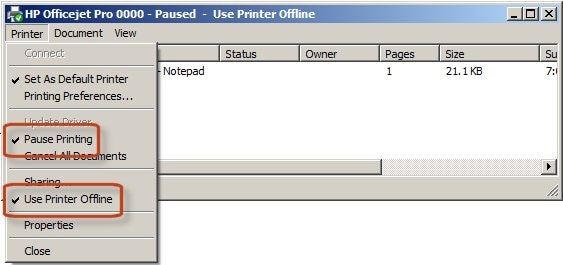
Click Printer. If a checkmark displays next to Pause Printing and Use Printer Offline, click each item to remove the checkmark.
Figure : Example of the Pause and Use Printer Offline selections
-
Try to print.
Reset the printer and check the connection status
-
If the printer is off, turn on the printer, and then check the status of the printer.
-
If the printer starts printing jobs from the print queue, your printer is clearing out queued print jobs and is online. You can stop troubleshooting.
-
If the printer goes to an idle state after its startup routine, it might be online.
-
If the computer still shows the printer as offline, continue using these steps.
-
-
With the printer turned on, disconnect the power cord from the printer.
-
Unplug the printer power cord from the wall outlet.
-
Wait at least 60 seconds. Restart the computer while you are waiting.
-
Plug the power cord back into the wall outlet.
-
Reconnect the power cord to the rear of the printer.
-
If the printer does not turn on by itself, press the Power button to turn it on.
-
Make sure the printer is connected to the computer or the network.
-
Wireless network connection: On the printer, open the Wireless network or Settings menu to make sure the wireless signal is turned on. Make sure the light next to the Wireless icon
is on and steady.
-
Wired network connection: Make sure the cable is connected to the printer Ethernet port
and to an available port on the router. The green link light should be steady, and the orange activity light should blink.
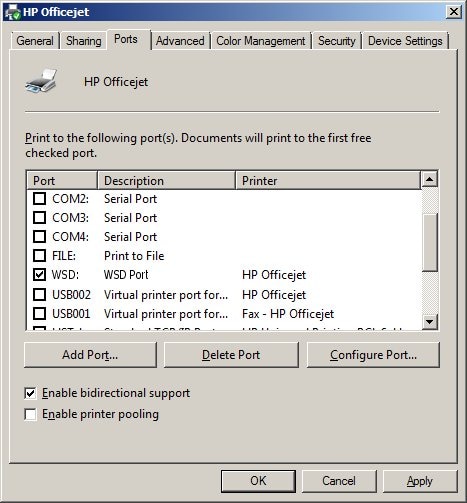
Figure : Connect the cable to the printer and to the router
-
USB connection: Make sure the cable is securely connected to the printer and to a working USB port on the computer.
-
-
Try to print.
Make sure the correct port is selected
-
Search Windows for devices, and then select Devices and Printers in the list of results.
The Devices and Printers window opens.
-
Right-click the name of your printer, and then select Printer Properties.
The Properties window opens.
-
Click the Ports tab, and then find the name of your printer in the Printers column.
-
If the printer uses a USB connection, make sure the port name or description includes USB or DOT4
-
If the printer uses a network connection, make sure the port name or description includes WSD, network, Standard TCP/IP Port, or HP Standard TCP/IP Port.
Figure : Example of the WSD port selected for a wireless printer
-
-
Select the correct port type if the selection does not match the current connection used by the printer.
Update the printer firmware
HP regularly releases printer updates. Updating the printer firmware might resolve the issue. For more information, see Updating Firmware on the Printer.
Create a manual connection
-
Print a Network Configuration Report or Wireless Test Report from your printer.
-
If your printer has a control panel with a display, print the report from the network settings or network setup menu.
-
If your printer does not have a display, print the report using the buttons on the printer control panel. For many HP printers, this is done by pressing and holding the cancel button or a combination of buttons on the control panel until a report prints. For more information on how to print a report for your printer model, see the User Guide or search the HP website for network configuration report and the model of your HP printer.
-
-
On the report printout, look at the network status for your network connection type (wired or wireless.)
Figure : Example of a correctly connected wireless network status
-
If status is connected, continue with these steps.
-
If status is anything other than connected, such as Off or Disabled, then the printer is disconnected from your network. This is the reason your printer is offline. You must connect the printer to your network before you continue. For more help on how to set up a connection to your network, see the User Guide, search the HP website for your printer model and wireless or wired network install, or use the wireless setup wizard from the control panel of your printer if available.
-
-
On the report, find the IP Address, subnet mask, and Default Gateway for your active (connected) network connection type. If your report has separate numbers for IPv4 and IPv6, then use the numbers listed in the IPv4 section.
-
From a computer connected to your network, find the URL(s) for Embedded Web Server (EWS) on the report and enter the URL into your Internet browser. If the webpage appears blank, use a different Internet browser.
Figure : Example of the URL for the EWS
-
Click the Network or Networking tab, and then open the section or page for your network type: wired or wireless.
-
Click Manual IP.
-
If you see a Suggest a Manual IP Address button, click Manual IP address, and the Manual IP addresses are automatically filled out for you.
-
If your page does not have a button to suggest a manual IP address, type the IP address, subnet mask, and default gateway using the numbers shown in the report you printed.
Figure : Example of setting up a Manual IP configuration
-
-
Write these new numbers on a piece of paper. You might need to use them later when adding a second printer device.
-
Click Apply, and then wait until the changes are confirmed.
Add a second printer device to Windows
-
Search Windows for devices, and then select Devices and Printers in the list of results.
-
Right-click the name of your printer, and then select Printer Properties.
The Properties window opens.
-
Click the Ports tab, and then click Add Port.
-
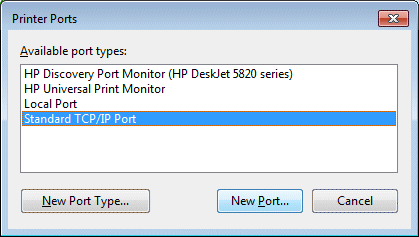
Select Standard TCP/IP Port, and then click New Port.
Figure : Creating a new TCP/IP Port
-
Type the printer’s IP address that you wrote down earlier, and then click Next.
-
Select the new Standard TCP/IP Port from the list, and then click OK.
NOTE:
You might see a second printer device display in the list of devices. Do not uninstall either printer device. Leave both printer devices.
-
Try printing.
Add the printer using HP Printer Assistant
-
From the Device and Printers window, right-click one of the HP printer icons, and then click Remove Device.
-
If a second printer icon is shown, right-click it, and then click Remove Device.
There should be no printer devices listed for your printer.
-
Open HP Printer Assistant. Search Windows for your printer name, and then click it in the list of results.
HP Printer Assistant opens.
-
Read and respond to the screens to add a new printer.
-
From the Devices and printers window, right-click the name of your printer, and then select Printer Properties.
The Properties window opens.
-
Click the Ports tab, and then select the Standard Port you created earlier.
A second printer displays in the list of devices.
-
Try printing.
Click here and refer the HP Document to perform the above steps.
Let me know how it goes.
Cheers.
Sandytechy20
I am an HP Employee