-
×InformationNeed Windows 11 help?Check documents on compatibility, FAQs, upgrade information and available fixes.
Windows 11 Support Center. -
-
×InformationNeed Windows 11 help?Check documents on compatibility, FAQs, upgrade information and available fixes.
Windows 11 Support Center. -
- HP Community
- Printers
- Printing Errors or Lights & Stuck Print Jobs
- Re: Paper/Tray Selection

Create an account on the HP Community to personalize your profile and ask a question
11-01-2019 12:08 PM
In the olden days, when HP printers were simple and reliable, you never had to worry about setting the tray and paper type on the printer console, because no matter what, the software you were printing from (if it was fairly sophisticated) would override those settings anyway.
Now, however, paper source and paper type are a constant headache.
Case in point: I have an Officejet 5740. It has a main tray and a photo tray. I cannot rely on my software to set the paper source correctly, the printer seems to ignore that setting and draw from the main tray by default. And just now, I have printed out a photo, setting the source and type in both my print driver interface AND on the printer console. On the print driver, I chose "Paper Size: Index 4x6" and "Source: Photo Tray". On the printer console, every time I open the paper drawer, it asks if I changed the paper, and if so, what type and size? I enter 4x6 and glossy photo. No matter what I do, in what order I do it, I cannot get it to draw from the photo tray. (And yes, I load it with photo paper).
Can I get some tutelage with this function? Am I doing something wrong?
Solved! Go to Solution.
Accepted Solutions
11-04-2019 04:30 PM
Thank you for your effort, Kumar. I am familiar with the media loading process on this unit.
I have finally succeeded in printing to the photo paper; but, I have determined that the problem seems to be with the number of places you need to specify to draw media from the photo tray. First, the software I'm using is XnView. It has a Print dialog. That box has a Printer tab, on which you specify your printer and then click Configuration. This brings you to a Print Setup dialog, on which you can specify Paper Size, Paper Source, and Orientation. I set the Paper Size to 4x6, and the Paper Source to Photo Tray. All set, right? Wrong. There is yet another page you can go to from Print Setup called Print Properties, on which you need to make the same choices before the printer will do what you want.
Now that I have told you this, the printer seems to be functioning properly without going to that Print Properties page. But its a little scary how inconsistent this is. I think there should be ways to simplify this.
Thanks,
Jim Speiser
11-04-2019 11:10 AM
@jimspy, Welcome to the HP Support Community!
Which application are you using to print photos?
What happens when you try printing on regular paper?
For now, let us try these steps:
Make sure the photo papers are loaded correctly in the photo tray
- Turn the printer on if it is not already on.
-
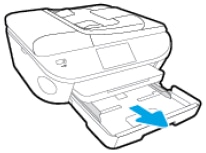
Pull the photo tray inside the input tray toward you to open it as far as possible.
NOTE: If you do not see the photo tray inside the input tray, remove the output tray, and then open the photo tray.
Figure: Pull out the photo tray inside the input tray

-
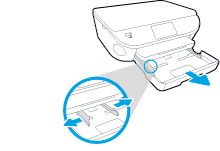
Slide the paper width guides to their outermost positions.
Figure : Slide the paper-width guides to their outermost positions

-
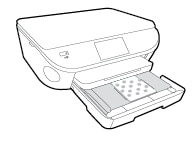
Load the photo paper with the short edge forward and the print side down into the photo tray.
NOTE: For photo paper with a perforated tab, load the paper in the tray print-side down with the perforated tab closest to you.
Figure : Load photo paper in the paper tray with the print side down

-
Slide the paper forward until it stops.
NOTE: Make sure that the stack of photo paper is not higher than the top edges of the paper width guides.
-
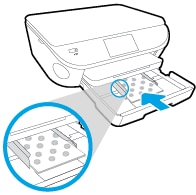
Slide the paper width guides inward so that they lightly rest against the edges of the photo paper and make sure that the photo paper is centered in the tray.
Figure : Adjust the paper-width guides

-
Reinstall the output tray on the input tray, if you removed it, and then push the input tray into the printer until it locks into place.
For more info on loading photo papers, refer to this document.
Check the print settings on the PC
Refer to this document.
Let me know how this goes.
If you feel my post solved your issue, please click “Accept as Solution”, it will help others find the solution. Click the “Kudos/Thumbs Up" on the bottom right to say “Thanks” for helping!
KUMAR0307
I am an HP Employee
11-04-2019 04:30 PM
Thank you for your effort, Kumar. I am familiar with the media loading process on this unit.
I have finally succeeded in printing to the photo paper; but, I have determined that the problem seems to be with the number of places you need to specify to draw media from the photo tray. First, the software I'm using is XnView. It has a Print dialog. That box has a Printer tab, on which you specify your printer and then click Configuration. This brings you to a Print Setup dialog, on which you can specify Paper Size, Paper Source, and Orientation. I set the Paper Size to 4x6, and the Paper Source to Photo Tray. All set, right? Wrong. There is yet another page you can go to from Print Setup called Print Properties, on which you need to make the same choices before the printer will do what you want.
Now that I have told you this, the printer seems to be functioning properly without going to that Print Properties page. But its a little scary how inconsistent this is. I think there should be ways to simplify this.
Thanks,
Jim Speiser
11-05-2019 10:51 AM
That is correct. These settings have to be made both on the application used to print and in the printer properties. This is exactly why I asked you which application you are using to print and also attached a document to check the print settings on the PC.
Glad to know that the issue is now resolved. Feel free to contact us with any concerns related to HP products.
Happy to help!
If you feel my post solved your issue, please click “Accept as Solution”, it will help others find the solution. Click the “Kudos/Thumbs Up" on the bottom right to say “Thanks” for helping!
KUMAR0307
I am an HP Employee
