-
×InformationNeed Windows 11 help?Check documents on compatibility, FAQs, upgrade information and available fixes.
Windows 11 Support Center. -
-
×InformationNeed Windows 11 help?Check documents on compatibility, FAQs, upgrade information and available fixes.
Windows 11 Support Center. -
- HP Community
- Printers
- Printing Errors or Lights & Stuck Print Jobs
- Photo prints streaks on back of paper

Create an account on the HP Community to personalize your profile and ask a question
Your account also allows you to connect with HP support faster, access a personal dashboard to manage all of your devices in one place, view warranty information, case status and more.
Check some of the most frequent questions about Instant Ink: HP INSTANT INK, HP+ PLANS: INK AND TONER.
Check out our Black or Color Ink Not Printing, Other Print Quality Issues info about: Print quality and Cartridge Issues.

It has been a while since anyone has replied. Simply ask a new question if you would like to start the discussion again.
11-27-2018 07:14 AM
 HP Recommended
Product: 5530 e-All-in-One Series
Operating System: Microsoft Windows 7 (64-bit)
Hi, I have followed the help loaded the HP Advanced Photo Paper face down as described set the layout and paper size to 10x15 cm and hit the print button (from paint or windows photo viewer). 4 times out of 5 the printer has printed a series of streaks on the back of the photo paper and printed the photo successfully once! What could I possibly be doing wrong?
Solved! Go to Solution.
1 ACCEPTED SOLUTION
Accepted Solutions
11-28-2018 04:23 PM
HP Recommended
Welcome to HP Forums, I see that you are getting streaks on the back of tha photo paper while printing photos.
Did you try to print on regular A4 size paper and see if that prints fine?
Make a copy and check if that prints fine?
Meanwhile:
Clean the paper rollers behind the ink cartridge access area
-
Gather the following materials:
-
A clean, lint-free swab that will not come apart or leave fibers
-
Distilled, filtered, or bottled water (tap water might damage the printer)
-
-
Press the Power button to turn off the printer.
-
Disconnect the power cord from the rear of the printer.
-
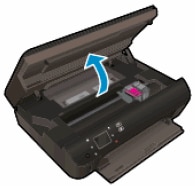
Open the cartridge access door.
Figure : Open the cartridge access door
-
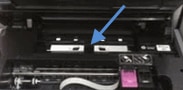
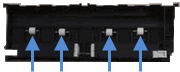
Locate the paper path cover, in the area behind the cartridge access area.
Figure : Locate the paper path cover
-
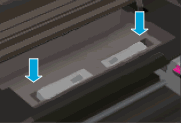
To remove the paper path cover, pinch the tabs together, and then lift up.
Figure : Remove the paper path cover
-
-
Pinch the tabs together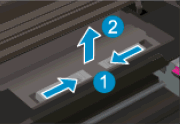
-
Lift up
-
-
Lightly dampen the swab with the water, and then squeeze any excess liquid from the swab.
-
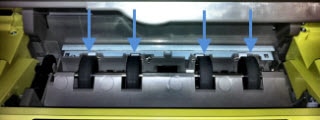
Press the swab against the rollers inside the printer, and then rotate the rollers upwards with your fingers. Apply a moderate amount of pressure to remove any dust or dirt buildup.
Figure : Clean the rollers inside the printer
-
Allow the rollers to dry for 10 to 15 minutes.
-
Check the rollers on the underside of the paper path cover. Make sure that the rollers are not missing, that they turn easily, and that they are springy when you press them. If the rollers are damaged, replace the paper path cover with a new one.
Figure : Check the rollers on the paper path cover
- Replace the paper path cover with the spring-loaded tabs facing toward the front of the printer. Gently press the cover down at the left and right edges. The cover clicks into place.
NOTE:
Make sure that both edges of the paper path cover are in place.
Figure : Replace the paper path cover
-
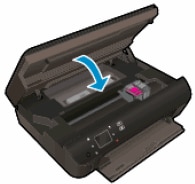
Close the cartridge access door.
Figure : Close the cartridge access door
-
Reconnect the power cord to the rear of the printer.
-
Press the Power button to turn on the printer.
-
Touch OK to clear any messages on the printer control panel.
Try to print.
Let me know how it goes.
To thank me for my efforts to help you, please mark my post as an accepted solution so that it benefits several others.
Cheers.
Sandytechy20
I am an HP Employee
5 REPLIES 5
11-28-2018 04:23 PM
HP Recommended
Welcome to HP Forums, I see that you are getting streaks on the back of tha photo paper while printing photos.
Did you try to print on regular A4 size paper and see if that prints fine?
Make a copy and check if that prints fine?
Meanwhile:
Clean the paper rollers behind the ink cartridge access area
-
Gather the following materials:
-
A clean, lint-free swab that will not come apart or leave fibers
-
Distilled, filtered, or bottled water (tap water might damage the printer)
-
-
Press the Power button to turn off the printer.
-
Disconnect the power cord from the rear of the printer.
-
Open the cartridge access door.
Figure : Open the cartridge access door
-
Locate the paper path cover, in the area behind the cartridge access area.
Figure : Locate the paper path cover
-
To remove the paper path cover, pinch the tabs together, and then lift up.
Figure : Remove the paper path cover
-
-
Pinch the tabs together -
Lift up
-
-
Lightly dampen the swab with the water, and then squeeze any excess liquid from the swab.
-
Press the swab against the rollers inside the printer, and then rotate the rollers upwards with your fingers. Apply a moderate amount of pressure to remove any dust or dirt buildup.
Figure : Clean the rollers inside the printer
-
Allow the rollers to dry for 10 to 15 minutes.
-
Check the rollers on the underside of the paper path cover. Make sure that the rollers are not missing, that they turn easily, and that they are springy when you press them. If the rollers are damaged, replace the paper path cover with a new one.
Figure : Check the rollers on the paper path cover
- Replace the paper path cover with the spring-loaded tabs facing toward the front of the printer. Gently press the cover down at the left and right edges. The cover clicks into place.
NOTE:
Make sure that both edges of the paper path cover are in place.
Figure : Replace the paper path cover
-
Close the cartridge access door.
Figure : Close the cartridge access door
-
Reconnect the power cord to the rear of the printer.
-
Press the Power button to turn on the printer.
-
Touch OK to clear any messages on the printer control panel.
Try to print.
Let me know how it goes.
To thank me for my efforts to help you, please mark my post as an accepted solution so that it benefits several others.
Cheers.
Sandytechy20
I am an HP Employee
11-29-2018 01:18 AM
HP Recommended
Sandy, many thanks for your feedback.
I printed photos successfully on A4 so figured the problem related to the paper. I found a post that suggested using a lighter (weight) photographic paper as the 5530 printer media spec is lower than the 250mgs Advanced Paper that came with the device!
Sure enough i'm now printing photos successfully on my newly aquired (150mgs) paper (£2 for 30 sheets!).
I will clean the device as you describe and try with the 250mgs paper and feedback.
Best Regards
Phil
11-29-2018 11:36 AM
HP Recommended
Thanks for the reply.
I appreciate your time and effort.
Yes, you can try the steps mentioned in the above post and get back to us with the outcome.
I will be more than glad to assist you if required.
Cheers.
Sandytechy20
I am an HP Employee
Be alert for scammers posting fake support phone numbers and/or email addresses on the community.
If you think you have received a fake HP Support message, please report it to us by clicking on "Flag Post".
† The opinions expressed above are the personal opinions of the authors, not of HP. By using this site, you accept the Terms of Use and Rules of Participation.


Didn't find what you were looking for?
Ask the community
† The opinions expressed above are the personal opinions of the authors, not of HP. By using this site, you accept the <a href="https://www8.hp.com/us/en/terms-of-use.html" class="udrlinesmall">Terms of Use</a> and <a href="/t5/custom/page/page-id/hp.rulespage" class="udrlinesmall"> Rules of Participation</a>.