Guidelines
Experiencing 'Printer Blocked' or 'Printer Error' message? Click here for more information.
Check some of the most frequent questions about Instant Ink: HP INSTANT INK, HP+ PLANS: INK AND TONER.


Check out our Black or Color Ink Not Printing, Other Print Quality Issues info about: Print quality and Cartridge Issues.
HP Recommended
HP Envy 5530

I have the HP Envy 5530 and an instant ink subscription. I’ve recently been having nothing but trouble with quality of prints produced. I have tried a range of paper (included HP branded paper) and have the same results. Everytime I print anything it is very poorly allogned on the paper (I’ve already done the test pages alignment scans). Also, the ink itself rubs off of the paper very easily and smudges everywhere, even after if left it to dry for days! 


I am relatively tech tech savvy and have tried all of the different options and settings to try and resolve this myself. Whether the issue is with the ink or the printer itself this is down to  HP and quite frankly not good enough. 

2 REPLIES 2
HP Recommended

@Hlj1


Thank you for joining HP Forums. 
This is a great place to get support, find answers to your technical queries.


I understand that you are getting print quality issue while printing.


Are you facing the same issue while making a copy?

Are you using instant ink or regular cartridge?


Let's clean the area around the ink nozzles


Do not perform these steps unless the test page or printout specifically shows smeared text or track marks. Clean the area around the ink nozzles if you see track marks or smears on the printouts.

Figure : Example of smeared text

Image: Example of smeared text.

Figure : Example of text with track marks

Image: Example of text with track marks.

  1. Gather the following materials:

    • Dry foam-rubber swabs, lint-free cloth, or any soft material that does not come apart or leave fibers (coffee filters work well)

    • Distilled, filtered, or bottled water (tap water might contain contaminants that can damage the ink cartridges)

         CAUTION:

      Do not use platen cleaners or alcohol to clean the area. These can damage the ink cartridge or the printer.

  2. Make sure the printer is on.

  3. Open the scanner lid.

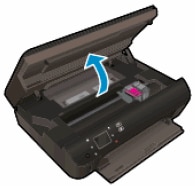
  4. Open the ink cartridge access door.

    The carriage moves to the ink cartridge access area.

    Figure : Open the cartridge access door

    Image: Open the cartridge access door.
  5. Wait until the carriage is idle and silent before continuing.

  6. To release the ink cartridge, lift the lid on the ink cartridge slot, and then gently push the lid back until it stops.

  7. Pull up on the ink cartridge to remove it from the slot.

    Figure : Remove the ink cartridge

    1. Lift the lid

    2. Gently push the lid back

    3. Pull up on the ink cartridge

       CAUTION:

    Do not remove both ink cartridges at the same time. Remove and clean each ink cartridge one at a time. Do not leave an ink cartridge outside the printer for more than 30 minutes.

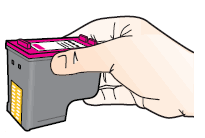
  8. Hold the ink cartridge by its sides.

    Figure : Hold the ink cartridge by its sides

    Image: Hold the ink cartridge by its sides.
  9. Inspect the ink cartridge contacts for ink and debris buildup.

       CAUTION:

    Do not touch the copper-colored contacts or the ink nozzles. Touching these parts can result in clogs, ink failure, and bad electrical connections.

    Figure : Do not touch the contacts or nozzles

    Image: Do not touch the contacts or nozzles.
  10. Lightly moisten a clean, foam-rubber swab with distilled water, and then squeeze any excess water from it.

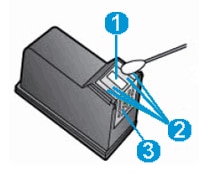
  11. Clean the face and edges around the ink nozzle with the swab.

       CAUTION:

    Do not clean the ink nozzle plate.

    Figure : Clean the area around the ink nozzle
    Image: The ink nozzle and ink cartridge contacts.

    1. Nozzle plate - Do not clean

    2. Area surrounding ink nozzle - Do clean

    3. Ink cartridge contacts - Do not clean

  12. Either let the ink cartridge sit for 10 minutes to allow the cleaned area to dry, or use a new swab to dry it.

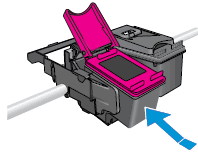
  13. Hold the ink cartridge at a slight upward angle with the ink cartridge contacts facing the rear of the printer, and then slide the ink cartridge into the empty slot.

    Figure : Reinstall the ink cartridge

    Image: Reinstall the ink cartridge.
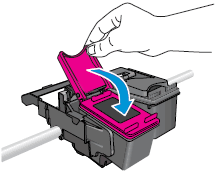
  14. Close the ink cartridge lid to secure the ink cartridge into place.

    Figure : Close the ink cartridge lid

    Image: Close the ink cartridge lid.
  15. Repeat these steps to clean the area surrounding the ink nozzle on the other ink cartridge.

  16. Close the ink cartridge access door.

  17. try to print.

If you are facing the same issue, Clean the ink cartridges


If you found defects on the Print Quality Diagnostic Report, run an automatic tool to clean the ink cartridges.

   NOTE:

To avoid issues that require cleaning, always turn the printer off with the Power button.

  1. On the printer control panel, touch the Settings icon .

  2. Touch Tools, and then touch Clean Printhead. The printer cleans the printhead, and then prints a test page.

  3. Check the print quality of the test page.

    • If the print quality is good, touch Done.

    • If the print quality is not good, touch Clean Again. The printer cleans the ink cartridges again, and then prints another test page.

 Align the printer


For the best print quality, align the ink cartridges.

  1. Load plain white paper in the paper tray.

  2. On the printer control panel, touch the Settings icon .

  3. Touch Tools, and then touch the Down Arrow  once.

  4. Touch Align Printer.

    The printer prints a test page, and then prompts you to scan the page.

  5. Lift the scanner lid, and then place the page on the glass according to the instructions on the alignment page.

  6. Close the scanner lid, and then touch OK.

Print another Print Quality Diagnostic report, and examine the page.

  • If these steps resolved the issue, you can stop troubleshooting.

  • If the Print Quality Diagnostic report shows track marks or smears, continue to the next step to clean the area around the ink nozzles.

  • If the Print Quality Diagnostic report does not show track marks or smears

However, to provide accurate details, I need a few more details: 

I have sent you a private message, for more details that cannot be shared in a public post.


Can you please check your inbox on the forums page for the private message.


Eagerly waiting for your reply!


Cheers!

Raj1788
I am an HP Employee 

HP Recommended

Hi, your suggestion doesn't answer the problem with ink still smudging days after printing. No amount of cleaning the printer will help the ink drying!

My problem is the similar. When printing a photo the black ink areas do not 'dry'. Colour is fine but the black ink is leaving a film of black residual on the surface. My canon printer has no issues with the same photo. I've replaced the black cartridge and problem remains. There must be a problem with the HP instant ink.

Can you help please

Pj 

† The opinions expressed above are the personal opinions of the authors, not of HP. By using this site, you accept the <a href="https://www8.hp.com/us/en/terms-of-use.html" class="udrlinesmall">Terms of Use</a> and <a href="/t5/custom/page/page-id/hp.rulespage" class="udrlinesmall"> Rules of Participation</a>.