-
×InformationNeed Windows 11 help?Check documents on compatibility, FAQs, upgrade information and available fixes.
Windows 11 Support Center. -
-
×InformationNeed Windows 11 help?Check documents on compatibility, FAQs, upgrade information and available fixes.
Windows 11 Support Center. -
- HP Community
- Printers
- Printing Errors or Lights & Stuck Print Jobs
- Printer failure code 0x6100004a

Create an account on the HP Community to personalize your profile and ask a question
Your account also allows you to connect with HP support faster, access a personal dashboard to manage all of your devices in one place, view warranty information, case status and more.
Check some of the most frequent questions about Instant Ink: HP INSTANT INK, HP+ PLANS: INK AND TONER.
Check out our Black or Color Ink Not Printing, Other Print Quality Issues info about: Print quality and Cartridge Issues.

It has been a while since anyone has replied. Simply ask a new question if you would like to start the discussion again.
12-10-2018
02:53 PM
- last edited on
12-10-2018
03:12 PM
by
![]() Cheron-Z
Cheron-Z
 HP Recommended
Product: HP officejet 6815, [edit]
Operating System: Microsoft Windows 10 (32-bit)
I need some help, I have an HP officejet 6815 and a couple months ago had to replaced the ink cartragies, replaced them went smoothly however after I put the new ones in the message Printer failure: 0x6100004a came up after a paper jam message came up aswell. I checked to see if there was a jam however there wan't, turn the printer off for 60 sec and turn it on, still these two messages appear. Looked and saw someone else having a similar issue and saw other solution, but non had any affect to fix the problem. Can you help
5 REPLIES 5
12-11-2018 06:17 PM
HP Recommended
Welcome to HP forums, I see that you are getting printer failure error.
Clean the ink cartridge vents and contacts
-
Gather the following materials:
-
A pin to clean any clogged vents
-
A clean, lint-free cloth
-
A clean, dry cotton swab
-
Distilled or bottled water
CAUTION:
Do not use tap water because it might contain contaminants that might damage the printhead.
-
-
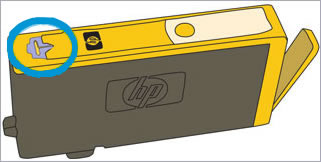
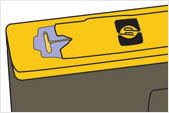
Examine the vent area located on top of the ink cartridge, next to the HP logo.
-
If any of the ink cartridges have clogged vents, use a pin to clean the vents.
Figure : Example of a clogged vent

Figure : Example of a clean vent
-
Lightly dampen a fresh, lint-free cloth.
-
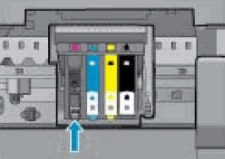
Wipe any accumulated ink and debris on the copper-colored contact on the ink cartridge.
CAUTION:
Be careful to wipe only the ink cartridge contacts. Do not smear any ink or debris elsewhere on the ink cartridge.
-
Ink cartridge contacts
-
-
Wipe the contact with a dry, lint-free cloth.
-
Repeat the steps to clean each ink cartridge contact.
-
Lightly dampen a lint-free swab.
-
Wipe any accumulated ink and debris on the copper-colored contact on the printhead.
-
Wipe the contact with a dry, lint-free swab.
-
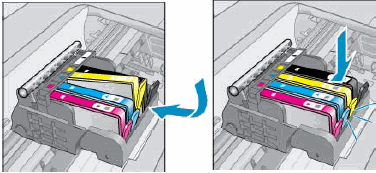
Reinsert each of the ink cartridges into its slot, and then push the ink cartridge forward and down until it snaps into place.
Make sure each colored dot on the ink cartridge label matches the colored dot on the carriage.
-
Run your finger along the top of the ink cartridges to make sure none of them protrude.
If any ink cartridges protrude, press down firmly until each ink cartridge snaps into place.
-
Close the ink cartridge access door.
-
Check the printer control panel display for the error message.
-
If the message is to Replace the
 ,
,  ,
,  , or
, or  Ink Cartridge, remove the specified ink cartridge(s) and clean the copper-colored contact again, and then reinsert the ink cartridge(s).
-
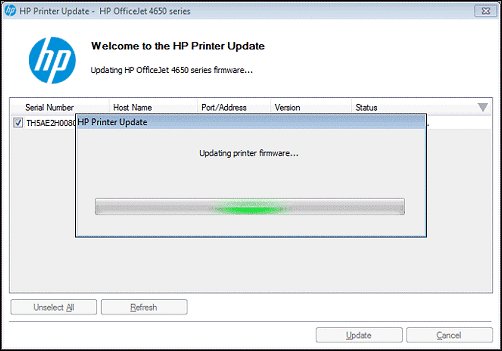
Update the printer firmware
-
Make sure the printer is on and connected to the computer through your local network or USB cable.
-
If a Let's identify your product to get started page displays, click Printer.
-
Type your printer model number, and then click Submit.
The software results page for your printer displays with the default operating system selected.
-
If you need to change the version of Windows, click Change, select your version, and then click Change.
-
Click Firmware, and then click Download.
If a Firmware section is not listed, an update is not currently available for your printer.
-
Save the file to your computer.
-
Locate and then open the file to start the installation process.
-
When the HP Printer Update window opens, see if the printer serial number displays.
-
If the serial number displays, select the checkbox next to it, and then click Update.
-
If the serial number displays but the status is 'not applicable' (grayed out), you do not need the firmware update. Click Cancel.
-
If the serial number does not display and your printer uses a network connection, connect a USB cable to the printer and computer. Wait 20 seconds, and then click Refresh. When the serial number displays, select the checkbox next to it, and then click Update.
-
-
When the update completes, click OK.
-
If you connected a USB cable to update your network printer, remove the USB driver installed by Windows.
-
Search Windows for control panel, and then click Control Panel in the results.
-
Click View Devices and printers.
-
Right-click the USB printer device that matches your printer model, and then select Remove Device.
-
Disconnect the USB cable from the printer and the computer, and then restart the computer.
-
You can refer to this HP document for more assistance:- Click here
Let me know how it goes.
To thank me for my efforts to help you, please mark my post as an accepted solution so that it benefits several others.
Cheers.
Sandytechy20
I am an HP Employee
12-12-2018 02:00 PM
HP Recommended
Thanks for the reply.
I appreciate your time and effort.
I am sending you a private message. Please check the mailbox icon at the top-right corner of this screen.
I hope this helps resolve this issue completely.
Cheers.
Sandytechy20
I am an HP Employee
06-17-2019 01:42 PM
HP Recommended
I request you to talk to HP support.
They might have multiple options to help you with this.
- Click on this link - https://support.hp.com/us-en/contact-hp?openCLC=true
- Select the country.
- Enter the serial of your device.
- Select the country from the drop-down.
- Click on "Show Options".
- Fill the web-form. A case number and phone number will now populate for you.
To thank me for my efforts to help you, please mark my post as an accepted solution so that it benefits several others.
Cheers.
Sandytechy20
I am an HP Employee
Be alert for scammers posting fake support phone numbers and/or email addresses on the community.
If you think you have received a fake HP Support message, please report it to us by clicking on "Flag Post".
† The opinions expressed above are the personal opinions of the authors, not of HP. By using this site, you accept the Terms of Use and Rules of Participation.


Didn't find what you were looking for?
Ask the community
† The opinions expressed above are the personal opinions of the authors, not of HP. By using this site, you accept the <a href="https://www8.hp.com/us/en/terms-of-use.html" class="udrlinesmall">Terms of Use</a> and <a href="/t5/custom/page/page-id/hp.rulespage" class="udrlinesmall"> Rules of Participation</a>.