-
×InformationNeed Windows 11 help?Check documents on compatibility, FAQs, upgrade information and available fixes.
Windows 11 Support Center. -
-
×InformationNeed Windows 11 help?Check documents on compatibility, FAQs, upgrade information and available fixes.
Windows 11 Support Center. -
- HP Community
- Printers
- Printing Errors or Lights & Stuck Print Jobs
- Printer has full ink cartridges but doesn't print even when ...

Create an account on the HP Community to personalize your profile and ask a question
Your account also allows you to connect with HP support faster, access a personal dashboard to manage all of your devices in one place, view warranty information, case status and more.
Check some of the most frequent questions about Instant Ink: HP INSTANT INK, HP+ PLANS: INK AND TONER.
Check out our Black or Color Ink Not Printing, Other Print Quality Issues info about: Print quality and Cartridge Issues.

It has been a while since anyone has replied. Simply ask a new question if you would like to start the discussion again.
09-20-2017 02:06 PM
 HP Recommended
Product: HP F4440
Operating System: Microsoft Windows XP
My printer has full ink cartridges in both the color and black and it still won't print. It tries but only prints a little blue on about 3 lines and one little spot of red, no black ink at all. Any suggestions? I already cleaned both the print and cartridge contacts with a lint free coffee filter and have turned the computer off and back on.
5 REPLIES 5
09-20-2017 02:13 PM
HP Recommended
Follow these steps:
(See them in context at https://support.hp.com/us-en/product/hp-deskjet-f4400-all-in-one-printer-series/3742084/model/383740...)
Solution six: Print and evaluate an extended self-test report and troubleshoot defects
Follow these steps to print, and then evaluate an extended self-test report.
Step one: Print an extended self-test report
- Make sure you have plain white, letter-size paper loaded in the input tray.
- Press and hold the Power button (
 ) and the Cancel button (
 ) for 10 seconds. The extended self-test report prints.Figure : Example extended self-test report
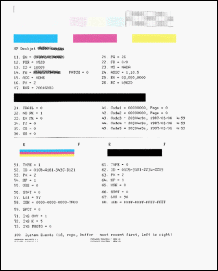
Step two: Determine which cartridges printed which areas of the extended self-test report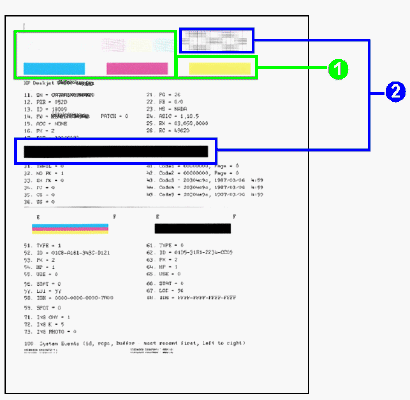
Different cartridges print different areas of the extended self-test report. Use the following guidelines to determine which cartridge printed which areas.
- The black cartridge prints the black areas of the report, such as the black bars and black text.
- The color cartridge prints the color areas of the report, such as the cyan (blue), magenta, and yellow color bars.
Figure : Which cartridges print which areas of the extended self-test report
Make a note of which cartridges printed which areas of the extended self-test, and then continue to the next step to troubleshoot defects on the report.
Step three: Check the extended self-test report for defects
In general, if the product and its cartridges are working correctly, all the color bars should be present, unstreaked, and uniform in color. The black text on the page should not show ink streaks.
Use the following table for examples of defects that can exist on the extended-self test report. The following examples are not inclusive, but tend to represent the most common issues.
Examples of defects on the extended self-test report | ||
Defect | Example | Description or cause |
Broken lines in grid patterns | 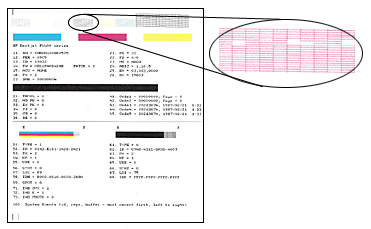 | Problem with the ink nozzles |
Faded or non-uniform colors in the color blocks |  | Depleted cartridges, or ink mixing together |
Track marks or ink smears in the text | 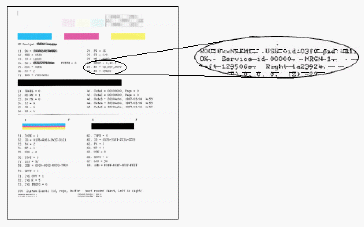 | Fibers or other debris on one or both of the cartridges |
The color blocks are streaked or lined |  | The cartridge might be running out of ink or the nozzles might be clogged |
One or more of the colored blocks is missing entirely | 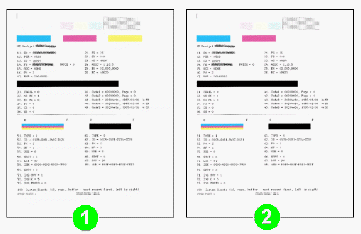
| The cartridge is out of one color of ink or the ink nozzles might be clogged. |
- If you see no defects on the extended self-test report, the print mechanism and ink supplies work correctly. If printouts are still unsatisfactory, try these general print-quality guidelines, and then do not continue the troubleshooting steps in the remainder of this document:
- Make sure the image you are printing has sufficient resolution. Images that have been enlarged too much might appear fuzzy or blurry.
- If the problem is confined to a band near the edge of a print, use the software you installed with the product, or another software program to rotate the image 180°. The problem might not appear on the other end of the printout.
- If you see one or more of these defects on the extended self-test report, continue to the next steps.
Step four: Clean the cartridges using an automated utility
Follow these steps to run an automated tool to clean the cartridges if you found defects on the extended self-test report.
- Open HP Solution Center:
- Windows XP:
- Click Start.
- Click All Programs.
- Click HP.
- Click HP Solution Center.
- Windows Vista or Windows 7:
HP Solution Center opens in a new window. - Click Settings (
 ).
). - In the Print Settings area, click Printer Toolbox. The printer Toolbox opens.
- On the Device Services tab, click Clean the Print Cartridge(s) (
 ).
). - Click Clean to begin the process.
NOTE:
Mechanical noises during the cleaning process are normal. A test page prints when the cleaning process finishes.
Step five: Align the HP product
Follow these steps to align the product.
- Make sure you have plain paper loaded in the product.
- Open HP Solution Center:
- Windows XPClick Start, click All Programs, click HP, and then click HP Solution Center.
- Windows Vista or Windows 7
HP Solution Center opens in a new window. - In HP Solution Center, click Settings ().
- In the Print Settings section, click Printer Toolbox. The printer Toolbox opens in a new window.
- Click Align the Print Cartridges (
 ).
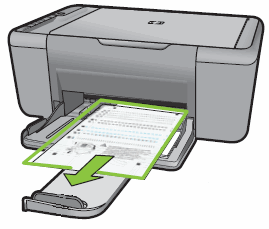
). - Click Print Page. The product prints an alignment page.Figure : Product prints an alignment page
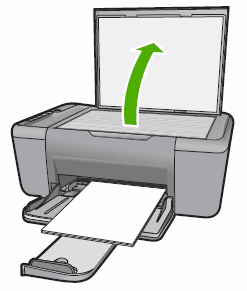
- Lift the product lid.Figure : Lift the product lid
- Place the alignment page on with the printed-side down on the right-front corner of the scanner glass. See the engraved guide next to the scanner glass for help loading the alignment page.Figure : Load the alignment page

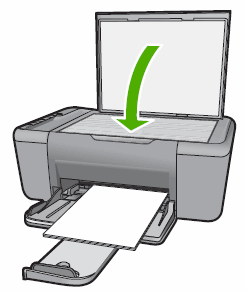
- Lower the product lid.Figure : Lower the lid
- Press the Scan button (
 ) to scan the alignment page.Figure : Scan the alignment page
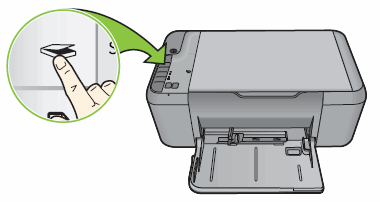
- Wait while the product scans the alignment page and completes the alignment process.
-- ReverseTalk
I work on behalf of HP.
Click the thumbs up + button to thank me. Mark Accepted Solution if I solved your inquiry.
I work on behalf of HP.
Click the thumbs up + button to thank me. Mark Accepted Solution if I solved your inquiry.
09-20-2017 02:13 PM
HP Recommended
Hello,
Please click HERE to access the steps that should resolve the issue .
You may also copy / paste the below URL in a browser .
Regards,
Jabzi

Give Kudos to say "thanks" by clicking on the "thumps Up icon" .
Click "Accept as Solution" if it solved your problem, so others can find it.
Although I am an HP employee, I am speaking for myself and not for HP.
Jabzi
Give Kudos to say "thanks" by clicking on the "thumps Up icon" .
Click "Accept as Solution" if it solved your problem, so others can find it.
Although I am an HP employee, I am speaking for myself and not for HP.
09-20-2017 02:15 PM
HP Recommended
I'd also like to mention that cartridge cleaning should only be performed if you see streaks or smears on printouts.
-- ReverseTalk
I work on behalf of HP.
Click the thumbs up + button to thank me. Mark Accepted Solution if I solved your inquiry.
I work on behalf of HP.
Click the thumbs up + button to thank me. Mark Accepted Solution if I solved your inquiry.
11-29-2019 08:12 AM
HP Recommended
Hello,
Thank you for posting in this thread. Unfortunately based on when the last response was made, I have closed this thread to help keep comments current and up to date. We recommend starting a new thread for your issue by clicking here.
To be more helpful with your post, you can add key information if you desire:
1. Product Name and Number (please do not post Serial Number)
• Example: HP Pavilion DV2-1209AX or HP Deskjet 3000 Printer CH393A
2. Operating System installed (if applicable)
• Example: Windows XP, Windows Vista 32-bit, Windows 7 64-bit
3. Error message (if any)
• Example: ""Low disk space"" error in Windows
4. Any changes made to your system before the issue occurred
• Examples: Upgrading your Operating System or installing a new software; or installing new hardware like a printer, modem, or router.
If you have any other questions about posting in the community, please feel free to send me a private message!
Thank you
I work on behalf of HP
Be alert for scammers posting fake support phone numbers and/or email addresses on the community.
If you think you have received a fake HP Support message, please report it to us by clicking on "Flag Post".
† The opinions expressed above are the personal opinions of the authors, not of HP. By using this site, you accept the Terms of Use and Rules of Participation.


Didn't find what you were looking for?
Ask the community
† The opinions expressed above are the personal opinions of the authors, not of HP. By using this site, you accept the <a href="https://www8.hp.com/us/en/terms-of-use.html" class="udrlinesmall">Terms of Use</a> and <a href="/t5/custom/page/page-id/hp.rulespage" class="udrlinesmall"> Rules of Participation</a>.