-
×InformationNeed Windows 11 help?Check documents on compatibility, FAQs, upgrade information and available fixes.
Windows 11 Support Center. -
-
×InformationNeed Windows 11 help?Check documents on compatibility, FAQs, upgrade information and available fixes.
Windows 11 Support Center. -
- HP Community
- Printers
- Printing Errors or Lights & Stuck Print Jobs
- Printer leaking yellow ink...

Create an account on the HP Community to personalize your profile and ask a question
07-24-2019 11:44 AM - edited 07-24-2019 11:44 AM
Hi,
I was printing, and suddenly a blank paper went through and out and it had yellow streaks on it. This happened about twice. And now the printer prints everything blueish.
I'm not sure if colored ink is empty or not, but I bought new one:
If yellow ink leaked how can I prevent this from happening again?
Thanks
Solved! Go to Solution.
Accepted Solutions
07-31-2019 05:08 PM
Thank you for keeping me posted.
If any other questions arise, please feel free to write back to me.
If you wish to show appreciation for my efforts, mark my post as Accept as Solution. Your feedback counts!
Cheers!
The_Fossette
I am an HP Employee
07-27-2019 10:21 AM
Welcome to the HP Support Community!
Is the issue resolved after changing the cartridges?
Meanwhile, I recommend you follow the below steps and check if it helps.
-
Gather the following materials:
-
Dry foam-rubber swabs, lint-free cloth, or any soft material that will not come apart or leave fibers (coffee filters work well)
-
Clean sheets of paper
-
Distilled, filtered, or bottled water (tap water might contain contaminants that can damage the print cartridges)
CAUTION:
Do not use platen cleaners or alcohol to clean the area. These can damage the cartridge or the product.
-
-
Press the Power button (
 ) to turn on the product, if it is not already on.
 -
Open the front access door.
Figure : Open the front access door

-
Wait for the carriage to move to the center of the product.
-
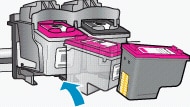
Press down on one of the cartridges to release it, and then pull it out from its slot.
Figure : Remove the cartridge

CAUTION:
Do not remove both cartridges at the same time. Do not leave a cartridge outside the product for more than 30 minutes.
CAUTION:
Do not touch the cartridge contacts or nozzles.
Figure : Do not touch the contacts or nozzles

-
Set the cartridge on a piece of paper with the ink nozzles facing up.
-
Lightly moisten a clean, foam-rubber swab with distilled water.
-
Clean the face and edges around the ink nozzle with the swab.
CAUTION:
Do not clean the ink nozzle plate.
Figure : Clean the area around the ink nozzle
-
Nozzle plate - DO NOT CLEAN
-
Area surrounding ink nozzle - Do clean
-
Cartridge contacts - Do not clean
-
-
Either let the cartridge sit for 10 minutes to allow the cleaned area to dry, or use a new swab to dry it.
-
Hold the cartridge with the HP logo on top, and insert the cartridge back into its slot. Push the cartridge in firmly until it snaps into place. Make sure that the icon on the cartridge matches the icon on the slot.
Figure : Insert cartridge

-
Insert the tri-color cartridge in the slot on the left.
-
Insert the black cartridge in the slot on the right.
-
-
Repeat these steps to clean the area surrounding the ink nozzle on the other cartridge.
-
Close the front access door.
Figure : Close the front access door

-
Try printing again.
Let me know how it goes and you have a great day!
If you wish to show appreciation for my efforts, mark my post as Accept as Solution. Your feedback counts!
Cheers!
The_Fossette
I am an HP Employee
07-31-2019 05:08 PM
Thank you for keeping me posted.
If any other questions arise, please feel free to write back to me.
If you wish to show appreciation for my efforts, mark my post as Accept as Solution. Your feedback counts!
Cheers!
The_Fossette
I am an HP Employee

