• ×
    Information
    Need Windows 11 help?
    Check documents on compatibility, FAQs, upgrade information and available fixes.
    Windows 11 Support Center.
  • post a message
  • ×
    Information
    Need Windows 11 help?
    Check documents on compatibility, FAQs, upgrade information and available fixes.
    Windows 11 Support Center.
  • post a message
Guidelines
Experiencing 'Printer Blocked' or 'Printer Error' message? Click here for more information.
Check some of the most frequent questions about Instant Ink: HP INSTANT INK, HP+ PLANS: INK AND TONER.


Check out our Black or Color Ink Not Printing, Other Print Quality Issues info about: Print quality and Cartridge Issues.
HP Recommended
DeskJet 2652
Microsoft Windows 10 (64-bit)

Errors in black printing occur at the top and bottom of the pages (middle of the pages with text documents).  See bottom of scan for an example.  What would cause this printer to not print certain sections of data?  Software says ink level is okay, doesn't expire until mid-2019.  I've run printhead cleaning and alignments about a dozen times each.  Thanks for the help!Scan.jpg

3 REPLIES 3
HP Recommended

Hi there,


Did you try a different set of pens?


JonW

I work for HP
HP Recommended

For the uninitiated, HP Inkjet engineers often refer to  ink cartridges as "pens".  (Makes sense - pens are things that put ink on paper....)


Your issue looks like an electrical issue to me.  Before replacing the cartridge I would suggest cleaning the electrical contacts on the printer and cartrdige as shown in step 4 of the document here.


Step 4: Clean the ink cartridge contacts
When the ink cartridge contacts are dirty, the printer might display an ink cartridge error. Unplug any cords or cables, remove the ink cartridges, and then clean the electrical contacts on the ink cartridges and print carriage.
   CAUTION:
Clean the ink cartridges one at a time. Do not leave an ink cartridge outside the printer for more than 30 minutes.
  1. Gather the following materials:
    • Dry foam-rubber swabs or lint-free cloth (eyeglass wipes or coffee filters work well)
    • Distilled, filtered, or bottled water (tap water might contain contaminants that can damage the ink cartridges)
         CAUTION:
      Do not use platen cleaners or alcohol to clean the ink cartridge contacts. These can damage the ink cartridge or the printer.
  2. Turn on the printer.
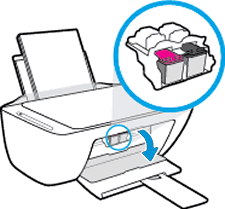
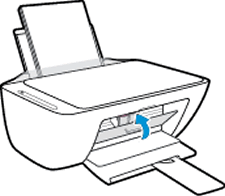
  3. Open the ink cartridge access door.
    The carriage moves to the center of the printer. Wait until the carriage is idle and silent before continuing.
    Open the ink cartridge acesss door
  4. Disconnect the power cord and any Ethernet or USB cables, unless your printer is connected to a wireless network.
  5. Lightly press down on the ink cartridge to release it, and then pull the ink cartridge out of its slot.
    Remove the ink cartridge
       CAUTION:
    Do not remove both ink cartridges at the same time. Remove and then clean each ink cartridge one at a time. Do not leave an ink cartridge outside the printer for more than 30 minutes.
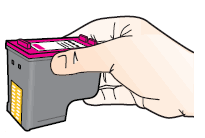
  6. Hold the ink cartridge by its sides.
    Hold the ink cartridge by its sides
  7. Dip a clean foam-rubber swab or lint-free cloth into distilled water, and then squeeze any excess water from it.
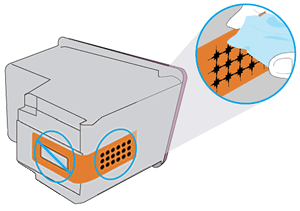
  8. Clean only the copper-colored contacts, and then allow the ink cartridge to dry for approximately 10 minutes.
    Clean the contacts
  9. Lightly moisten another foam-rubber swab with distilled water, and then squeeze any excess water from the swab.
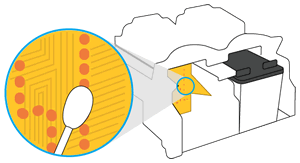
  10. Use the swab to clean the electrical contacts in the carriage, located inside the printer.
    The carriage contacts
  11. Either let the ink cartridge sit for 10 minutes to allow the cleaned area to dry, or use a new swab to dry it.
       NOTE:
    Make sure the ink cartridge is not left out of the printer for more than 30 minutes.
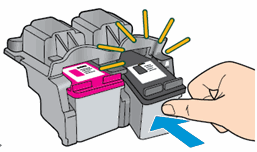
  12. Hold the ink cartridge by its sides with the contacts toward the printer, and then insert the ink cartridge into its proper slot.
    Snap the ink cartridge into place
  13. Slide the ink cartridge at a slight upward angle into the empty slot, and then gently push the ink cartridge until it snaps into place.
  14. Repeat these steps to clean and then reinsert the other ink cartridge.
  15. Close the ink cartridge access door.
    Close the ink cartridge access door
  16. Reconnect the power cord and any Ethernet or USB cables, unless your printer is connected to a wireless network.
  17. Turn on the printer if it does not turn on automatically.
If the error persists, continue to the next step.

Bob Headrick,  HP Expert

I am not an employee of HP, I am a volunteer posting here on my own time.

If your problem is solved please click the "Accept as Solution" button 

If my answer was helpful please click "Yes" to the "Was this post helpful" question.


HP Recommended

Thanks for all of the replies.  I tried the cleaning process as described but it didn't help those sections print.  I'll buy a new ink cartridge and go back to calling HP if that doesn't work.

† The opinions expressed above are the personal opinions of the authors, not of HP. By using this site, you accept the <a href="https://www8.hp.com/us/en/terms-of-use.html" class="udrlinesmall">Terms of Use</a> and <a href="/t5/custom/page/page-id/hp.rulespage" class="udrlinesmall"> Rules of Participation</a>.