-
×InformationNeed Windows 11 help?Check documents on compatibility, FAQs, upgrade information and available fixes.
Windows 11 Support Center. -
-
×InformationNeed Windows 11 help?Check documents on compatibility, FAQs, upgrade information and available fixes.
Windows 11 Support Center. -
- HP Community
- Printers
- Printing Errors or Lights & Stuck Print Jobs
- Printer not working for top loader and small tray

Create an account on the HP Community to personalize your profile and ask a question
Your account also allows you to connect with HP support faster, access a personal dashboard to manage all of your devices in one place, view warranty information, case status and more.
Check some of the most frequent questions about Instant Ink: HP INSTANT INK, HP+ PLANS: INK AND TONER.
Check out our Black or Color Ink Not Printing, Other Print Quality Issues info about: Print quality and Cartridge Issues.

It has been a while since anyone has replied. Simply ask a new question if you would like to start the discussion again.
08-14-2018 08:25 PM
 HP Recommended
Product: HO Envt 7640
Operating System: Microsoft Windows 10 (64-bit)
I bought a new printer and it worked fine for a few days. We had some problems with our router But we now have and new one and everything has been updated. My problem is that the printer won't accept paper in the top loader. I get the message (Original Loaded). I have no idea what that means but the second problem is that it won't print from the small tray. I had a photo set as a 4x6 and it printed from the 8x10 tray. This is very frustrating. I'm considering sending the printe back. I would really appreciate it if anyone can help me fix these problems.
Solved! Go to Solution.
1 ACCEPTED SOLUTION
Accepted Solutions
08-17-2018 12:02 PM
HP Recommended
Thanks for the reply.
I appreciate your time and effort.
Yes, you can try these steps when and reply with the outcome whenever you find the time.
I will be more than glad to assist you if required.
To thank me for my efforts to help you, please mark my post as an accepted solution so that it benefits several others and please give the same post a Kudos.
Cheers.
Sandytechy20
I am an HP Employee
4 REPLIES 4
08-15-2018 06:33 PM
HP Recommended
Welcome to HP forums, I see that printer does not load paper from ADF and input tray.
Adjust the paper settings in the print driver
-
Return to the document that you were trying to print when the issue occurred.
-
Click File, and then click Print.
-
Select your printer, and then click the Properties button.
NOTE:
Depending on your software application, this button might be a link, and it might be called Properties, Printer Properties, Options, Printer Setup, Printer, Preferences, or Page Setup.
-
Click the Paper/Quality or Paper tab.
-
From the Paper Size drop-down list, select the option that matches your paper size.
-
From the Media drop-down list, or for the paper source or type, select the paper type that matches the paper loaded in the printer.
-
Click OK to apply the settings.
-
Click OK or Print.
Clean the paper feed and pick rollers
-
Remove any paper in the printer before you clean the rollers.
-
Press the Power button to turn off the printer, if it is not off already.
-
Disconnect the power cord from the rear of the printer.
WARNING:
You must disconnect the power cord before reaching inside the printer to avoid risk of injuries or electric shock.
-
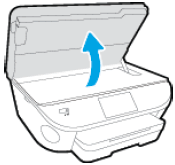
Open the cartridge access door.
Figure : Open the cartridge access door
-
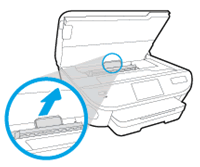
Locate the paper path cover, grasp the handle, and then lift up to remove it.
Figure : Remove the paper path cover
-
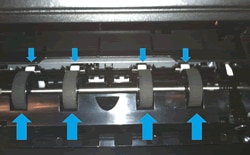
Lightly dampen a clean swab with the water, and then squeeze any excess liquid from the swab.
-
Press the swab against the rollers inside the printer, and then rotate the rollers upwards with your fingers. Apply a moderate amount of pressure to remove any dust or dirt buildup.
Figure : Clean the rollers in the paper path access area
-
Replace the paper path cover, and then close the cartridge access door.
Figure : Close the cartridge access door

-
Gently turn the printer onto its right side, and then pull open the input tray so that you can access its underside.
Figure : Turn the printer onto its right side

-
Lightly dampen a clean swab with the water, and then squeeze any excess liquid from the swab.
-
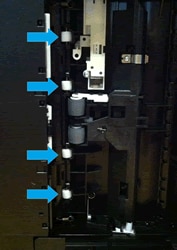
Clean the rollers in the gap behind the input tray. Make sure that none of the rollers are not missing, that they turn easily, and that they are springy when you press them.
Figure : Clean the rollers behind the input tray
-
Before you turn the printer over to its normal position, continue to the next step to clean the paper pick rollers.
Step 2: Clean the paper pick rollers
Follow these steps to clean the paper pick rollers.
-
Make sure that the printer is turned off, the power cord is disconnected, and the printer is turned onto its right side with the input tray open.
-
Lightly dampen a clean swab with the water, and then squeeze any excess liquid from the swab.
-
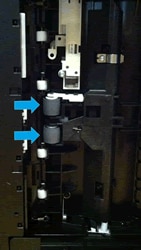
Press the swab against the rollers inside the printer, and then rotate the rollers upwards with your fingers. Apply a moderate amount of pressure to remove any dust or dirt buildup.
Figure : Clean the paper pick rollers
-
Make sure that the rollers turn easily when you press them.
-
Allow the rollers to dry for 10 to 15 minutes.
-
Turn the printer over to its normal position.
-
Reconnect the power cord to the rear of the printer, and then press the Power button to turn on the printer.
Reset the printer
-
Turn the printer on, if it is not already on.
-
Wait until the printer is idle and silent before you continue.
-
With the printer turned on, disconnect the power cord from the rear of the printer.
-
Unplug the power cord from the wall outlet.
-
Wait at least 60 seconds.
-
Plug the power cord back into the wall outlet.
NOTE:
HP recommends connecting the printer power cord directly to the wall outlet.
-
Reconnect the power cord to the rear of the printer.
-
Turn on the printer, if it does not automatically turn on.
-
Wait until the printer is idle and silent before you proceed.
You can refer this HP document for more assistance:- Click here
Let me know how it goes.
To thank me for my efforts to help you, please mark my post as an accepted solution so that it benefits several others and please give the same post a Kudos.
Cheers.
Sandytechy20
I am an HP Employee
08-17-2018 10:48 AM
HP Recommended
I found my problem for the top loader from a video on youtube. I wasn't moving the sliders up to the paper close enough and I wasn't clicking on the copy shown on the screen. I haven't solved my problem on my small tray yet. I printed out your instructions and I'll try to fix it following your instructions. I'll let you know in a few days how it works out for me. Thanks for taking the time to help me.
08-17-2018 10:50 AM
HP Recommended
I found my problem for the top loader from a video on youtube. I wasn't moving the sliders up to the paper close enough and I wasn't clicking on the copy shown on the screen. I haven't solved my problem on my small tray yet. I printed out your instructions and I'll try to fix it following your instructions. I'll let you know in a few days how it works out for me. Thanks for taking the time to help me.
08-17-2018 12:02 PM
HP Recommended
Thanks for the reply.
I appreciate your time and effort.
Yes, you can try these steps when and reply with the outcome whenever you find the time.
I will be more than glad to assist you if required.
To thank me for my efforts to help you, please mark my post as an accepted solution so that it benefits several others and please give the same post a Kudos.
Cheers.
Sandytechy20
I am an HP Employee
Be alert for scammers posting fake support phone numbers and/or email addresses on the community.
If you think you have received a fake HP Support message, please report it to us by clicking on "Flag Post".
† The opinions expressed above are the personal opinions of the authors, not of HP. By using this site, you accept the Terms of Use and Rules of Participation.


Didn't find what you were looking for?
Ask the community
† The opinions expressed above are the personal opinions of the authors, not of HP. By using this site, you accept the <a href="https://www8.hp.com/us/en/terms-of-use.html" class="udrlinesmall">Terms of Use</a> and <a href="/t5/custom/page/page-id/hp.rulespage" class="udrlinesmall"> Rules of Participation</a>.