-
×InformationNeed Windows 11 help?Check documents on compatibility, FAQs, upgrade information and available fixes.
Windows 11 Support Center. -
-
×InformationNeed Windows 11 help?Check documents on compatibility, FAQs, upgrade information and available fixes.
Windows 11 Support Center. -
- HP Community
- Printers
- Printing Errors or Lights & Stuck Print Jobs
- Printer problem HP Deskjet 3630

Create an account on the HP Community to personalize your profile and ask a question
Your account also allows you to connect with HP support faster, access a personal dashboard to manage all of your devices in one place, view warranty information, case status and more.
Check some of the most frequent questions about Instant Ink: HP INSTANT INK, HP+ PLANS: INK AND TONER.
Check out our Black or Color Ink Not Printing, Other Print Quality Issues info about: Print quality and Cartridge Issues.

It has been a while since anyone has replied. Simply ask a new question if you would like to start the discussion again.
04-22-2020 03:15 AM
 HP Recommended
Product: HP Deskjet 3630
Operating System: Microsoft Windows 10 (64-bit)
Both cartridge indicators showing as empty even though I have just replaced black cartridge this morning. Product is 3 years old, is it time to skip it?
3 REPLIES 3
04-25-2020 12:07 PM
HP Recommended
@TerryW2 Welcome to HP Community!
I understand that you are getting install ink cartridges message while you have already replaced the ink cartridges.
Do not worry. I will try to fix the issue.
Please let us know if you are using HP genuine ink cartridges.
Please clean the ink cartridges' contacts and check for the issue.
Please refer to the below link to HP DeskJet 3630, 4720 Printers - Replacing the Ink Cartridges.
https://support.hp.com/in-en/document/c04602728
If the issue still persists, please perform the hard reset.
-
Turn the printer on, if it is not already on.
-
Wait until the printer is idle and silent before you continue.
-
With the printer turned on, disconnect the power cord from the rear of the printer.
-
Unplug the power cord from the wall outlet.
-
Wait at least 60 seconds.
-
Plug the power cord back into the wall outlet.
-
Reconnect the power cord to the rear of the printer.
-
Turn on the printer, if it does not automatically turn on.
-
Wait until the printer is idle and silent before you proceed
Keep us posted,
If you would like to thank us for our efforts to help you,
Give us a virtual high-five by clicking the 'Thumbs Up' icon below, followed by clicking on the "Accept as solution" on this post,
Have a great day!
04-26-2020 01:03 PM
HP Recommended
Thank you for the update.
Remove, inspect, and then reseat the ink cartridges
The printer might display an error if the ink cartridges are not correctly installed.
NOTE:HP cannot guarantee the quality of remanufactured or refilled ink cartridges. Use genuine HP ink cartridges for good print quality.
-
If the printer is off, press the Power button to turn on the printer.
-
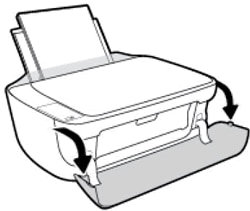
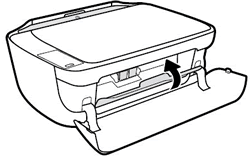
Open the exterior door.
Figure : Open the exterior door
-
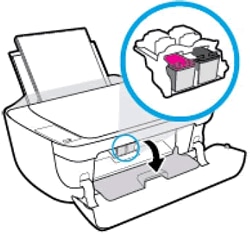
Open the ink cartridge access door.
The carriage moves to the center of the printer. Wait until the carriage is idle and silent before continuing.
Figure : Open the ink cartridge access door
-
Press down on the ink cartridge to release it, and then pull the ink cartridge out to remove it from its slot.
Figure : Remove the ink cartridge

CAUTION:
Do not touch the copper-colored contacts or the ink nozzles. Touching these parts can result in clogs, ink failure, and bad electrical connections.
-
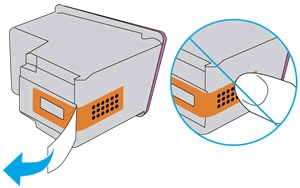
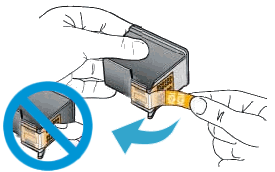
Remove any protective tape that still might be on the nozzles.
CAUTION:
Do not try to remove the copper electrical strip.
Figure : Remove the plastic tape
-
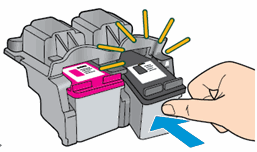
Hold the ink cartridge by its sides with the nozzles toward the printer, and then insert the ink cartridge into its slot. Make sure that the ink cartridge is inserted in the correct slot.
-
The tri-color ink cartridge (
 ) goes in the slot on the left.
 -
The black ink cartridge (
 ) goes in the slot on the right.
Figure : Reinsert the ink cartridge
-
-
Push the ink cartridge forward into its slot until it snaps into place.
-
Repeat these steps to replace the other ink cartridge, if necessary.
-
Close the ink cartridge access door.
Figure : Close the ink cartridge access door
-
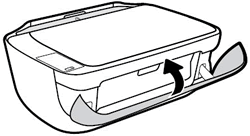
Close the exterior door.
Figure : Close the exterior door
If the error persists, continue to the next step.
Step 3: Clean the ink cartridge contacts
The printer might display an ink cartridge error if the ink cartridge contacts are dirty.
CAUTION:Clean the ink cartridges one at a time. Do not leave an ink cartridge outside the printer for more than 30 minutes.
-
Gather the following materials:
-
Dry foam-rubber swabs, lint-free cloth, or any soft material that does not come apart or leave fibers (coffee filters work well)
-
Distilled, filtered, or bottled water (tap water might contain contaminants that can damage the ink cartridges)
CAUTION:
Do not use platen cleaners or alcohol to clean the ink cartridge contacts. These can damage the ink cartridge or the printer.
-
-
Press the Power button to turn on the printer.
-
Open the exterior door.
Figure : Open the exterior door
-
Open the ink cartridge access door.
The carriage moves to the center of the printer. Wait until the carriage is idle and silent before continuing.
Figure : Open the ink cartridge access door
-
Disconnect the power cord from the rear of the printer.
-
Disconnect the USB cable, unless your printer is connected to a wireless network.
-
Press down on the ink cartridge to release it, and then pull the ink cartridge out to remove it from its slot.
Figure : Remove the ink cartridge
CAUTION:
Do not remove both ink cartridges at the same time. Remove and then clean each ink cartridge one at a time. Do not leave an ink cartridge outside the printer for more than 30 minutes.
-
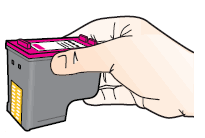
Hold the ink cartridge by its sides.
Figure : Hold the ink cartridge by its sides
-
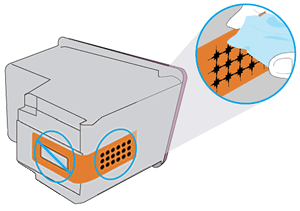
Inspect the contacts for ink and debris buildup.
-
Wipe the contacts with a dry swab or other lint-free material until no debris remains on them.
CAUTION:
Be careful to wipe only the contacts. Do not smear any ink or debris elsewhere on the ink cartridge.
-
Dip a clean foam-rubber swab or lint-free cloth into distilled water, and then squeeze any excess water from it.
-
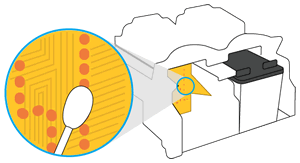
Clean only the copper-colored contacts, and then allow the ink cartridge to dry for approximately 10 minutes.
Figure : Clean the contacts
-
Lightly moisten another foam-rubber swab with distilled water, and then squeeze any excess water from the swab.
-
Use the swab to clean the electrical contacts in the carriage, located inside the printer.
-
Clean the contacts in the carriage.
Figure : The carriage contacts
-
Either let the ink cartridge sit for 10 minutes to allow the cleaned area to dry, or use a new swab to dry it.
NOTE:
Make sure that the ink cartridge is not left out of the printer for more than 30 minutes.
-
Hold the ink cartridge by its sides with the nozzles toward the printer, and then insert the ink cartridge into its slot. Make sure that the ink cartridge is inserted in the correct slot.
Figure : Insert the ink cartridge into the slot
-
Push the ink cartridge forward into its slot until it snaps into place.
-
Repeat these steps to clean and then reinsert the other ink cartridge.
-
Close the ink cartridge access door.
Figure : Close the ink cartridge access door
-
Close the exterior door.
Figure : Close the exterior door
-
Reconnect the power cord to the rear of the printer.
-
Reconnect the USB cable, unless your printer is connected to a wireless network.
-
Press the Power button to turn on the printer if it does not turn on automatically.
If the error persists, continue to the next step.
Step 4: Remove and then reinsert the ink cartridges again
Repeat the steps that you performed earlier in this document to remove and then reinsert the ink cartridges.
NOTE:Make sure the ink cartridges snap firmly into place.
If the error persists, continue to the next step.
Step 5: Clean the ink cartridge contacts again
Cleaning the ink cartridge contacts again can help resolve the issue. Repeat the steps that you performed earlier in this document to clean the contacts of the ink cartridges.
If the error persists, continue to the next step.
Step 6: Restart the printer
Restarting the printer can sometimes resolve an ink cartridge error.
-
With the printer turned on, disconnect the power cord from the rear of the printer.
-
Unplug the power cord from the wall outlet.
-
Wait at least 15 seconds.
-
Plug the power cord back into the wall outlet.
-
Reconnect the power cord to the printer.
-
Turn the printer on.
Step 7: Replace the ink cartridge
Replace the ink cartridge or ink cartridges indicated by the blinking Ink Level icon ( ).
).
If you have a defective cartridge or printhead, it might be under warranty. To check the warranty on your ink or toner supplies, go to Printer and Page Yield Overview, and then review the limited warranty information for your supplies.
-
Press the Power button to turn on the printer, if it is not already on.
-
Load plain white paper into the input tray.
-
Open the exterior door.
Figure : Open the exterior door
-
Open the ink cartridge access door.
The carriage moves to the center of the printer.
Wait until the carriage is idle and silent before you continue.
Figure : Open the ink cartridge access door
-
Lightly press down on the ink cartridge to release it, and then pull the ink cartridge out of its slot.
Figure : Remove the ink cartridge
-
Remove the new ink cartridge from its packaging, and then remove the plastic tape.
CAUTION:
Do not try to remove the copper electrical strip.
Do not touch the copper-colored contacts or the ink nozzles. Do not replace the protective tape on the contacts. Handling these parts can result in clogs, ink failure, and bad electrical connections.
Figure : Remove the plastic tape
-
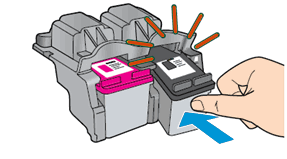
Hold the ink cartridge by its sides with the nozzles toward the printer, and then insert the ink cartridge into its slot. Make sure that the ink cartridge is inserted in the correct slot.
-
The tri-color ink cartridge (
) goes in the slot on the left. -
The black ink cartridge (
) goes in the slot on the right.
-
-
Push the ink cartridge forward into its slot until it snaps into place.
Figure : Snap the ink cartridge into place
-
Repeat these steps to replace the other ink cartridge, if necessary.
-
Close the ink cartridge access door.
Figure : Close the ink cartridge access door
-
Close the exterior door.
Figure : Close the exterior door
-
Follow any prompts on the computer screen.
-
Wait about 30 seconds for the alignment page to automatically print.
NOTE:
The printer prints an alignment page automatically only when a new ink cartridge has been installed.
Continue to the next step to complete the ink cartridge alignment.
Step 8: Align the ink cartridges
Scanning the alignment page allows the printer to align the ink cartridges and provides the best print quality.
-
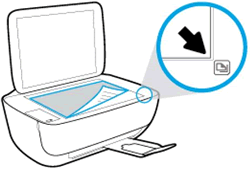
Lift the scanner lid.
-
Place the alignment page with the print side down on the right-front corner of the scanner glass. See the engraved guide next to the scanner glass for help loading the alignment page.
Figure : Place the alignment page on the scanner glass
-
Close the scanner lid.
-
Press the Start Copy Black button
 or the Start Copy Color button
  on the printer control panel.
The printer aligns the ink cartridges.
NOTE:
If the alignment page fails to automatically print, you can manually print an alignment page using the HP Printer Assistant software (Windows) or the Printer Utility (macOS or OS X).
If the error persists, please contact our phone support and check for the support option, They will help you.
Here is how you can get in touch with phone support.
1)Click on this link - www.hp.com/contacthp/
2)Select the product type.
3)Enter the serial number of your device or select let HP detect your product option.
4)Select the country from the drop-down.
5)You should see the HP phone support number or Chat option listed.
Have a nice day!!
Be alert for scammers posting fake support phone numbers and/or email addresses on the community.
If you think you have received a fake HP Support message, please report it to us by clicking on "Flag Post".
† The opinions expressed above are the personal opinions of the authors, not of HP. By using this site, you accept the Terms of Use and Rules of Participation.


Didn't find what you were looking for?
Ask the community
† The opinions expressed above are the personal opinions of the authors, not of HP. By using this site, you accept the <a href="https://www8.hp.com/us/en/terms-of-use.html" class="udrlinesmall">Terms of Use</a> and <a href="/t5/custom/page/page-id/hp.rulespage" class="udrlinesmall"> Rules of Participation</a>.