-
×InformationNeed Windows 11 help?Check documents on compatibility, FAQs, upgrade information and available fixes.
Windows 11 Support Center. -
-
×InformationNeed Windows 11 help?Check documents on compatibility, FAQs, upgrade information and available fixes.
Windows 11 Support Center. -
- HP Community
- Printers
- Printing Errors or Lights & Stuck Print Jobs
- Printer problem error code 0x610004a

Create an account on the HP Community to personalize your profile and ask a question
12-11-2017 08:38 AM
Printer Failure Error: reads as 'There is a problem with the printer or print system. Turn the printer OFF, then ON. If you continue to get this message, contact HP 0x610004a.' We have followed those instructions, checked for jams, checked the cartridges, and continue to get this message. We can fax, but cannot copy or print.
12-11-2017 09:07 AM
I received this email message:
It is hard to privide you the appropriate solution for this issue in community. In order to get easy and hassle free HP Technical support for you peripherals. Kindly call +1-888-242-9613 for assistance.
Improper english like 'for you preipherals' sends up a red flag to me.
The support gentleman had a foreign accent and wanted remote access to my computer. He said the only way to fix the issue was to let him into my computer. The printer is wireless! Am I right to find this suspicious?
12-12-2017 01:52 PM
Hi @KJGH17,
Welcome to HP Forums,
This is a great place to get support, find answers and tips.
Thank you for posting your query, I'll be more than glad to help you out 🙂
As I understand you are getting an error message on the printer screen.
Don't worry as I'll be glad to help you with the issue you are facing.
Please follow the troubleshooting steps mentioned below.
Reset the printing mechanism.
-
Turn the printer on, if it is not already on.
-
Wait until the printer is idle and silent before you continue.
-
With the printer turned on, disconnect the power cord from the rear of the printer.
-
Unplug the power cord from the wall outlet.
-
Wait at least 60 seconds.
-
Plug the power cord back into the wall outlet.
-
Reconnect the power cord to the rear of the printer.
-
Turn on the printer, if it does not automatically turn on.
The printer might go through a warm-up period. The printer lights might flash, and the carriage might move.
-
Wait until the warm-up period finishes and your printer is idle and silent before you proceed.
Try to print.
If the issue persists, click here for further assistance.
Keep me posted, how it goes!
If I have helped you resolve the issue, feel free to give me a virtual high-five by clicking the 'Thumbs Up' icon below,
Followed by clicking on "Accept as solution" from the drop-down menu on the upper right corner,
Thank you for posting in the HP Support Forum.
Have a great day!
Raj1788
I am an HP Employee
12-14-2017 11:22 AM
Hi @KJGH17 ,
Thank you for replying with this detailed response 😉
I appreciate your time and efforts, Please follow the steps given below:
Clean the ink cartridge vents and contacts
Cleaning the ink cartridge contacts and vents, and then reinstalling the ink cartridges one at a time can help determine if a specific ink cartridge is causing the error message.
-
Gather the following materials:
-
A pin to clean any clogged vents
-
A clean, lint-free cloth
-
A clean, dry cotton swab
-
Distilled or bottled water
caution:
Do not use tap water because it might contain contaminants that can damage the printhead.
-
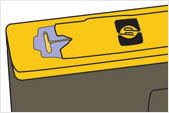
- Examine the vent area located on top of the ink cartridge, next to the HP logo.
Figure : Example of the vent area
-
If any of the ink cartridges have clogged vents, use a pin to clean the vents.
Figure : Example of a clogged vent
Figure : Example of a clean vent
-
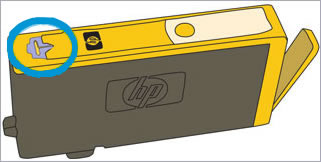
Use a fresh, lightly dampened, lint-free cloth to wipe any accumulated ink and debris on the copper-colored contact on the ink cartridge.
caution:
Be careful to wipe only the ink cartridge contacts. Do not smear any ink or debris elsewhere on the ink cartridge.
Figure : Example of the contacts on the ink cartridge
-
Ink cartridge contacts
-
-
Wipe the contact with a dry, lint-free cloth before proceeding to the next step.
-
Repeat the steps to clean each ink cartridge contact.
-
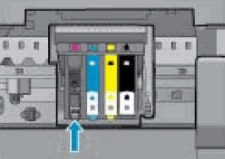
Use a fresh, lightly dampened, lint-free swab to wipe any accumulated ink and debris on the copper-colored contact on the printhead.
Figure : Example of the copper-colored contact on the printhead
-
Wipe the contact with a dry, lint-free swab before you proceed to the next step.
-
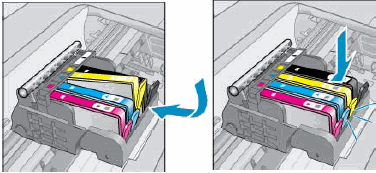
Carefully reinsert each of the ink cartridges into its slot, and then push the ink cartridge down and forward until it snaps into place.
Make sure each colored dot on the ink cartridge label matches the colored dot on the carriage.
Figure : Snapping the ink cartridge into place
-
Run your finger along the top of the ink cartridges to make sure none of them protrude.
If any ink cartridges protrude, press down firmly until each ink cartridge snaps into place.
-
Close the ink cartridge access door.
-
Check the printer control panel display for the error message.
-
If the message is to Replace the
,
,
, or
Ink Cartridge, remove the specified ink cartridge(s) and clean the copper-colored contact again, and then reinsert the ink cartridge(s).
-
Update the firmware:
Follow this link and update the firmware.
Let me know how that pans out.
I hope you have a good day ahead,
And Feel free to ask any other queries as well,
Considering, this forum has some of the best people in the world available and ready to help. 😉
Barachiel
I am an HP Employee