-
×InformationNeed Windows 11 help?Check documents on compatibility, FAQs, upgrade information and available fixes.
Windows 11 Support Center. -
-
×InformationNeed Windows 11 help?Check documents on compatibility, FAQs, upgrade information and available fixes.
Windows 11 Support Center. -
- HP Community
- Printers
- Printing Errors or Lights & Stuck Print Jobs
- Printer shows cartridge problem after installing refilled ca...

Create an account on the HP Community to personalize your profile and ask a question
Your account also allows you to connect with HP support faster, access a personal dashboard to manage all of your devices in one place, view warranty information, case status and more.
Check some of the most frequent questions about Instant Ink: HP INSTANT INK, HP+ PLANS: INK AND TONER.
Check out our Black or Color Ink Not Printing, Other Print Quality Issues info about: Print quality and Cartridge Issues.

It has been a while since anyone has replied. Simply ask a new question if you would like to start the discussion again.
3 REPLIES 3
03-28-2018 12:14 PM
 HP Recommended
Hi
Please try this
Ink Cartridge Problem: An 'Ink Cartridge Problem,' 'Incompatible Ink Cartridge,' or 'Ink Cartridge Failure' Message Displays on the Printer Control Panel for HP Photosmart 7510 e-All-in-One and HP Photosmart 7520 e-All-in-One Printer Series
This document is for the HP Photosmart 7510 e-All-in-One, HP Photosmart 7520 and 7525 e-All-in-One printers.
After you install a cartridge, one of the following error messages displays on the printer control panel:
- Ink Cartridge Problem
- Incompatible Ink Cartridge
- Ink Cartridge Failure
An icon displays on the control panel that indicates which cartridge is causing the error.
Solution one: Use genuine HP ink cartridges
Make sure that the installed cartridges are compatible with your printer and that they are unmodified, genuine HP cartridges.
Cartridge Description | Country/Region | |||
The Americas | Europe | Middle East and Africa | Asia Pacific | |
Black cartridge | HP 564 Black | HP 364 Black | HP 178 Black | HP 862 Black |
Color cartridges | HP 564 Cyan HP 564 Magenta HP 564 Yellow | HP 364 Cyan HP 364 Magenta HP 364 Yellow | HP 178 Cyan HP 178 Magenta HP 178 Yellow | HP 862 Cyan HP 862 Magenta HP 862 Yellow |
Photo cartridge | HP 564 Photo | HP 364 Photo | HP 178 Photo | HP 862 Photo |
Visit HP SureSupply to check ink or toner cartridge compatibility or purchase replacement cartridges and other supplies.
- Go to HP SureSupply.
- If necessary, select your country/region.Figure : Country/region selector

- Follow the on-screen instructions to order new supplies or check cartridge compatibility with your printer.
You can also purchase genuine HP cartridges and supplies from other retailers.
HP recommends that you use genuine HP ink or toner supplies. HP cannot guarantee the quality or reliability of non-HP or refilled cartridges. If you do not use genuine HP cartridges, the steps in this document might not resolve the issue. To check the authenticity of your cartridges, go to hp.com/go/anticounterfeit.
- If the cartridges are compatible, continue with the steps in this document.
- If the cartridges are not compatible, continue to the step in this document to replace the cartridge.
Solution two: Make sure that the cartridges are inserted correctly
The control panel might display an error message if the ink cartridges are not inserted correctly. Make sure that the cartridges are inserted correctly.
CAUTION:If your printer shipped with SETUP cartridges, you must install them during initial printer setup or an error occurs.
- If the printer is off, press the Power button to turn on the printer.
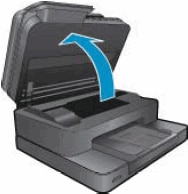
- Open the cartridge access door. The carriage moves to the access area.Figure : Open the cartridge access door
- Make sure that the color icon on each cartridge label matches the color icon on the carriage slot.Figure : Match the color icons

- Feel across the top of the cartridges to check for any unseated cartridges in the carriage. Press down on any cartridge that is higher than the others to firmly snap the cartridge into its slot.Figure : Snap the cartridge into its slot

- If the cartridge does not snap into place, or does not seat properly, remove the cartridge from the carriage. Gently bend the tab away from the cartridge, and then reinsert the cartridge into the carriage.
CAUTION:
Be careful not to bend the tab out more than 1.27 cm (0.5 in). Moving the tab too far might damage the cartridge or cause the tab to break off.Figure : An example of gently bending the tab away from the ink cartridge.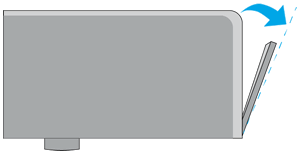
- Gently bend the tab away from the ink cartridge
- Do not bend the tab more than 1.27 cm (0.5 in)
- Raise, and then lower the printhead latch to make sure that it is all the way down.Figure : Lower the printhead latch
 Figure : Press down on the printhead latch
CAUTION:
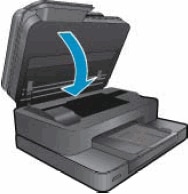
Leaving the latch handle raised can result in incorrectly seated cartridges. The latch must remain down to install the cartridges correctly. - Close the cartridge access door.Figure : Close the cartridge access door
- If these steps resolved the issue, you do not need to continue troubleshooting.
- If the issue persists, continue to the next solution.
Solution three: Remove, inspect, and reinsert the cartridges
Remove and reinsert the ink cartridge or ink cartridges indicated in the error message. Make sure that the cartridges are inserted correctly.
- If the printer is off, press the Power button to turn on the printer. Wait until the printer is idle and silent before you continue.
- Open the cartridge access door. The carriage moves to the access area.Figure : Open the cartridge access door
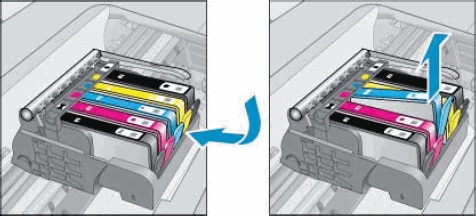
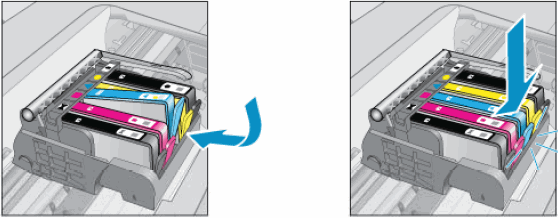
- Press the tab on the front of the cartridge in to release it, and then pull up on the cartridge to remove it from the slot.Figure : Remove the cartridge from the slot
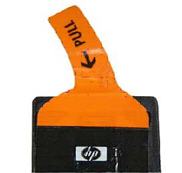
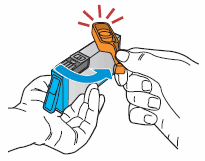
- If an orange pull tab is still attached, remove it.Figure : Orange pull tab
CAUTION:
Make sure that you remove the orange pull-tab and plastic wrap completely. Otherwise, ink might leak from the cartridge. When you remove the plastic wrap, the paper label on the top of the cartridge tears slightly, which is necessary to properly vent the cartridge. - With the nozzle and contacts facing down, slide the cartridge into its slot. Press down on the cartridge until it is firmly seated.Figure : Reinsert the cartridge
- Repeat these steps to inspect any other cartridges indicated on the control panel.
- Close the cartridge access door.Figure : Close the cartridge access door
Solution four: Clean the cartridge contacts
Follow these steps to clean the contacts on the cartridge and in the cartridge slot.
CAUTION:Clean the cartridges one at a time. Do not leave a cartridge outside the product for more than 30 minutes.
- Gather the following materials:
- Clean, lint-free swabs that will not come apart or leave fibers
- A sheet of paper to place the cartridges on
- Press the Power button (
 ) to turn on the product.
 - Open the cartridge access door. The carriage moves to the access area.Figure : Open the cartridge access door
- Disconnect the power cord from the rear of the product.
- Press the tab on the front of the cartridge in to release it, and then pull up on the cartridge to remove it from the slot.Figure : Remove the cartridge from the slot
- Hold the cartridge by its sides, and then find the electrical contacts on the bottom of the cartridge. The electrical contacts are four small rectangles of copper-colored metal.Figure : Cartridge contacts
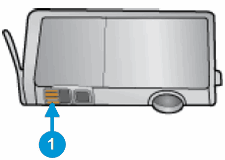
- Cartridge contacts
- Inspect the contacts for ink and debris buildup.
- Wipe the contacts with a swab until no debris remains on them.
CAUTION:
Be careful to wipe only the contacts. Do not smear any ink or debris elsewhere on the cartridge. - Turn the cartridge on its side, and then place it onto the sheet of paper.
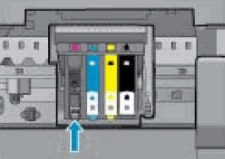
- Locate the electrical contacts in the cartridge slot. The contacts are four copper-colored pins.Figure : Location of the cartridge slot contacts
- Wipe the contacts with a swab until no debris remains on them.
- With the contacts facing down, slide the cartridge into its slot. Press down on the cartridge until it clicks into place.Figure : Insert the cartridge
- Repeat these steps to clean and reinsert any of the other cartridges.
- Close the cartridge access door.Figure : Close the cartridge access door
- Reconnect the power cord to the rear of the product.
- Press the Power button () to turn on the product if it does not turn on automatically.
Solution five: Remove and reinsert the cartridges again
Removing and reinserting the cartridges can help resolve the issue. Repeat the steps that you performed earlier in this document to remove and then reinsert the cartridges identified on the control panel.
Solution six: Clean the cartridge contacts again
Cleaning the cartridge contacts again can help resolve the issue. Repeat the steps that you performed earlier in this document to clean the contacts of the cartridges identified on the control panel.
Solution seven: Restart the printer
- Press the Power button (
 ) to turn on the product.
 - With the product turned on, disconnect the power cord from the rear of the product.
- Unplug the power cord from the wall outlet.
- Wait at least 15 seconds.
- Plug the power cord back into the wall outlet.
- Reconnect the power cord to the rear of the product.
- If the product does not turn on by itself, press the Power button () to turn it on.
Solution eight: Replace the problem cartridge
Even genuine HP ink cartridges can cause error messages. Check the ink cartridge warranty status, and then replace the ink cartridge(s) indicated in the error message.
If you have a defective cartridge or printhead, it might be under warranty. To check the warranty on your ink or toner supplies, go to hp.com/go/learnaboutsupplies, select your country/region, and then review the limited warranty information for your supplies.
Step 2: Replace the problem ink cartridge
Replace the problem ink cartridge.
- Press the Power button to turn on the printer, if it is not already turned on. Wait until the printer is idle and silent before you continue.
- Open the cartridge access door. The carriage moves to the access area.Figure : Open the cartridge access door
- Press the tab on the front of the cartridge inward to release it, and then pull up on the cartridge to remove it from the slot.Figure : Remove the cartridge from the slot
CAUTION:
Do not lift the latch next to the carriage to install the ink cartridges. Doing so can result in incorrectly seated ink cartridges and printing problems. The latch must remain down to install the ink cartridges correctly. - Repeat step 3 until you have removed all of the cartridges from the printer.
- Pull the orange tab to remove the new cartridge from the plastic wrap.Figure : Remove the new cartridge from the plastic wrap

- Twist the orange cap counter clockwise until it snaps off the new cartridge.Figure : Remove the orange cap from the new cartridge
- With the nozzle and contacts facing down, slide the cartridge into its slot. Press down on the cartridge until it is firmly seated.Figure : Insert the cartridge
- Repeat these steps to replace other ink cartridges, if necessary.
- Close the cartridge access door.Figure : Close the cartridge access door
Solution nine: Replace the printhead
If the previous solutions did not resolve the issue, replace the printhead. Note however that printhead replacement is not recommended as a solution for ‘Incompatible Cartridge’ errors that occur with compatible cartridges.
CAUTION:Wait until you have a new printhead available before you remove the printhead and ink cartridges.
If you have a defective cartridge or printhead, it might be under warranty. To check the warranty on your ink or toner supplies, go to hp.com/go/learnaboutsupplies, select your country/region, and then review the limited warranty information for your supplies.
Step 3: Replace the printhead
When you have the replacement printhead, click here for detailed instructions to remove the old printhead and install the new one.
Contacting HP for service in Asia Pacific.
If you completed all the preceding steps and your product still has an issue, you might need further assistance from HP. Go to Contact HP Supportto review available service options.
Click the KUDOS thumb up on the left to say 'Thanks'**
Make it easier for other people to find solutions by marking a Reply 'Accept as Solution' if it solves your problem.
Make it easier for other people to find solutions by marking a Reply 'Accept as Solution' if it solves your problem.
03-28-2018 12:21 PM
HP Recommended
Hi Don351,
We often see this issue with customers that choose to use refilled cartridges with non-HP ink. Non-HP ink can cause damage to your printer as it does not undergo the rigorous quality-control process original HP ink does. If you're looking for money-saving options on original HP ink, check to see if your printer is eligible for HP Instant Ink.
HP Instant Ink is a monthly subscription service from as low as $0/month, where you pay for pages printed instead of cartridges. It does not matter how much ink you use, only pages. Here's a breakdown of each plan:
- $0.00/month for 15 pages/month, $1 for every 10 additional pages printed after 15 (only select printers eligible)
- $2.99/month for 50 pages/month, $1 for every 15 additional pages printed after 50
- $4.99/month for 100 pages/month, $1 for every 20 additional pages printed after 100
- $9.99/month for 300 pages/month, $1 for every 25 additional pages printed after 300
If you sign up, you will immediately be shipped a set of cartridges and receive within 10 days. HP will monitor your ink and ship it to you before you run out. You can also monitor your pages printed with your Instant Ink account page at instantink.com
Hope this helps.
riley-m
I am a HP employee, but I'm speaking for myself and not on behalf of HP
Please click the Kudos Star if my post helped you
Please mark the post that solves your problem as "Accepted Solution"
Please click the Kudos Star if my post helped you
Please mark the post that solves your problem as "Accepted Solution"
03-28-2018 12:23 PM
HP Recommended
Hi Don351,
We often see this issue with customers that choose to use refilled cartridges with non-HP ink. Non-HP ink can cause damage to your printer as it does not undergo the rigorous quality-control process original HP ink does. If you're looking for money-saving options on original HP ink, check to see if your printer is eligible for HP Instant Ink.
HP Instant Ink is a monthly subscription service from as low as $0/month, where you pay for pages printed instead of cartridges. It does not matter how much ink you use, only pages. Here's a breakdown of each plan:
- $0.00/month for 15 pages/month, $1 for every 10 additional pages printed after 15 (only select printers eligible)
- $2.99/month for 50 pages/month, $1 for every 15 additional pages printed after 50
- $4.99/month for 100 pages/month, $1 for every 20 additional pages printed after 100
- $9.99/month for 300 pages/month, $1 for every 25 additional pages printed after 300
If you sign up, you will immediately be shipped a set of cartridges and receive within 10 days. HP will monitor your ink and ship it to you before you run out. You can also monitor your pages printed with your Instant Ink account page at instantink.com
Hope this helps.
riley-m
I am a HP employee, but I'm speaking for myself and not on behalf of HP
Please click the Kudos Star if my post helped you
Please mark the post that solves your problem as "Accepted Solution"
Please click the Kudos Star if my post helped you
Please mark the post that solves your problem as "Accepted Solution"
Be alert for scammers posting fake support phone numbers and/or email addresses on the community.
If you think you have received a fake HP Support message, please report it to us by clicking on "Flag Post".
† The opinions expressed above are the personal opinions of the authors, not of HP. By using this site, you accept the Terms of Use and Rules of Participation.


Didn't find what you were looking for?
Ask the community
† The opinions expressed above are the personal opinions of the authors, not of HP. By using this site, you accept the <a href="https://www8.hp.com/us/en/terms-of-use.html" class="udrlinesmall">Terms of Use</a> and <a href="/t5/custom/page/page-id/hp.rulespage" class="udrlinesmall"> Rules of Participation</a>.