• ×
    Information
    Need Windows 11 help?
    Check documents on compatibility, FAQs, upgrade information and available fixes.
    Windows 11 Support Center.
  • post a message
  • ×
    Information
    Need Windows 11 help?
    Check documents on compatibility, FAQs, upgrade information and available fixes.
    Windows 11 Support Center.
  • post a message
Guidelines
Experiencing 'Printer Blocked' or 'Printer Error' message? Click here for more information.
Check some of the most frequent questions about Instant Ink: HP INSTANT INK, HP+ PLANS: INK AND TONER.


Check out our Black or Color Ink Not Printing, Other Print Quality Issues info about: Print quality and Cartridge Issues.
HP Recommended
Officejet Pro 8500A Plus
Mac OS X 10.7 Lion

After sitting idle for a couple days, I turned on the printer for a job but it entered a continuos “Checking printer......Cleanining printhead” loop that couldn’t be interrupted.  I finally just pulled the plug.  What can I do to fix this?

6 REPLIES 6
HP Recommended

Hi! @Jeffc777, Thank you for visiting the HP Forums! A great place where you can find solutions for your issues with help from the community!


I understand your printer is stuck at checking printer cleaning print head error.


Don't worry I'll try to help you out.


Did you make any changes to your printer?


Try updating the printer firmware and check if it helps.


Update the printer firmware using this link. Click Here


Use the following steps to reset the product. Make sure you connect the product directly to a wall outlet and not a surge protector or power strip.

  1. Press the Power button () to turn on the product.

  2. With the product turned on, disconnect the power cord from the rear of the product.

  3. Unplug the power cord from the wall outlet.

  4. Wait at least 15 seconds.

  5. Plug the power cord back into the wall outlet.

  6. Reconnect the power cord to the rear of the product.

  7. If the product does not turn on by itself, press the Power button () to turn it on.

Also, please try the steps recommended below.


Clean the electrical contacts on the printhead and inside the product

Use the following steps to clean the electrical contacts on the printheads.

  • If the error message indicates that a specific printhead is causing the error, clean only the contacts on that printhead.

  • If the error message indicates that both printheads are causing the error, clean the contacts on both printheads.

   NOTE:

The black/yellow printhead is located in the left printhead slot. The magenta/cyan printhead is located in the right printhead slot.

  1. Press the Power button () to turn on the product, if it is not already on.
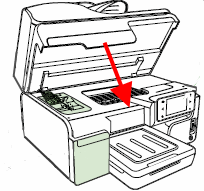
  2. Open the carriage access door.

    Figure : Open the carriage access door

    Illustration of opening the carriage access door
  3. Touch Change Printheads on the product control panel. The carriage moves to the access area on the left side of the product. Wait for the carriage to stop moving.

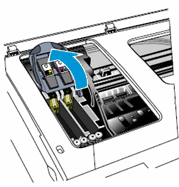
  4. Lift the printhead latch.

    Figure : Lift the printhead latch

    Illustration of lifting the printhead latch.
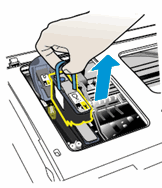
  5. Lift the handle on the printhead, and then use the handle to pull the printhead out of its slot.

       CAUTION:

    The ink nozzles on the printheads might clog if you expose them to air for more than a few minutes. Clean the contacts right after removal to avoid clogging the nozzles.

    Figure : Remove the printhead

    Illustration of removing the printhead
  6. After you have removed the printhead, disconnect the power cord from the back of the product.

  7. Use a dry, soft, lint-free cloth to remove any ink from the electrical contacts on the printhead.

       CAUTION:

    Wipe only the electrical contacts. Wiping the ink nozzles, located on the underside of the printhead, can damage the printhead. Do not touch the nozzles. Doing so permanently damages the ink nozzles, and the ink stains clothing.

    Figure : Electrical contacts and ink nozzles

    1. Electrical contacts

    2. Ink nozzles

  8. Wipe the electrical contacts with the swab until no ink residue remains.

  9. Wipe the electrical contacts with a fresh cloth to dry them and remove lint.

  10. After the electrical contacts on the printhead are clean and dry, place the printhead on a sheet of paper or a paper towel. Make sure that the ink nozzles face up and do not touch the paper.

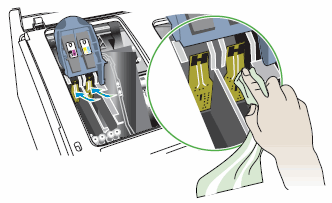
  11. Use a fresh, dry, soft, lint-free cloth to clean the electrical contacts inside the product.

    Figure : Clean the electrical contacts inside the product

    Reach inside the product and clean the electrical contacts with a clean, dry cloth.
  12. Allow at least five minutes for the contacts to dry. Check the contacts for lint or debris, and then dry or clean the contacts again if needed.

       NOTE:

    Leave the carriage access door open until prompted to close it.

  13. Reconnect the power cord to the back of the product.

  14. If the product does not turn on automatically after reconnecting the power cord, press the Power button () to turn on the product.

  15. Insert the printhead into its color-coded slot (the label on the printhead must match the label on the printhead latch). Press down firmly on the printhead to make sure that the electrical contacts touch.

  16. Repeat these steps for the remaining printheads, if necessary.

  17. Pull the printhead latch all the way forward, and then press down to engage the latch.

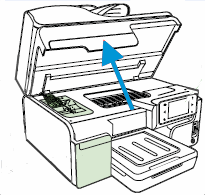
  18. Close the carriage access door. The product initializes the printheads, and then prints an alignment page.

    Figure : Close the carriage access door

    Illustration of closing the carriage access door


Refer this article to further troubleshoot printhead issues on your printer. Click Here


If you still have issues connecting your printer the router try performing a semi full reset on your printer and check if it helps.


Since the steps to perform a semi-full reset on your printer is confidential.


I will send you the steps in a private message. Please watch your inbox for more information.


If the solution provided worked for you, please mark an accepted solution for this post.


Hope this answers your query!

Have a great day! 🙂


Please click “Accept as Solution” if you feel my post solved your issue, it will help others find the solution.

Click the “Kudos, Thumbs Up" on the bottom right to say “Thanks” for helping!

A4Apollo
I am an HP Employee

HP Recommended

Thank you for the reply and information.


The firmware link provided did not take me anywhere.  Still looking for that as I have not been able to proceed on that solution attempt.  Also, I cannot access my printer menu to see what the firmware is - the continuous “Checking printer....Cleaning pronthead loop” locks me out of the menu.


I tried the remaining steps regarding the printhead cleaning to no avail.  Did it several times with hopes it would work,  but the printer just goes right back into the same cycle.  It has done it so many times now it burned through my yellow ink!!!  Now I have to replace that in order to troubleshoot!  Uuuuggghh!  Knew I disliked inkjet for a reason.


Any further ideas are welcome.  Could it be as simple as new printheads, or would that be throwing good money after bad?


Thanks for the help.

HP Recommended

@Jeffc777, Thanks for your quick response and time.


You did a Marvellous job by trying the steps recommended previously.


As you mentioned you have issues performing a semi-full reset on your printer.


Try downloading the firmware again using this link. Click Here


If the issue still persists after updating the firmware it is a hardware issue with your printer.


I will share you few details in a private message. Please watch your inbox for more information.


Have a great day ahead!

Take Care! 🙂


Please click “Accept as Solution” if you feel my post solved your issue, it will help others find the solution.

Click the “Kudos, Thumbs Up" on the bottom right to say “Thanks” for helping!

A4Apollo
I am an HP Employee

HP Recommended

I downloaded the new firmware version but cannot get it to update.  The printer is on and my computer can see it, but the firmware updater does not.


Current version is LRP1FN1621DR.  The printer actually printed a diagnostics page when I set it up recently, and surprisingly another one mid "cycle" unexpectedly.  It also printed two pages of printhead alignment, then immediately went back into the endless "cycle" and ran my cyan ink dry!  Now I have two empty inks!


What to do?

HP Recommended

@Jeffc777, I appriciate your efforts for writing back to us.


As you mentioned you have issues updating the printer firmware.


It certainly looks be a hardware issue with your printer. And there is nothing much we can do in forums.


Please use the options I have shared you in the private message for further assistance.


Have a pleasant day ahead!

Take Care! 🙂


Please click “Accept as Solution” if you feel my post solved your issue, it will help others find the solution.

Click the “Kudos, Thumbs Up" on the bottom right to say “Thanks” for helping!


A4Apollo
I am an HP Employee

HP Recommended

Thank you for the guidance.

† The opinions expressed above are the personal opinions of the authors, not of HP. By using this site, you accept the <a href="https://www8.hp.com/us/en/terms-of-use.html" class="udrlinesmall">Terms of Use</a> and <a href="/t5/custom/page/page-id/hp.rulespage" class="udrlinesmall"> Rules of Participation</a>.