• ×
    Information
    Need Windows 11 help?
    Check documents on compatibility, FAQs, upgrade information and available fixes.
    Windows 11 Support Center.
  • post a message
  • ×
    Information
    Need Windows 11 help?
    Check documents on compatibility, FAQs, upgrade information and available fixes.
    Windows 11 Support Center.
  • post a message
Guidelines
Experiencing 'Printer Blocked' or 'Printer Error' message? Click here for more information.
Check some of the most frequent questions about Instant Ink: HP INSTANT INK, HP+ PLANS: INK AND TONER.


Check out our Black or Color Ink Not Printing, Other Print Quality Issues info about: Print quality and Cartridge Issues.
HP Recommended
HP OfficeJet 8600 e all-in-one

My blue went empty, and when I replaced it with a new ink cartridge, the printer failure message came up.  It does not allow me to go into the main menu or do any functionality with the menu screen.  However, when I put the empty blue ink cartridge back in, it will tell me it's empty again and allow me to have the main menu functions with NO printer failure message!  EVERY time I put in a new ink cartridge, it returns to printer failure.  I have even put in all new cartridges (new yellow, magenta, cyan AND black), and when I do, the power failure message comes up again!

3 REPLIES 3
HP Recommended

@JSilvaDC


Welcome to HP support community.


Update the printer firmware

  1. From the home screen on the printer control panel, touch the ePrint icon ().

  2. Wait for the printer to connect to the ePrint server. The ePrint status displays.

  3. Touch Settings on the bottom left corner of the screen.

  4. Touch Printer Update, and then touch Check for Update Now.

 Remove and reinsert the printhead for three times

Step 1: Remove the printhead

Open the ink cartridge access door, disconnect the power cord from the rear of the printer, and then remove the printhead.

  1. Press the Power button to turn on the printer, if it is not already on. Wait until the warm-up period finishes and your printer is idle and silent before you proceed.

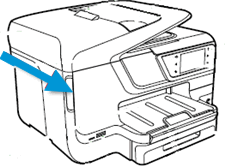
  2. Place your fingers into the slot on the left side of the printer, and then pull to open the cartridge access door. Allow the carriage to move to the cartridge access area, and the carriage stops moving.

    Figure : The slot on the side of the printer

    Image: The slot on the side of the printer.
  3. Disconnect the power cord from the rear of the printer. Unplugging the printer prevents the carriage from moving.

       WARNING: 

    You must disconnect the power cord before reaching inside the printer to avoid risk of injuries or electric shock.

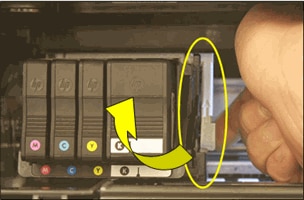
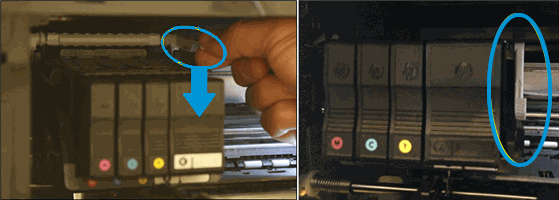
  4. Lift the carriage latch.

    Figure : Lift the carriage latch

    Image: Lift the carriage latch.
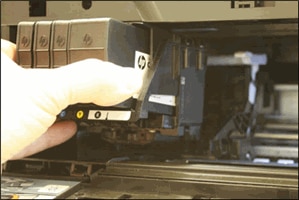
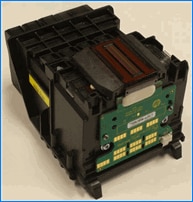
  5. Grasp the sides of the printhead, gently lift and remove the printhead from the carriage.

    NOTE: 

    Do not remove the cartridges from the printhead. You can safely remove the printhead with all of the cartridges inserted.

    Figure : Remove the printhead

    Image: Remove the printhead.
       CAUTION: 

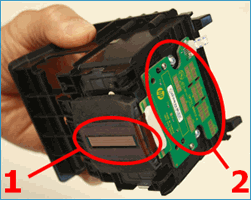
    The nozzle area on the bottom of the printhead is fragile! Make sure that the bottom of the printhead does not bump or rub on the printer. Do not touch the nozzles or electrical contacts. Touching these areas can cause electrical failures or print quality problems.

    Figure : Nozzles and electrical contacts

    1.  

      Image: Nozzles and electrical contacts

      Nozzles


    2. Electrical contacts

  6. Place the printhead assembly (with the cartridges still installed) upside down on a clean sheet of paper.

       CAUTION: 

    Do not leave the printhead assembly outside of the printer for an extended period. Doing so can result in damage to the printhead or the printer.

    Figure : Printhead upside down on a clean sheet of paper

    Image: Printhead upside down on a clean sheet of paper.

Step 2: Inspect the carriage path inside the printer

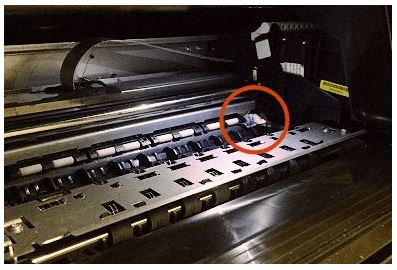
Inside the printer, look for and remove any obstructions from the printhead compartment. If necessary, use a flashlight to thoroughly check for any obstructions.

Figure : Check for paper jammed in the carriage path

Image: Check for paper jammed in the carriage path

Step 3: Reinsert the printhead, and then lower the carriage latch

After checking the carriage path for jammed paper, reinsert the printhead into the carriage, and then lower the carriage latch.

  1. Grasp the sides of the printhead and turn it right side up with the nozzles facing down and the electrical contacts facing away from you.

  2. On the front of the printer, insert the printhead into the carriage, ensuring that the electrical contacts face the inside of the printer. As you guide the printhead into the carriage, it lowers into the carriage as it seats.

       CAUTION: 

    The nozzle area on the bottom of the printhead is fragile! Make sure that the bottom of the printhead does not bump or rub on the printer. Do not touch the nozzles or electrical contacts. Touching these areas can cause electrical failures or print quality problems.

    Figure : Insert the printhead

    Image: Insert the printhead.
  3. Gently rock the printhead to the left and right to make sure that the printhead fully seats in the carriage.

  4. Carefully lower the carriage latch to secure the printhead.

    Figure : Lower the carriage latch

    Image: Lower the carriage latch.
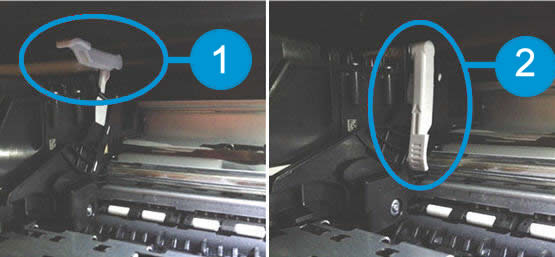
  5. Verify that the carriage latch is down.

    Figure : Carriage latch positions

    1. Image: Carriage latch positions.


      Carriage latch is up


    2. Carriage latch is down

  6. Close the cartridge access door.

  7. Reconnect the power cord to the rear of the printer.

  8. If the printer does not turn on by itself, press the Power button to turn it on.

You can refer this HP document for more assistance:- Click here


Let me know how it goes.

To thank me for my efforts to help you, please mark my post as an accepted solution so that it benefits several others.

Cheers.

Sandytechy20
I am an HP Employee

HP Recommended

Thanks for replying, Sandy.  I had already gone through all of what you suggested, as those instructions and details were on the HP site.  However, none of them worked.  I went to Best Buy to see the Geek Squad today - and they were 100% unhelpful. While I was deciding if I should pay them $200 to see if there was a resolve/repair they could do to the printer (NOT!),  I thought to call up HP directly.  I ended up explaining my situation just as I have here, and I was informed that the printhead was faulty and for whatever reason was no longer identifying ink cartridges (remember I had put in brand new ones and that's' when the "printer failure" messages would come up.  While I was there, I had a GREAT convo with an HP agent, who ended up helping me to decide upon a new printer (I'm getting a OfficeJet 5255, AND got me a GREAT deal on a 2-yr extended warranty.  I am also considering signing up for the instant ink promotion, which at this time would give me 7 months of FREE ink!  So, all in all - my loving 8600 went to Printer Heaven (I ended up leaving it at Best Buy as they recycle it and offer a coupon towards an Epson printer (I'll see if I can find anyone who might wanna use it), and I ended up having a very nice customer service experience from that HP agent. 

HP Recommended

@JSilvaDC


Good to know you got a new printer.

Feel free to contact us in the future if you need any assistance.


To thank me for my efforts to help you, please mark my post as an accepted solution so that it benefits several others.

Cheers.

Sandytechy20
I am an HP Employee

† The opinions expressed above are the personal opinions of the authors, not of HP. By using this site, you accept the <a href="https://www8.hp.com/us/en/terms-of-use.html" class="udrlinesmall">Terms of Use</a> and <a href="/t5/custom/page/page-id/hp.rulespage" class="udrlinesmall"> Rules of Participation</a>.