• ×
    Information
    Need Windows 11 help?
    Check documents on compatibility, FAQs, upgrade information and available fixes.
    Windows 11 Support Center.
  • post a message
  • ×
    Information
    Need Windows 11 help?
    Check documents on compatibility, FAQs, upgrade information and available fixes.
    Windows 11 Support Center.
  • post a message
Guidelines
Here is the solution for Blue screen error 83C0000B on HP OfficeJet Pro 8010e, 9020e Printer Series: Click here to view.
Check some of the most frequent questions about Instant Ink: HP INSTANT INK, HP+ PLANS: INK AND TONER.


Check out our Black or Color Ink Not Printing, Other Print Quality Issues info about: Print quality and Cartridge Issues.
HP Recommended
HP Officejet 5740 Series
Microsoft Windows XP (64-bit)

I have a new Inspiron 2-in-1 and installed the latest driver and it seems to recognize my printer (no error codes) but when I go to print anything, including a test page, nothing happens.  I rebooted both the printer and the PC but there's no file in the print queue and only a message that says the page could not be printed. I tried using the HP Print/Scan Doctor but it froze when I told it the test page did not print.


Any help/suggestions would be appreciated

3 REPLIES 3
HP Recommended

Hey there! @Dilbert54, Thanks for stopping by the HP Support Community!


Are you able to print from other devices?


Have you replaced the router recently?


Have you tried printing from a different application does the issue persist?


Is the printer connected by a wired or a wireless connection?


Are you able to make a copy from the printer directly?


Are the printer and computer connected to the same wireless network?


Try the steps recommended below.


Restart computer, router and printer together to connect them back to the network.


Uninstall the printer software from the root level on your PC and install the full feature printer software. (Windows Only)


In Windows, search for and open Programs and Features. 
Select your HP printer. 
Select Uninstall. 
In Windows, search for and open Devices and Printers. 
In the Devices and Printers window look for your HP Printer. If you see it listed, right-click on it and choose "Delete" or "Remove Device.” 
Open up the run command with the "Windows Key + R" key combo. 
Type printui.exe /s and click OK. 
Click on Drivers tab. 
Look for HP Printer driver. If you see it click on it and click remove at the bottom. 
Select OK. 
Select Apply and OK on the Print Server Properties windows. 
Close Devices and Printers. 
 

Update the full feature printer software using this link. Click Here


Also, I'd suggest you assign a manual IP address and also disable the IPv6 on the printer. Here are the steps:


•    Obtain the IP address of the printer – You can touch the “wireless” icon on the printer control panel to get the IP address.
•    Type the IP address on your web browser to obtain the printer EWS page on your computer.
•    Go to "Network" tab - General - Select "Network protocols" - Select "Enable IPv4 only" (or similar) - Apply the settings.
•    Go to the “Network” tab – Click on “Wireless (802.11) – Then click on “Network address (IPv4)
•    Click on the radio button which says “Manual IP” and then click “Suggest a manual IP address” to give a manual IP address to your printer.
•    Click on radio button which says “Manual DNS Server” and under manual preferred type 8.8.8.8 and under manual alternate type 8.8.4.4 (This is Google DNS server address)


Lastly, if nothing works try restoring the printer network settings to default and connect the printer back to the network again.


Access the Wireless Setup Wizard through the printer control panel to establish a wireless connection between your printer and network.

  1. From the home screen of your printer control panel, touch the Wireless icon .

  2. Touch the Setup icon .

  3. Touch Restore Network Defaults or Restore Network Settings, and then touch Yes to confirm your selection.

  4. After the default network settings are restored, touch the back arrow, touch Wireless Settings, and then touch Wireless Setup Wizard.

    The printer searches for available networks.

  5. Touch the name of your wireless network.

  6. If your wireless network does not display in the list of wireless networks, touch Enter New Network Name, and then type the name of your wireless network.

    NOTE: 

    Type the exact network name, including any uppercase and lowercase letters.

  7. Type the WEP or WPA key (network password), and then touch Done.


Let me know if this helps!

Have a great day ahead! 🙂


Please click “Accept as Solution” if you feel my post solved your issue, it will help others find the solution.

Click the “Kudos, Thumbs Up" on the bottom right to say “Thanks” for helping!

A4Apollo
I am an HP Employee

HP Recommended

Hi A4Apollo and thanks for the reply.  I was able to print from all other devices, no new router, did not print from any other applications, on a wireless network, can make a copy from the printer and all devices are on the same network.

Spent an hour on the phone with a Dell tech and he was unable to help.  Got transferred to their software support but they wouldn't help without me paying them $200 first.

We tried many of the items you listed below including removing/readding the device, using the manual IP address, reinstalling the driver.  Did not try the last solution but decided to return the device.


Thanks for the response though.

HP Recommended

@Dilbert54,


Thanks for the update. And as you have decided to return the product.


However, before you return the product you can try this one last step and check if it helps.


Remove the printer from the control panel and add a TCP/IP port.


  1. Select “Start” and type “printers” in the search box.
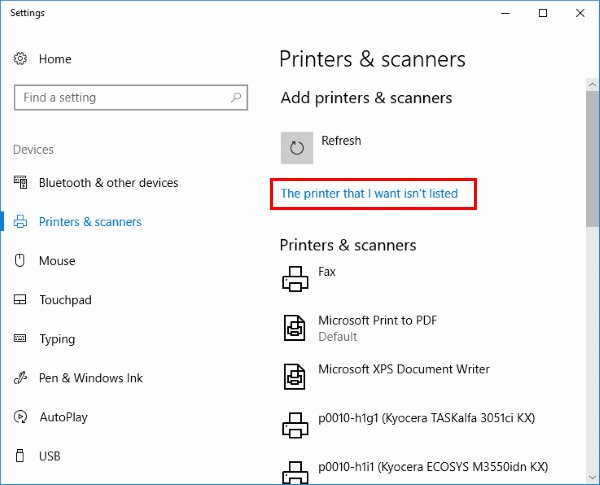
  2. Choose “Printers & scanners“.
  3. Select “Add a printer or scanner“.
  4. Wait for the “The printer that I want isn’t listed” option to appear, then select it.
  5. Select “Add a printer using a TCP/IP address or hostname” , then select “Next“.
  6. Select “TCP/IP Device” in the “Device type” list.
    Windows 7 - Adding printer by IP address
  7. Type the hostname or the IP address of the printer. Select “Next“.
  8. Windows should find the printer if the printer is on and configured correctly. You may have to specify more information. If prompted, Select the type of network adapter installed in the printer in the “Device Type” drop-down list. You can also click “Custom” to specify custom settings for the network printer. Select “Next“.


If you have any queries in future related to any HP products, you can always reach out to us.


We will try our best to help you out.


Take care,
Have a great day! 🙂


Please click “Accept as Solution” if you feel my post solved your issue, it will help others find the solution.

Click the “Kudos, Thumbs Up" on the bottom right to say “Thanks” for helping!


A4Apollo
I am an HP Employee

† The opinions expressed above are the personal opinions of the authors, not of HP. By using this site, you accept the <a href="https://www8.hp.com/us/en/terms-of-use.html" class="udrlinesmall">Terms of Use</a> and <a href="/t5/custom/page/page-id/hp.rulespage" class="udrlinesmall"> Rules of Participation</a>.