• ×
    Information
    Need Windows 11 help?
    Check documents on compatibility, FAQs, upgrade information and available fixes.
    Windows 11 Support Center.
  • post a message
  • ×
    Information
    Need Windows 11 help?
    Check documents on compatibility, FAQs, upgrade information and available fixes.
    Windows 11 Support Center.
  • post a message
Guidelines
Here is the solution for Blue screen error 83C0000B on HP OfficeJet Pro 8010e, 9020e Printer Series: Click here to view.
Check some of the most frequent questions about Instant Ink: HP INSTANT INK, HP+ PLANS: INK AND TONER.


Check out our Black or Color Ink Not Printing, Other Print Quality Issues info about: Print quality and Cartridge Issues.
HP Recommended

HP OffficeJet Pro 6968 useless so is the support..     spent two days with sharing the screen on the new HP Pavillion computer to remove the printer and then set it up again. Did not help the screen is locked on the front. Never did print to my email would not accept my email    HP Scan DR useless HP smart print useless    ALL the troubleshooting around the globe Useless    four days of phone time trying to get help .with a printer less than 6 months old USELESS   still having to call  .i even called the CEO

office ......STILL ISSUES 


1 REPLY 1
HP Recommended

@kacssk

Welcome to HP Forums, 

This is a great place to get support, find answers and tips to your technical queries.


To provide you with an accurate solution, I'll need a few more details:

Are you using genuine HP Ink cartridge?

Any hardware changes made in the printer?


If your error message does not include an error code, reset the printer, update the firmware, and check the ink cartridges for leaks.

Step 1: Use genuine HP ink cartridges

If your ink cartridges are not compatible with your printer, it might cause an error message.

HP recommends that you use genuine HP ink or toner supplies. HP cannot guarantee the quality or reliability of non-HP or refilled cartridges. If you do not use genuine HP cartridges, the steps in this document might not resolve the issue. To check the authenticity of your cartridges, go to hp.com/go/anticounterfeit.

Purchase replacement cartridges and other supplies from the HP Store or local retailers.

If the issue persists, continue to the next step.

Step 2: Reset the printer

  1. Turn the printer on, if it is not already on.

  2. Wait until the printer is idle and silent before you continue.

  3. With the printer turned on, disconnect the power cord from the rear of the printer.

  4. Unplug the power cord from the wall outlet.

  5. Wait at least 60 seconds.

  6. Plug the power cord back into the wall outlet.

    NOTE: 

    HP recommends connecting the printer power cord directly to the wall outlet.

  7. Reconnect the power cord to the rear of the printer.

  8. Turn on the printer, if it does not automatically turn on.

  9. Wait until the printer is idle and silent before you proceed.

Try to print. If the issue persists, continue to the next step.

Step 3: Update the printer firmware

HP regularly releases new printer firmware versions with product enhancements or issue fixes. Updating to the current firmware version can often resolve issues.

NOTE: 

The printer must be connected to the Internet and have Web Services enabled to update the firmware from the printer control panel.

  1. Touch the HP ePrint icon .

  2. Touch Settings, and then touch Product Update.

  3. If you are prompted to sign up or accept terms of service, follow any on-screen instructions to enable Web Services and setup automatic updates. This procedure sets up the printer's Internet connection so it can receive updates.

  4. If the printer does not automatically start the update process, touch Check for Updates to start the update.

Try to print. If the issue persists, continue to the next step.

Step 4: Check the ink cartridges for leaks

If you have a defective cartridge or printhead, it might be under warranty. To check the warranty on your ink or toner supplies, go to hp.com/go/learnaboutsupplies, and then review the limited warranty information for your supplies.

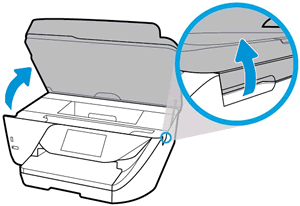
  1. Slip your fingers into the slot on the left side of the printer, and then lift to open the ink cartridge access door.

    The carriage moves to the left side of the printer.

    NOTE: 

    If the scanner lid is open, the ink cartridge access door does not open.

    Figure : Opening the ink cartridge access door

    Open the cartridge access door
  2. Wait until the carriage is idle and silent before you proceed.

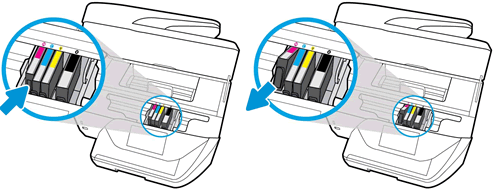
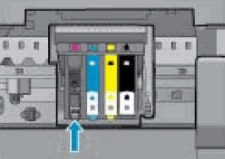
  3. Press the tab inward on the front of the ink cartridge to release it, and then pull up on the ink cartridge to remove it from the slot.

    Figure : Removing the ink cartridge

    Pushing the ink cartridge inward and then pulling up to remove it
  4. Check the ink cartridge for leaking ink. Be careful not to get ink on your skin or clothing.

    • If the ink cartridge is leaking, do not continue troubleshooting. Replace the cartridge.

    • If the ink cartridge is not are leaking, continue to the next step.

  5. Turn the ink cartridge so that the cartridge contacts face downward, and then match the label color with the color dot on the carriage.

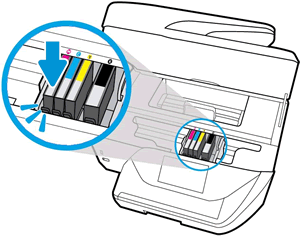
  6. Slide the ink cartridge into its slot, and then gently press the ink cartridge down until it snaps into place.

    Figure : Installing the ink cartridge

    Reinserting the ink cartridge
  7. Repeat these steps to check for leaking on each of the ink cartridges.

  8. Replace any other leaking ink cartridges, and then close the ink cartridge access door.

Try to print. If the issue persists, continue to the next step.

Step 5: Clean the ink cartridge vents and contacts

Cleaning the ink cartridge contacts and vents, and then reinstalling the ink cartridges one at a time can help determine if a specific ink cartridge is causing the error message.

  1. Gather the following materials:

    • A pin to clean any clogged vents

    • A clean, lint-free cloth

    • A clean, dry cotton swab

    • Distilled or bottled water

         CAUTION: 

      Do not use tap water because it might contain contaminants that can damage the printhead.

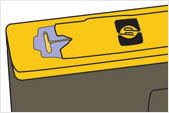
  2. Examine the vent area located on top of the ink cartridge, next to the HP logo.

    Figure : Example of the vent area

    Example of the venta area.
  3. If any of the ink cartridges have clogged vents, use a pin to clean the vents.

    Figure : Example of a clogged vent

    Example of a clogged vent.

    Figure : Example of a clean vent

    Example of a clean vent.
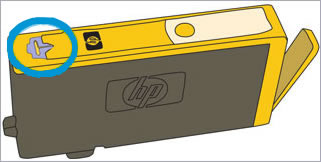
  4. Use a fresh, lightly dampened, lint-free cloth to wipe any accumulated ink and debris on the copper-colored contact on the ink cartridge.

       CAUTION: 

    Be careful to wipe only the ink cartridge contacts. Do not smear any ink or debris elsewhere on the ink cartridge.

    Figure : Example of the contacts on the ink cartridge

    1. Ink cartridge contacts

  5. Wipe the contact with a dry, lint-free cloth before proceeding to the next step.

  6. Repeat the steps to clean each ink cartridge contact.

  7. Use a fresh, lightly dampened, lint-free swab to wipe any accumulated ink and debris on the copper-colored contact on the printhead.

    Figure : Example of the copper-colored contact on the printhead

    Example of the copper-colored contacts on the printhead
  8. Wipe the contact with a dry, lint-free swab before you proceed to the next step.

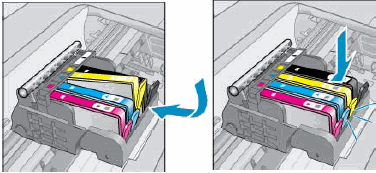
  9. Carefully reinsert each of the ink cartridges into its slot, and then push the ink cartridge down and forward until it snaps into place.

    Make sure each colored dot on the ink cartridge label matches the colored dot on the carriage.

    Figure : Snapping the ink cartridge into place

    Image: Snapping the ink cartridge into place
  10. Run your finger along the top of the ink cartridges to make sure none of them protrude.

    If any ink cartridges protrude, press down firmly until each ink cartridge snaps into place.

  11. Close the ink cartridge access door.

  12. Check the printer control panel display for the error message.

    If the message is to Replace the, or Ink Cartridge, remove the specified ink cartridge(s) and clean the copper-colored contact again, and then reinsert the ink cartridge(s).

Try to print.


Keep me posted, how it goes!

If the information I've provided was helpful, give us some reinforcement by clicking the Accepted Solution and Kudos buttons, that'll help us and others see that we've got the answers!

Have a great day!

Cheers:)

Raj1788
I am an HP Employee 

† The opinions expressed above are the personal opinions of the authors, not of HP. By using this site, you accept the <a href="https://www8.hp.com/us/en/terms-of-use.html" class="udrlinesmall">Terms of Use</a> and <a href="/t5/custom/page/page-id/hp.rulespage" class="udrlinesmall"> Rules of Participation</a>.