• ×
    Information
    Need Windows 11 help?
    Check documents on compatibility, FAQs, upgrade information and available fixes.
    Windows 11 Support Center.
  • post a message
  • ×
    Information
    Need Windows 11 help?
    Check documents on compatibility, FAQs, upgrade information and available fixes.
    Windows 11 Support Center.
  • post a message
Guidelines
Here is the solution for Blue screen error 83C0000B on HP OfficeJet Pro 8010e, 9020e Printer Series: Click here to view.
Check some of the most frequent questions about Instant Ink: HP INSTANT INK, HP+ PLANS: INK AND TONER.


Check out our Black or Color Ink Not Printing, Other Print Quality Issues info about: Print quality and Cartridge Issues.
HP Recommended
Microsoft Windows 10 (64-bit)

After using my HP ENVOY 5055 for several months I encountered a problem. The printer cuts the top of the document and skews the whole to the right as in the attached image.I scanned it with Hp Print and Scan Doctor but did not help. Any suggestion, please?
https://i.imgur.com/GMpl5l0.jpg


3 REPLIES 3
HP Recommended

@John472


Welcome to the HP Support Community.


Does this happen while copying too?


Clean the paper rollers underneath the printer.

  1. Turn off the printer, and then disconnect any cords connected to the printer, such as the power cord and USB cable.

  2. Turn the printer on its side to access its underside (base).

       CAUTION: 

    Before turning the printer, use your hands to secure the scanner lid.

  3. While supporting the printer with one hand, pull the paper tray open to expose the paper rollers underneath the printer.

    Figure : Rollers underneath the printer

    Rollers underneath the printer
  4. Lightly dampen a lint-free cloth with distilled water, and then squeeze any excess liquid from the cloth.

  5. Press the cloth against the rollers inside the printer, and then rotate the rollers upwards with your fingers. Apply a moderate amount of pressure to remove any dust or dirt buildup.

  6. Allow the rollers to dry completely (approximately 10 minutes).

  7. Close the paper tray, and then set the printer upright.

  8. Reconnect the power cord and any other cables to the rear of the printer, and then turn on the printer.

Try to print. If the error persists, continue to the next step.

Step 3: Clean the paper rollers inside the ink cartridge access area

Clean the paper rollers inside the ink cartridge access area.

  1. Turn off the printer, and then disconnect the power cord.

       WARNING: 

    To avoid risk of injuries or electric shock, disconnect the power cord before reaching inside the printer.

  2. Push in the output tray, if necessary.

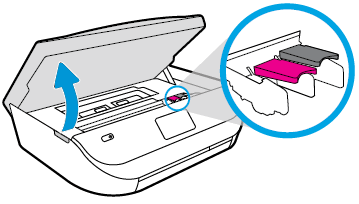
  3. Gently grasp the handles on either side of the printer, and then raise the ink cartridge access door until it locks into place.

    Figure : Opening the ink cartridge access door

    Opening the ink cartridge access door.
  4. Lightly dampen a lint-free cloth with distilled water, and then squeeze any excess liquid from the cloth.

  5. Press the cloth against the rollers inside the printer, and then rotate the rollers upwards with your fingers. Apply a moderate amount of pressure to remove any dust or dirt buildup.

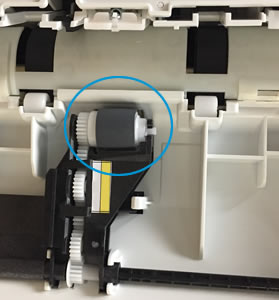
    Figure : Rollers in the ink cartridge access area

    Rollers in the ink cartridge access area
  6. Allow the rollers to dry (approximately 10 or 15 minutes).

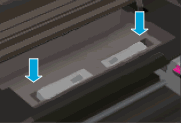
  7. Locate the paper path cover in the area behind the ink cartridge access area.

    Figure : Example of the paper path cover

    Example of the paper path cover.
  8. To remove the paper path cover, pinch the tabs together, and then lift up.

    Figure : Removing the paper path cover

    1. Pinch the tabs together

    2. Lift up

  9. Lightly dampen a lint-free cloth with distilled water, and then squeeze any excess liquid from the cloth.

  10. Press the cloth against the rollers, and then rotate them upward with your fingers. Apply a moderate amount of pressure to remove any dust or dirt buildup.

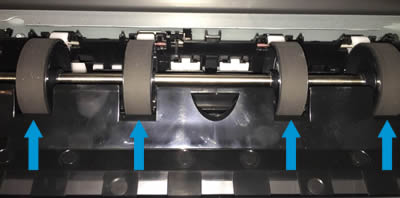
    Figure : Rollers behind the ink cartridges

    Rollers behind  the ink cartridges
  11. Allow the rollers to dry (approximately 10 or 15 minutes).

  12. Replace the paper path cover.

    Figure : Replacing the paper path cover

    Replacing the paper path cover.
  13. Close the ink cartridge access door.

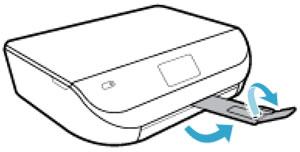
  14. Pull out the output tray, and then lift the output tray extender.

    Figure : Pulling out the output tray and lifting the output tray extender

    Pulling out the output tray and lifting the output tray extender
  15. Reconnect the power cord and any other cables to the rear of the printer, and then turn on the printer.

Try to print. 


Let's try to reset the Printer here as it helps in removing any stored static electricity from the Printer which might be causing these issues.

  1. Turn the printer on, if it is not already on.
  2. Wait until the printer is idle and silent before you continue.
  3. With the printer turned on, disconnect the power cord from the rear of the printer.
  4. Unplug the power cord from the wall outlet.
  5. Wait at least 60 seconds.
  6. Plug the power cord back into the wall outlet.
  7. NOTE: HP recommends connecting the printer power cord directly to the wall outlet.
  8. Reconnect the power cord to the rear of the printer.
  9. Turn on the printer, if it does not automatically turn on.
  10. Wait until the printer is idle and silent before you proceed.

Also, try connecting the Printer to a different wall outlet directly.


Let me know if this helps.


If the information I've provided was helpful, give us some reinforcement by clicking the Accepted Solution and Kudos buttons, that'll help us and others see that we've got the answers!


Thanks!

Have a great day!


I am an HP Employee

HP Recommended

Thank you for your response Betty0610.Yes. It also occurs when copying.
I followed your instruction step by step. Unfortunately, the problem still exists. The printer is still under warranty so I will report it this to HP Customer Support. Thanks for your help.

Regards.

HP Recommended

@John472


You're most welcome. Yes, it does look like a Hardware issue. Do get back to us in future for further assistance.


Have a nice day!:)


I am an HP Employee

† The opinions expressed above are the personal opinions of the authors, not of HP. By using this site, you accept the <a href="https://www8.hp.com/us/en/terms-of-use.html" class="udrlinesmall">Terms of Use</a> and <a href="/t5/custom/page/page-id/hp.rulespage" class="udrlinesmall"> Rules of Participation</a>.