-
×InformationNeed Windows 11 help?Check documents on compatibility, FAQs, upgrade information and available fixes.
Windows 11 Support Center. -
-
×InformationNeed Windows 11 help?Check documents on compatibility, FAQs, upgrade information and available fixes.
Windows 11 Support Center. -
- HP Community
- Printers
- Printing Errors or Lights & Stuck Print Jobs
- Re: clean printer heads\clog ink port

Create an account on the HP Community to personalize your profile and ask a question
Your account also allows you to connect with HP support faster, access a personal dashboard to manage all of your devices in one place, view warranty information, case status and more.
Check some of the most frequent questions about Instant Ink: HP INSTANT INK, HP+ PLANS: INK AND TONER.
Check out our Black or Color Ink Not Printing, Other Print Quality Issues info about: Print quality and Cartridge Issues.

It has been a while since anyone has replied. Simply ask a new question if you would like to start the discussion again.
02-26-2017 04:42 PM
 HP Recommended
Product: Example: HP deskjet F300
I really hope someone out there can help me this time, I ask for help a few times & I haven't had any luck so far. Yes, I been all over your site, uTube & the internet looking. the thing is I know it works, becaues it prints out the alignment page & will also print out anything off my computer, but will not print when I go to put something in to copy. Why it will not print a copy, becaues nothing I do to reset the copier will get rid of the "E" blinking in the " amount of pages" you want to print will go away. I have tried every thing out there on the subject & they are brand new ink cartridge, both of them. I can't find anything about my model (Deskjet F 300) on cleaning the internal "printer heads or how to unclog ink ports. Please someone help me, I spent over $50 on new ink cartridge and I sure can't afford a new printer. So I'm going to say THANK YOU hoping, no knowing some one out there will be able to help me. Like they say, 3 time a charm. Sincerly, Eilene
Solved! Go to Solution.
1 ACCEPTED SOLUTION
Accepted Solutions
02-26-2017 07:26 PM
HP Recommended
The troubleshooting steps in the document here may help resolve the error on your Deskjet f300 printer. Are there any other lights or blinking lights on the printer? Is so which lights and what blink pattern?
Bob Headrick, HP Expert
I am not an employee of HP, I am a volunteer posting here on my own time.
If your problem is solved please click the "Accept as Solution" button
If my answer was helpful please click "Yes" to the "Was this post helpful" question.
4 REPLIES 4
02-26-2017 07:26 PM
HP Recommended
The troubleshooting steps in the document here may help resolve the error on your Deskjet f300 printer. Are there any other lights or blinking lights on the printer? Is so which lights and what blink pattern?
Bob Headrick, HP Expert
I am not an employee of HP, I am a volunteer posting here on my own time.
If your problem is solved please click the "Accept as Solution" button
If my answer was helpful please click "Yes" to the "Was this post helpful" question.
03-01-2017 05:57 PM
HP Recommended
The following section of the document is the one you will want:
Issue: The Print Cartridge light is blinking
In this error condition, the following control panel blinking lights pattern displays:
- Power light: On
- Paper light: Off
- Print Cartridge light: Blinking
- Plain Paper Type light: Off
- Photo Paper Type light: Off
NOTE:In addition to the blinking light, an "E" might appear in the Copies area.
Figure : The Print Cartridge light blinks
- CauseThe cause of this blinking light pattern is one of the following conditions:
- The cartridge access door is open.
- The cartridges are not installed, not seated fully, or the protective tape is still on the cartridges.
- A cartridge is defective or low on ink.
Solutions Important: You must follow these solutions in the order presented to resolve the issue.
Important: You must follow these solutions in the order presented to resolve the issue.Solution one: Close the cartridge access door securely
If the cartridge access door is open even slightly, the print cartridge light will blink. Follow these steps in the order given to close the cartridge access door securely.
Step one: Close the cartridge access door
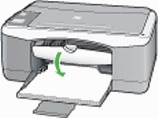
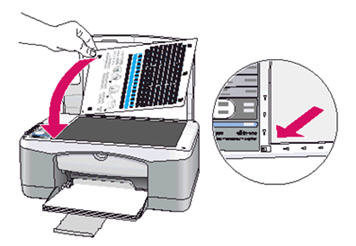
- Open the cartridge access door. The carriage moves to the center of the product.Figure : Open the cartridge access door
- Check inside the product to make sure that there are no obstructions that are preventing the cartridge access door from closing securely.
- Remove any obstructions you find.
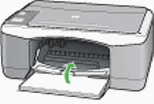
- Close the cartridge access door. Make sure that it closes completely.Figure : Close the cartridge access door
Step two: Print a self-test page
- Press and hold the Cancel button (
 ), and then press the Start Copy Color button (
 ).
). - Release both buttons at the same time. The self-test report prints.
- If these steps resolved the issue, and the test page prints, there is no need to continue troubleshooting.
- If the issue persists, continue with the next solution.
- If the test page does not print, continue with the next solution.
Solution two: Make sure that the cartridges are installed
Follow these steps to make sure that the cartridges are installed in the product.
Step one: Check the carriage
- Open the cartridge access door. The carriage moves to the center of the product.Figure : Open the cartridge access door
- Wait until the carriage is idle and silent.
- Check the cartridge slots in the carriage to make sure that the cartridges are installed.
- If the cartridges are installed, skip to the solution for removing and then reinstalling the cartridges.
- If the cartridges are not installed, continue to the next step.
Step two: Install the cartridges
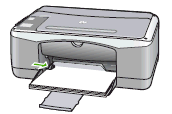
- Slide the paper width guide to its outermost position.Figure : Move the paper width guides outward
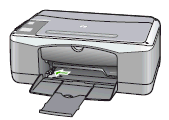
- Load U.S. letter or A4, unused, plain white paper into the paper tray. Push the paper forward until it stops.Figure : Insert paper into the product

NOTE:
Do not overload the paper tray. Make sure that the stack of paper fits within the paper tray and is no higher than the top of the paper width guide. - Slide the paper width guide inward until it stops at the edge of the paper. Do not push the guide in so tightly that it binds against the paper.Figure : Adjust the paper width guide inward
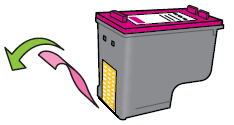
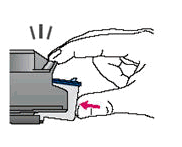
- Remove the new cartridge from its packaging.Figure : Unpack the new cartridge

- Remove the pink pull tab covering the nozzles.Figure : Remove the pull tab
CAUTION:
Do not touch the cartridge contacts or nozzles.Figure : Do not touch the nozzles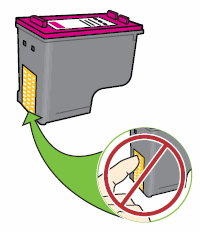
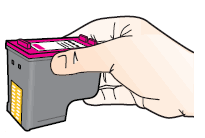
- Hold the cartridge by its sides.Figure : Hold the cartridge by its sides
- Slide the cartridge into its designated slot at a slightly upward angle. The black parallelogram icon (
 ) designates the slot for the black cartridge, and the magenta half circle icon (
 ) designates the slot for the color cartridge.
 - Press the cartridge inward to snap it into place.Figure : Press the cartridge into place
- Repeat these steps to insert the other cartridge into its designated slot.
- Close the cartridge access door.
- Wait while the product prints an alignment page.
- Load the alignment page face down on the left front corner of the scanner glass with the top of the page to the left.Figure : Load the alignment page on the scanner glass
- Lower the scanner lid, and then press the Scan button (
 to complete the alignment.
 - Discard or recycle the alignment page.
- If these steps resolved the issue, you do not need to continue troubleshooting.
- If the issue persists, continue to the next solution.
Solution three: Remove and then reinstall the cartridges
Follow these steps in the order given to remove and then reinstall the cartridges.
Step one: Remove the cartridges
- Press the Power button (
 ) to turn on the product.
 - Open the cartridge access door. The carriage moves to the center of the product.Figure : Open the cartridge access door
- Wait until the carriage is idle and silent.
- Lightly press down on a cartridge to release it, and then pull the cartridge toward you out of its slot.Figure : Press down on the cartridges
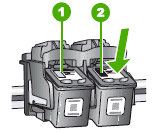
- Tri-color print cartridge
- Black and photo print cartridge
- Remove the tri-color cartridge from the slot on the left.
- Remove the black or photo cartridge from the slot on the right.
- Check the nozzles on the cartridges to see if the protective tape is still attached.
- If there is no protective tape on the cartridge, continue to the next step in this solution.
- If the protective tape is still on the cartridge, gently pull the pink pull tab to remove the protective plastic tape.
CAUTION:
Do not touch the copper-colored contacts or ink nozzles. Touching these parts can result in clogs, ink failure, and bad electrical connections.Figure : Remove the tape
- Copper-colored contacts
- Plastic tape with pink pull tab
- Ink nozzles under tape
- Repeat these steps to remove the other cartridge.
Step two: Reinstall the cartridges
- Hold the cartridge by its sides.Figure : Hold the cartridge by its sides
- Slide the cartridge into its designated slot at a slightly upward angle. The black parallelogram icon () designates the slot for the black cartridge, and the magenta half circle icon () designates the slot for the color cartridge.
- Press the cartridge inward until it snaps into place.Figure : Press the cartridge into place
- Repeat these steps to reinstall the other cartridge.
- Close the cartridge access door.Figure : Close the cartridge access door
Step three: Print a self-test page
- Press and hold the Cancel button (), and then press the Start Copy Color button ().
- Release both buttons at the same time. The self-test report prints.
- If these steps resolved the issue, and the test page prints, there is no need to continue troubleshooting.
- If the issue persists, continue with the next solution.
- If the test page does not print, continue with the next solution.
Solution four: Replace a defective cartridge
Follow these steps to replace a defective cartridge. A defective cartridge can be damaged or low on ink.
Step one: Remove the cartridge
- Press the Power button () to turn on the product.
- Open the cartridge access door. The carriage moves to the center of the product.Figure : Open the cartridge access door
- Wait until the carriage is idle and silent.
- Lightly press down on the black cartridge to release it, and then pull the cartridge toward you out of its slot.
NOTE:
Remove the black or photo cartridge from the slot on the right.Figure : Remove the black cartridge- Tri-color print cartridge
- Black and photo print cartridge
Step two: Find out which cartridge is defective
- Close the cartridge access door.Figure : Close the cartridge access door
- Check the Power light ().
- If the Power light blinks, reinsert the black cartridge, and then replace the current tri-color cartridge with a new tri-color print cartridge.
- If the Power light does not blink, do not reinsert the old black cartridge. Insert a new black cartridge into the product.
Step two: Install the new cartridge
- Slide the paper width guide to its outermost position.Figure : Move the paper width guides outward
- Load U.S. letter or A4, unused, plain white paper into the paper tray. Push the paper forward until it stops.Figure : Insert paper into the product
NOTE:
Do not overload the paper tray. Make sure that the stack of paper fits within the paper tray and is no higher than the top of the paper width guide. - Slide the paper width guide inward until it stops at the edge of the paper. Do not push the guide in so tightly that it binds against the paper.Figure : Adjust the paper width guide inward
- Remove the new cartridge from its packaging.Figure : Unpack the new cartridge
- Remove the pink pull tab covering the nozzles.Figure : Remove the pull tab
CAUTION:
Do not touch the cartridge contacts or nozzles.Figure : Do not touch the nozzles - Hold the cartridge by its sides.Figure : Hold the cartridge by its sides
- Slide the cartridge into its designated slot at a slightly upward angle. The black parallelogram icon () designates the slot for the black cartridge, and the magenta half circle icon () designates the slot for the color cartridge.
- Press the cartridge inward to snap it into place.Figure : Press the cartridge into place
- Close the cartridge access door.
- Wait while the product prints an alignment page.
- Load the alignment page face down on the left front corner of the scanner glass with the top of the page to the left.Figure : Load the alignment page on the scanner glass
- Lower the scanner lid, and then press the Scan button ( to complete the alignment.
- Discard or recycle the alignment page.
- If these steps resolved the issue, you do not need to continue troubleshooting.
- If the issue persists, continue to the next solution.
If you have completed all the steps and are still experiencing a problem, continue to the Service the All-in-One section at the end of this document.
Bob Headrick, HP Expert
I am not an employee of HP, I am a volunteer posting here on my own time.
If your problem is solved please click the "Accept as Solution" button
If my answer was helpful please click "Yes" to the "Was this post helpful" question.
03-01-2017 10:52 PM
HP Recommended
Bob, thank you again. It will take me some time to go thru the and see if the data you sent will clear up my issue. I'm crossing my fingers and hoping that this is the end of my copying problems. So I wanted to make sure to let you know how much I appreciate your response. When I finely get to applying this (a day or two) I'll let you how it all worked out. Sincerely, Eilene
Be alert for scammers posting fake support phone numbers and/or email addresses on the community.
If you think you have received a fake HP Support message, please report it to us by clicking on "Flag Post".
† The opinions expressed above are the personal opinions of the authors, not of HP. By using this site, you accept the Terms of Use and Rules of Participation.


Didn't find what you were looking for?
Ask the community
† The opinions expressed above are the personal opinions of the authors, not of HP. By using this site, you accept the <a href="https://www8.hp.com/us/en/terms-of-use.html" class="udrlinesmall">Terms of Use</a> and <a href="/t5/custom/page/page-id/hp.rulespage" class="udrlinesmall"> Rules of Participation</a>.