-
×InformationNeed Windows 11 help?Check documents on compatibility, FAQs, upgrade information and available fixes.
Windows 11 Support Center. -
-
×InformationNeed Windows 11 help?Check documents on compatibility, FAQs, upgrade information and available fixes.
Windows 11 Support Center. -
- HP Community
- Printers
- Printing Errors or Lights & Stuck Print Jobs
- envy 4500 crooked printing

Create an account on the HP Community to personalize your profile and ask a question
Your account also allows you to connect with HP support faster, access a personal dashboard to manage all of your devices in one place, view warranty information, case status and more.
Check some of the most frequent questions about Instant Ink: HP INSTANT INK, HP+ PLANS: INK AND TONER.
Check out our Black or Color Ink Not Printing, Other Print Quality Issues info about: Print quality and Cartridge Issues.

It has been a while since anyone has replied. Simply ask a new question if you would like to start the discussion again.
10-08-2015 03:37 AM
 HP Recommended
Product: Envy 4500
Operating System: Microsoft Windows 7 (64-bit)
I recently bought an Envy 4500 connected wirelessly, and everything is fine, other than that it prints at around 1 degree to the perpendicular. I have tried the head alignment endlessly, no change. None of the HP diagnostic tools detects a problem, but my eyes can (no, I don't need to visit the optician!).
Please help.
Solved! Go to Solution.
1 ACCEPTED SOLUTION
Accepted Solutions
10-09-2015 08:45 AM
HP Recommended
Hi @terrible823543,
Welcome to the HP Forums!
I noticed that you are getting crooked printing with your HP Envy 4500 printer, on Windows 7. And, I am happy to look into this issue for you!
Please try the following steps:
Paper feed issues might result from using ripped, dusty, curled, wrinkled, or bent paper. The quality of the paper can also make a difference. Follow these guidelines to help avoid the issue.
- Use only good quality paper that meets printer specifications.
- Store all paper in a dry, cool place. Paper feed issues occur more often in humid climates.
- Do not print on paper that is already printed. The dampness of the ink can cause the paper to stick together.
- Wait for the printer to complete a job or to display an 'Out of paper' message before you reload the paper.
Step 1: check the condition of the paper
Make sure that the paper you use to print is in good condition and neatly stacked in the tray, and the paper path and tray are free from obstructions.
- With the printer turned on, disconnect the power cord from the rear of the printer.
- Remove the stack of paper from the tray.
- Check for obstructions inside the tray. Use a flashlight to view the mechanism inside the tray to make sure that nothing blocks the paper from engaging with the rollers. Even small pieces of paper can cause paper feed issues.
NOTE:
If you find obstructions in the paper path, skip to the section on cleaning the rollers. - Examine the condition of the paper, and then replace any ripped, dusty, curled, wrinkled, or bent paper.
- Make sure that all the paper in the stack is the same size and type. Never load mixed types of paper in the tray. The product can only process one type of paper at a time.
- Tap the stack of paper on a flat surface to align the edges.
- Make sure that the stack of paper contains no fewer than 10 sheets and no more than 25 sheets of paper.
NOTE:
You need to use 10 to 25 sheets of paper only for purposes of these troubleshooting steps. When the issue is resolved, you can resume loading paper according to the paper tray capacity specifications for your product.
To purchase paper in the United States and Canada, go to HP Home & Home Office.
Step two: make sure that the printer rests on a flat surface
A flat surface clear of obstructions prevents the input tray from bending when it is pushed in. Follow these steps to make sure that the surface the printer rests on is flat and clear of any obstructions.
- Gently turn the printer onto its right side.Figure : Gently turn the printer onto its right side
- Check the surface directly under and around where the printer sits for the following:
- Pieces of paper trapped in the input tray
- Small, hard objects, such as cables, pens, pencils, and books
- Soft or uneven surfaces, such as placemats or carpet-like material
- Remove any obstructions that might remain.
- Turn the printer over to its normal position.
- Reconnect the power cord to the rear of the printer.
- Press the Power button to turn on the printer.
- Touch OK to clear any messages on the printer control panel.
Step 3: reload the paper
Load plain, white U.S. letter or A4 size paper in the printer. Make sure that the print side or shiny side of the paper is loaded face down in the tray.
- Open the paper tray door, and then pull it toward you to extend the paper tray.
- Gently pull out the paper tray extender, and then lift up the paper catch.Figure : Pull out the paper tray and the tray extender

- Slide the paper width guides to their outermost position.Figure : Slide out the paper width guides

- Load a stack of U.S. letter or A4 size paper into the paper tray with the short edge forward and the print side down. Push the stack into the tray until it stops.Figure : Load the paper

- Slide in the paper width guides in until they rest against the edges of the paper.Figure : Slide in the paper width guides

- Push the paper tray forward until it clicks into place.
NOTE:
Push the paper tray all the way in to avoid an error message.Figure : Push the paper tray forward until it clicks into place
Step 4: print a printer status report
Print a test page to make sure that the printer hardware functions correctly. If the test page does not print successfully on the first try, load a different brand of plain paper or a different type of paper in the tray, and then try to print the test page again.
- On the printer control panel, press the Down Arrow (
 ) to select Tools, and then press OK.
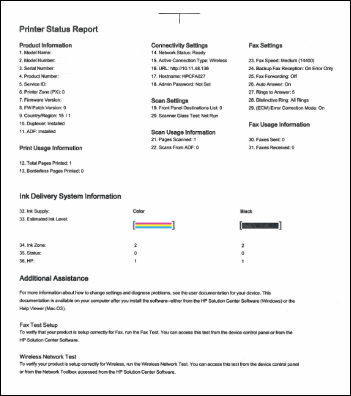
 - Press the Down Arrow () to select Printer Status Report, and then press OK. The printer prints the test page.Figure : Example of a Printer Status Report
- If the test page prints successfully, continue to the next step.
- If the test page does not print, skip to the next solution.
Step 5: try to print original document
If the test page printed successfully, try to print the original document again. If the document prints successfully, the issue is resolved.
Solution two: adjust the paper settings in the print driver
The printer might not pick up paper if the paper size and type in the paper tray do not match the paper size and type settings in the print driver. Select your operating system for steps to change the paper size and type settings in the print driver.
Windows
- Return to the document that you were trying to print when the issue occurred.
- Click File, and then click Print.
- Select your printer, and then click Properties or Printer Properties.
- Click the Paper/Quality tab.
- From the Paper Size drop-down list, select the option that matches your paper size. For example, if you have legal paper loaded in your printer, select Legal.
- From the Media drop-down list, select the paper type that matches the paper loaded in the printer.
- Click OK, and then click OK again to apply the settings.
- Click OK or Print from the Print dialog box to start the print job.
- If these steps resolved the issue, you do not need to continue troubleshooting.
- If the issue persists, continue to the next solution.
Solution three: clean the paper feed rollers
Dust, paper fiber, and other debris might accumulate on the paper feed rollers and cause paper feed issues. Follow these steps to clean the paper feed rollers.
Gather these materials:
- Long, lint-free cotton swabs
- A clean, lint-free cloth, or any cloth that does not come apart or leave fibers
- Distilled, filtered, or bottled water (tap water might damage the printer)
Step 2: clean the paper feed rollers
The paper feed rollers must be clean and function properly to feed paper.
- Press the Power button to turn off the printer, if it is not off already.
- Disconnect the power cord from the rear of the printer.
WARNING:
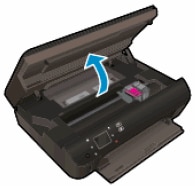
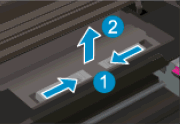
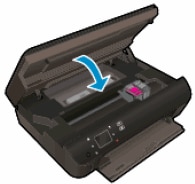
You must disconnect the power cord before reaching inside the printer to avoid risk of injuries or electric shock. - Open the cartridge access door.Figure : Open the cartridge access door
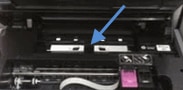
- Locate the paper path cover in the area behind the cartridge access area.Figure : Locate the paper path cover
- To remove the paper path cover, pinch the tabs together, and then lift up.Figure : Remove the paper path cover
- Pinch the tabs together
- Lift up
- Lightly dampen the swab with the water, and then squeeze any excess liquid from the swab.
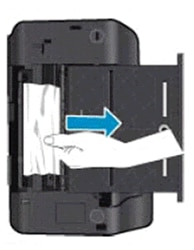
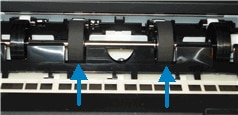
- Press the swab against the rollers inside the printer, and then rotate the rollers upwards with your fingers. Apply a moderate amount of pressure to remove any dust or dirt buildup.Figure : Clean the rollers inside the printer
- Allow the rollers to dry for 10 to 15 minutes.
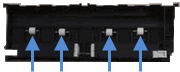
- Check the rollers on the underside of the paper path cover. Make sure that the rollers are not missing, that they turn easily, and that they are springy when you press them. If the rollers are damaged, replace the paper path cover with a new one.Figure : Check the rollers on the paper path cover
- Replace the paper path cover with the spring-loaded tabs facing toward the front of the printer. Gently press the cover down at the left and right edges. The cover clicks into place.
NOTE:
Make sure that both edges of the paper path cover are in place.Figure : Replace the paper path cover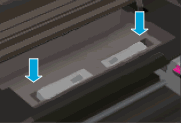
- Close the cartridge access door.Figure : Close the cartridge access door
- Reconnect the power cord to the rear of the printer.
- Press the Power button to turn on the printer.
- Press OK to clear any messages on the printer control panel.
Step 3: print a printer status report
Print a test page to make sure that the hardware functions correctly.
- If the test page prints successfully, continue to the next step.
- If the test page does not print, skip to the next solution.
Step 4: try to print
If the test page printed successfully, try to print the original document again. If the document prints successfully, the issue is resolved.
Source: An 'Out of Paper' Message Displays.
Hope these steps help! 
If this, or any of the posts on this thread, has helped you to resolve the issue, please click on "Accept as Solution" on said post. To show that you 'like', or are thankful of my post, kindly click the thumbs up below. If there is anything else I can do to help, please be sure to let me know!
RnRMusicMan
I work on behalf of HP
Please click “Accept as Solution ” if you feel my post solved your issue, it will help others find the solution.
Click the “Kudos Thumbs Up" to say “Thanks” for helping!
I work on behalf of HP
Please click “Accept as Solution ” if you feel my post solved your issue, it will help others find the solution.
Click the “Kudos Thumbs Up" to say “Thanks” for helping!
2 REPLIES 2
10-09-2015 08:45 AM
HP Recommended
Hi @terrible823543,
Welcome to the HP Forums!
I noticed that you are getting crooked printing with your HP Envy 4500 printer, on Windows 7. And, I am happy to look into this issue for you!
Please try the following steps:
Paper feed issues might result from using ripped, dusty, curled, wrinkled, or bent paper. The quality of the paper can also make a difference. Follow these guidelines to help avoid the issue.
- Use only good quality paper that meets printer specifications.
- Store all paper in a dry, cool place. Paper feed issues occur more often in humid climates.
- Do not print on paper that is already printed. The dampness of the ink can cause the paper to stick together.
- Wait for the printer to complete a job or to display an 'Out of paper' message before you reload the paper.
Step 1: check the condition of the paper
Make sure that the paper you use to print is in good condition and neatly stacked in the tray, and the paper path and tray are free from obstructions.
- With the printer turned on, disconnect the power cord from the rear of the printer.
- Remove the stack of paper from the tray.
- Check for obstructions inside the tray. Use a flashlight to view the mechanism inside the tray to make sure that nothing blocks the paper from engaging with the rollers. Even small pieces of paper can cause paper feed issues.
NOTE:
If you find obstructions in the paper path, skip to the section on cleaning the rollers. - Examine the condition of the paper, and then replace any ripped, dusty, curled, wrinkled, or bent paper.
- Make sure that all the paper in the stack is the same size and type. Never load mixed types of paper in the tray. The product can only process one type of paper at a time.
- Tap the stack of paper on a flat surface to align the edges.
- Make sure that the stack of paper contains no fewer than 10 sheets and no more than 25 sheets of paper.
NOTE:
You need to use 10 to 25 sheets of paper only for purposes of these troubleshooting steps. When the issue is resolved, you can resume loading paper according to the paper tray capacity specifications for your product.
To purchase paper in the United States and Canada, go to HP Home & Home Office.
Step two: make sure that the printer rests on a flat surface
A flat surface clear of obstructions prevents the input tray from bending when it is pushed in. Follow these steps to make sure that the surface the printer rests on is flat and clear of any obstructions.
- Gently turn the printer onto its right side.Figure : Gently turn the printer onto its right side
- Check the surface directly under and around where the printer sits for the following:
- Pieces of paper trapped in the input tray
- Small, hard objects, such as cables, pens, pencils, and books
- Soft or uneven surfaces, such as placemats or carpet-like material
- Remove any obstructions that might remain.
- Turn the printer over to its normal position.
- Reconnect the power cord to the rear of the printer.
- Press the Power button to turn on the printer.
- Touch OK to clear any messages on the printer control panel.
Step 3: reload the paper
Load plain, white U.S. letter or A4 size paper in the printer. Make sure that the print side or shiny side of the paper is loaded face down in the tray.
- Open the paper tray door, and then pull it toward you to extend the paper tray.
- Gently pull out the paper tray extender, and then lift up the paper catch.Figure : Pull out the paper tray and the tray extender
- Slide the paper width guides to their outermost position.Figure : Slide out the paper width guides
- Load a stack of U.S. letter or A4 size paper into the paper tray with the short edge forward and the print side down. Push the stack into the tray until it stops.Figure : Load the paper
- Slide in the paper width guides in until they rest against the edges of the paper.Figure : Slide in the paper width guides
- Push the paper tray forward until it clicks into place.
NOTE:
Push the paper tray all the way in to avoid an error message.Figure : Push the paper tray forward until it clicks into place
Step 4: print a printer status report
Print a test page to make sure that the printer hardware functions correctly. If the test page does not print successfully on the first try, load a different brand of plain paper or a different type of paper in the tray, and then try to print the test page again.
- On the printer control panel, press the Down Arrow () to select Tools, and then press OK.
- Press the Down Arrow () to select Printer Status Report, and then press OK. The printer prints the test page.Figure : Example of a Printer Status Report
- If the test page prints successfully, continue to the next step.
- If the test page does not print, skip to the next solution.
Step 5: try to print original document
If the test page printed successfully, try to print the original document again. If the document prints successfully, the issue is resolved.
Solution two: adjust the paper settings in the print driver
The printer might not pick up paper if the paper size and type in the paper tray do not match the paper size and type settings in the print driver. Select your operating system for steps to change the paper size and type settings in the print driver.
Windows
- Return to the document that you were trying to print when the issue occurred.
- Click File, and then click Print.
- Select your printer, and then click Properties or Printer Properties.
- Click the Paper/Quality tab.
- From the Paper Size drop-down list, select the option that matches your paper size. For example, if you have legal paper loaded in your printer, select Legal.
- From the Media drop-down list, select the paper type that matches the paper loaded in the printer.
- Click OK, and then click OK again to apply the settings.
- Click OK or Print from the Print dialog box to start the print job.
- If these steps resolved the issue, you do not need to continue troubleshooting.
- If the issue persists, continue to the next solution.
Solution three: clean the paper feed rollers
Dust, paper fiber, and other debris might accumulate on the paper feed rollers and cause paper feed issues. Follow these steps to clean the paper feed rollers.
Gather these materials:
- Long, lint-free cotton swabs
- A clean, lint-free cloth, or any cloth that does not come apart or leave fibers
- Distilled, filtered, or bottled water (tap water might damage the printer)
Step 2: clean the paper feed rollers
The paper feed rollers must be clean and function properly to feed paper.
- Press the Power button to turn off the printer, if it is not off already.
- Disconnect the power cord from the rear of the printer.
WARNING:
You must disconnect the power cord before reaching inside the printer to avoid risk of injuries or electric shock. - Open the cartridge access door.Figure : Open the cartridge access door
- Locate the paper path cover in the area behind the cartridge access area.Figure : Locate the paper path cover
- To remove the paper path cover, pinch the tabs together, and then lift up.Figure : Remove the paper path cover
- Pinch the tabs together
- Lift up
- Lightly dampen the swab with the water, and then squeeze any excess liquid from the swab.
- Press the swab against the rollers inside the printer, and then rotate the rollers upwards with your fingers. Apply a moderate amount of pressure to remove any dust or dirt buildup.Figure : Clean the rollers inside the printer
- Allow the rollers to dry for 10 to 15 minutes.
- Check the rollers on the underside of the paper path cover. Make sure that the rollers are not missing, that they turn easily, and that they are springy when you press them. If the rollers are damaged, replace the paper path cover with a new one.Figure : Check the rollers on the paper path cover
- Replace the paper path cover with the spring-loaded tabs facing toward the front of the printer. Gently press the cover down at the left and right edges. The cover clicks into place.
NOTE:
Make sure that both edges of the paper path cover are in place.Figure : Replace the paper path cover - Close the cartridge access door.Figure : Close the cartridge access door
- Reconnect the power cord to the rear of the printer.
- Press the Power button to turn on the printer.
- Press OK to clear any messages on the printer control panel.
Step 3: print a printer status report
Print a test page to make sure that the hardware functions correctly.
- If the test page prints successfully, continue to the next step.
- If the test page does not print, skip to the next solution.
Step 4: try to print
If the test page printed successfully, try to print the original document again. If the document prints successfully, the issue is resolved.
Source: An 'Out of Paper' Message Displays.
Hope these steps help!
If this, or any of the posts on this thread, has helped you to resolve the issue, please click on "Accept as Solution" on said post. To show that you 'like', or are thankful of my post, kindly click the thumbs up below. If there is anything else I can do to help, please be sure to let me know!
RnRMusicMan
I work on behalf of HP
Please click “Accept as Solution ” if you feel my post solved your issue, it will help others find the solution.
Click the “Kudos Thumbs Up" to say “Thanks” for helping!
I work on behalf of HP
Please click “Accept as Solution ” if you feel my post solved your issue, it will help others find the solution.
Click the “Kudos Thumbs Up" to say “Thanks” for helping!
05-29-2016 07:17 AM
HP Recommended
I have done all that was suggested, but all is clear and everything appears brand new. It still prints with about a 1 degree twist. This shows up more, of course, on smaller size HP photo-paper; say 6" by 4".
What do I do now? I have only just tried printing small photographs and the twist has happened every time.
Be alert for scammers posting fake support phone numbers and/or email addresses on the community.
If you think you have received a fake HP Support message, please report it to us by clicking on "Flag Post".
† The opinions expressed above are the personal opinions of the authors, not of HP. By using this site, you accept the Terms of Use and Rules of Participation.


Didn't find what you were looking for?
Ask the community
† The opinions expressed above are the personal opinions of the authors, not of HP. By using this site, you accept the <a href="https://www8.hp.com/us/en/terms-of-use.html" class="udrlinesmall">Terms of Use</a> and <a href="/t5/custom/page/page-id/hp.rulespage" class="udrlinesmall"> Rules of Participation</a>.