• ×
    Information
    Need Windows 11 help?
    Check documents on compatibility, FAQs, upgrade information and available fixes.
    Windows 11 Support Center.
  • post a message
  • ×
    Information
    Need Windows 11 help?
    Check documents on compatibility, FAQs, upgrade information and available fixes.
    Windows 11 Support Center.
  • post a message
Guidelines
Experiencing 'Printer Blocked' or 'Printer Error' message? Click here for more information.
Check some of the most frequent questions about Instant Ink: HP INSTANT INK, HP+ PLANS: INK AND TONER.


Check out our Black or Color Ink Not Printing, Other Print Quality Issues info about: Print quality and Cartridge Issues.
HP Recommended
HP officejet
Microsoft Windows 10 (32-bit)

since installing new black ink cartridge get error of cartridge damaged or missing, the cartridge installed was purchased direct from hp. I shut off printer and restarted it printed a couple of times then prints was faded or missing lines. ran maintenance to clean printhead. again printed a couple copies poorly then no print at all. Now is also telling me color cartridges low also, I am sure this is true am ordering colored cartridges. wondrering if I should start over with new black also.

3 REPLIES 3
HP Recommended

@tiger54


Welcome to  HP forums.


Provide the printer model number or the product number for further assistance.


Cheers.

Sandytechy20
I am an HP Employee

HP Recommended

Officejet 6500a

HP Recommended

@tiger54


Make sure that the cartridges are installed correctly.

  1. Press the Power button () to turn on the product, if it is not already on.

  2. Open the cartridge access door. The carriage moves to the center of the product.

    Figure : Open the cartridge access door

    Illustration: Open the cartridge access door.
       CAUTION: 

    Wait until the carriage stops moving before you proceed.

  3. Run a finger along the top of the cartridges to detect unseated cartridges in the carriage. Press down on any cartridge that is slightly higher than the others to snap it firmly into place.

  4. Close the cartridge access door.

  5. Check to see if the message displays again.

Clean the cartridge electrical contacts

  1. Gather the following:

    • Clean, lint-free cotton swabs

    • A clean, lint-free piece of paper

  2. If the product is not already on, press the Power button () to turn it on.

  3. Open the cartridge access door. The carriage moves to the center of the product.

    Figure : Open the cartridge access door.

    Illustration: Open the cartridge access door.
       CAUTION: 

    Before proceeding, wait until the carriage stops moving.

    • If the error message mentions a specific cartridge, find that cartridge, and then remove it from the carriage.

    • If the error message does not mention a specific cartridge, remove all the cartridges, one at a time.

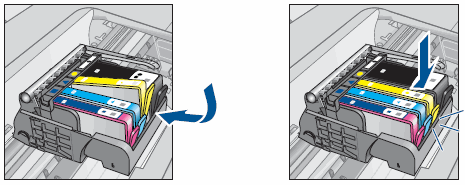
  4. Press in the tab on the front of the cartridge to release it, and then pull it up and out to remove it from its slot.

    Figure : Remove the cartridge

    Illustration of removing the cartridge
  5. Hold the cartridge by its sides with the bottom pointing up, and then find the electrical contacts on the cartridge. The electrical contacts are four small rectangles of copper or gold-colored metal on the bottom of the cartridge.

  6. Wipe the electrical contacts with a clean, dry cotton swab until no debris remains on them. Make sure that no ink or debris smears onto the clear window next to the electrical contacts.

  7. Place the cartridge on the clean, lint-free paper with the nozzle facing up.

  8. Find the electrical contacts inside the carriage. The electrical contacts resemble four copper-colored pins that touch the electrical contacts on the cartridge.

  9. Wipe the electrical contacts inside the carriage with an unused clean, dry cotton swab.

  10. Slide the cartridge into the correct slot until it clicks into place. The color shape icons on the cartridge and on the printhead indicate the correct slot.

    Figure : Reinstall the cartridge

    Illustration of reinstalling the cartridge
  11. Close the cartridge access door.

  12. Check to see if the message displays again.

You can also refer this HP document for more assistance:- Click here


Let me know how it goes.

To thank me for my efforts to help you, please mark my post as an accepted solution so that it benefits several others.

Cheers.

Sandytechy20
I am an HP Employee

† The opinions expressed above are the personal opinions of the authors, not of HP. By using this site, you accept the <a href="https://www8.hp.com/us/en/terms-of-use.html" class="udrlinesmall">Terms of Use</a> and <a href="/t5/custom/page/page-id/hp.rulespage" class="udrlinesmall"> Rules of Participation</a>.