• ×
    Information
    Need Windows 11 help?
    Check documents on compatibility, FAQs, upgrade information and available fixes.
    Windows 11 Support Center.
  • post a message
  • ×
    Information
    Need Windows 11 help?
    Check documents on compatibility, FAQs, upgrade information and available fixes.
    Windows 11 Support Center.
  • post a message
Guidelines
Experiencing 'Printer Blocked' or 'Printer Error' message? Click here for more information.
Check some of the most frequent questions about Instant Ink: HP INSTANT INK, HP+ PLANS: INK AND TONER.


Check out our Black or Color Ink Not Printing, Other Print Quality Issues info about: Print quality and Cartridge Issues.
HP Recommended
hp deskjet 5810 all-in-one series

it is shown on my computer again and againit is shown on my computer again and again

1 REPLY 1
HP Recommended

@Sahina


Welcome to the HP Forums 🙂 I would like to take a moment and thank you for using this forum, it is a great place to find answers. 


Please let me know if you're able to make a copy.


Let's try to reset the Printer here as it helps in removing any stored static electricity from the Printer which might be causing these issues.

  1. Turn the printer on, if it is not already on.
  2. Wait until the printer is idle and silent before you continue.
  3. With the printer turned on, disconnect the power cord from the rear of the printer.
  4. Unplug the power cord from the wall outlet.
  5. Wait at least 60 seconds.
  6. Plug the power cord back into the wall outlet.
  7. NOTE: HP recommends connecting the printer power cord directly to the wall outlet.
  8. Reconnect the power cord to the rear of the printer.
  9. Turn on the printer, if it does not automatically turn on.
  10. Wait until the printer is idle and silent before you proceed.

Have you tried inserting a new tri-color cartridge? 


The printer might display an error if the printheads are not correctly installed. Only remove the printhead indicated by the printhead icon  on the printer control panel.

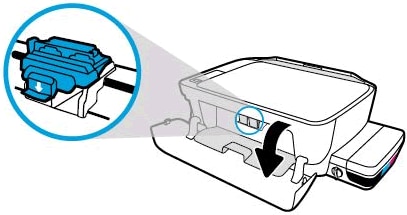
  1. Open the exterior door, and then open the printhead access door.

    Access the print carriage
  2. Gently push down on the blue carriage latch.

    The blue carriage latch opens.

    Open the carriage latch

  3. Lightly press down on the printhead to release it, and then pull the printhead out of its slot.

    Removing the printheads

  4. Make sure the plugs on top of the printhead have been removed.

    Pull the orange plugs

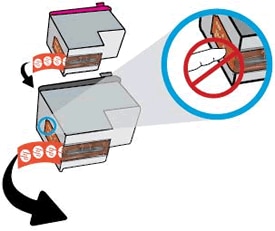
  5. Make sure the tape from the printhead contacts has been removed.

       CAUTION: 

    Do not touch the copper-colored contacts or the ink nozzles. Do not replace the protective tape on the contacts. Handling these parts can result in clogs, ink failure, and bad electrical connections.

    Remove the tape

  6. Slide the printhead at a slight upward angle into the empty slot, and then gently push up on the printhead until it snaps into place.

    Insert the printheads

    • Insert the tri-color printhead into the left slot.

    • Insert the black printhead into the right slot.

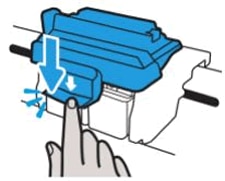
  7. Close the blue carriage latch by pushing down firmly until the latch snaps into place.

    Close the latch

  8. Close the printhead access door.

  9. Close the exterior door.

Let me know if this helps.


If the information I've provided was helpful, give us some reinforcement by clicking the Accepted Solution and Kudos buttons, that'll help us and others see that we've got the answers!


Thanks!


Have a great day!


I am an HP Employee

† The opinions expressed above are the personal opinions of the authors, not of HP. By using this site, you accept the <a href="https://www8.hp.com/us/en/terms-of-use.html" class="udrlinesmall">Terms of Use</a> and <a href="/t5/custom/page/page-id/hp.rulespage" class="udrlinesmall"> Rules of Participation</a>.