-
×InformationNeed Windows 11 help?Check documents on compatibility, FAQs, upgrade information and available fixes.
Windows 11 Support Center. -
-
×InformationNeed Windows 11 help?Check documents on compatibility, FAQs, upgrade information and available fixes.
Windows 11 Support Center. -
- HP Community
- Printers
- Printing Errors or Lights & Stuck Print Jobs
- my 4630 will not accept paper from the tray to start the pri...

Create an account on the HP Community to personalize your profile and ask a question
08-18-2018 01:14 PM
Welcome to the HP Forums!
Thank you for posting your query on this forum, it's a great place to find answers.
Don’t worry, I assure you I will try my best to get this sorted.
I recommend you follow the below steps and check if it resolves the issue.
Step One: Gather Materials to Clean the Rollers
Gather these materials:
-
Long, lint-free cotton swabs
-
A clean, lint-free cloth, or any cloth that does not come apart or leave fibers
-
Distilled, filtered, or bottled water (tap water might damage the printer)
Step Two: Clean the Paper Feed Rollers
The paper feed rollers must be clean and function properly to feed paper.
-
Turn off the printer if it is not off already.
-
Disconnect the power cord from the rear of the printer if it is not disconnected already.
WARNING:
You must disconnect the power cord before reaching inside the printer to avoid risk of injuries or electric shock.
-
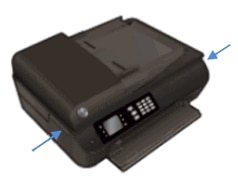
Locate the slots on the left and right sides of the printer.
-
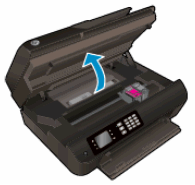
Slide your fingers into the two slots, and then gently lift up to open the ink cartridge access door.
-
Locate the paper path cover in the area behind the ink cartridge access area.
-
To remove the paper path cover, pinch the tabs together, and then lift up.
-
Pinch the tabs together
-
Lift up
-
-
Lightly dampen a lint-free swab with distilled or bottled water, and then squeeze any excess liquid from the swab.
-
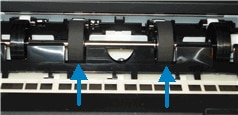
Press the swab against the rollers inside the printer, and then rotate the rollers upwards with your fingers. Apply a moderate amount of pressure to remove any dust or dirt buildup.
-
Allow the rollers to dry for 10 to 15 minutes.
-
Check the rollers on the underside of the paper path cover. Make sure the rollers are not missing, that they turn easily, and that they are springy when you press them. If the rollers are damaged, replace the paper path cover with a new one.
-
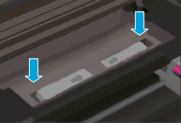
Replace the paper path cover with the spring-loaded tabs facing toward the front of the printer. Gently press the cover down at the left and right edges. The cover clicks into place.
NOTE:
Make sure both edges of the paper path cover are in place.
-
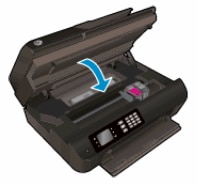
Close the ink cartridge access door.
-
Reconnect the power cord to the rear of the printer, and then turn on the printer.
-
Press OK to clear any messages on the printer control panel.
Step Three: Clean the ADF Rollers and the Separator Pad (Optional)
If you are trying to copy or fax a document, and the document does not feed into the Automatic Document Feeder (ADF), clean the ADF rollers and the separator pad. If you are not using the ADF, continue to the next step.
-
Press the Power button to turn off the printer, if it is not off already.
-
Disconnect the power cord from the rear of the printer, if it is not disconnected already.
WARNING:
You must disconnect the power cord before reaching inside the printer to avoid the risk of injuries or electric shock.
-
Disconnect the USB cable from the rear of the printer, if you have a USB cable connection to the printer.
-
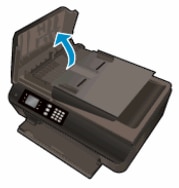
Lift the ADF cover.
Figure : Lift the ADF cover
-
Lightly dampen a clean, lint-free cloth with bottled or distilled water, and then squeeze any excess liquid from the cloth.
-
Press the cloth against the rollers, and then rotate them upward with your fingers. Apply a moderate amount of pressure to remove any dust or dirt buildup.
-
With the lightly dampened cloth, wipe to clean the separator pad.
Figure : Clean the rollers and separator pad
-
Rollers
-
Separator pad
-
-
Allow the rollers and the separator pad to dry completely (approximately 10 minutes).
-
Lower the ADF mechanism until it snaps in place.
-
Close the ADF cover tightly at both ends.
Figure : Close the ADF cover tightly at both ends
-
Reconnect the power cord to the rear of the printer.
-
Plug the power cord back into the power source or electrical outlet.
-
Reconnect the USB cable to the rear of the printer, if you have a USB connection to the computer.
-
Press the Power button to turn on the printer.
-
Press OK to clear any messages on the printer control panel.
If you continue to face the issue, follow the steps in the below article and test.
Let me know how it goes and you have a great day!
If you wish to show appreciation for my efforts, mark my post as Accept as Solution. Your feedback counts!
Cheers!
The_Fossette
I am an HP Employee