-
×InformationNeed Windows 11 help?Check documents on compatibility, FAQs, upgrade information and available fixes.
Windows 11 Support Center. -
-
×InformationNeed Windows 11 help?Check documents on compatibility, FAQs, upgrade information and available fixes.
Windows 11 Support Center. -
- HP Community
- Printers
- Printing Errors or Lights & Stuck Print Jobs
- new ink cartridges

Create an account on the HP Community to personalize your profile and ask a question
Your account also allows you to connect with HP support faster, access a personal dashboard to manage all of your devices in one place, view warranty information, case status and more.
Check some of the most frequent questions about Instant Ink: HP INSTANT INK, HP+ PLANS: INK AND TONER.
Check out our Black or Color Ink Not Printing, Other Print Quality Issues info about: Print quality and Cartridge Issues.

It has been a while since anyone has replied. Simply ask a new question if you would like to start the discussion again.
02-15-2018 06:36 PM
 HP Recommended
Product: HP 8715
Operating System: Microsoft Windows 10 (32-bit)
I've installed new HP 952 incartridges in my 8715 printer and I keep getting message saying cartidge missing or damaged. I replaced the new one back with the old cartridge which had a small amount of ink left and get the same message.
Solved! Go to Solution.
1 ACCEPTED SOLUTION
Accepted Solutions
02-16-2018 02:58 PM
HP Recommended
Thank you for joining HP Forums.
This is a great place to get support, find answers
I understand that you are facing issue with the cartridge.
No worries, I'll be glad to help you, that said, I'll need a few more details to dissect your concern & provide an accurate solution:
Make sure the ink cartridges are inserted correctly.
-
Press the Power button to turn on the printer, if it is not already on.
-
Open the ink cartridge access door.
The carriage moves to the center of the printer.
-
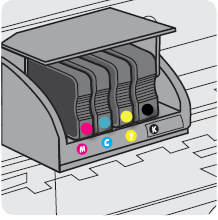
Make sure the letter on the ink cartridge label matches the letter on the carriage slot.
Figure : Properly installed ink cartridges
-
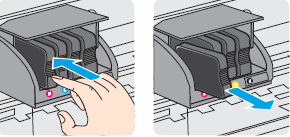
Push in on the front of the ink cartridge to release it, and then pull it toward you to remove it from its slot.
Figure : Removing the ink cartridge from its slot
-
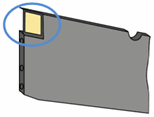
Inspect the copper-colored ink cartridge contact for ink buildup or debris.
Figure : Copper-colored contact on the ink cartridge
-
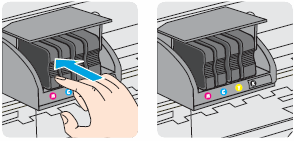
Carefully reinsert the ink cartridge into its slot, making sure the letter on the ink cartridge matches the letter on the slot, and then push the ink cartridge forward until it clicks into place.
CAUTION:
Do not lift the latch handle on the carriage to insert ink cartridges. Doing so could cause the printhead or ink cartridges to be incorrectly seated, which could damage the print mechanism and cause printing problems.
Figure : Inserting the ink cartridge into its slot
-
Repeat these steps for other ink cartridges, if necessary.
-
Make sure no ink cartridge is sticking out farther than the other ink cartridges.
If an ink cartridge is sticking out, push it until it snaps into place.
-
Close the ink cartridge access door.
-
Check the control panel for any error messages.
If these steps resolved the issue, and the printer does not display an ink cartridge error, you do not need to continue troubleshooting.
Check the carriage latch
Make sure the carriage latch is down.
-
Open the ink cartridge access door.
The carriage moves to the center of the printer.
-
Make sure the carriage latch is down. If the carriage latch is up, press it down until it snaps into place.
Figure : Carriage latch is down

-
Close the ink cartridge access door.
If these steps resolved the issue, and the printer does not display an ink cartridge error, you do not need to continue troubleshooting.
Clean the ink cartridge contacts
Clean the ink cartridge contacts to remove debris that might be preventing an electrical connection.
CAUTION:
Clean the ink cartridges one at a time. Do not leave an ink cartridge outside of the printer for more than 10 minutes. Also, never turn off the printer when an ink cartridge is removed from its slot. Leaving ink cartridge slots empty might cause damage to the ink cartridge ink system.
-
Find a clean, lint-free cloth (eyeglass wipes or coffee filters work well) that you can use to clean the ink cartridge contacts.
-
Make sure the printer is turned on.
-
Open the ink cartridge access door.
The carriage moves to the center of the printer.
-
Push in on the front of the problem ink cartridge to release it, and then pull the ink cartridge toward you to remove it from its slot.
Figure : Remove the problem ink cartridge from its slot
-
With a clean, lint-free cloth (eyeglass wipes or coffee filters work well), wipe the copper-colored contact on the ink cartridge.
Figure : Copper-colored contact on the ink cartridge
-
Carefully reinsert the ink cartridge into its slot, making sure the letter on the ink cartridge matches the letter on the slot.
Figure : Insert the ink cartridge into its slot
-
Push the ink cartridge forward until it clicks into place.
-
Repeat these steps for the other ink cartridges, if necessary.
-
Close the ink cartridge access door.
-
Check the control panel for any error messages.
-
If the error message persists, repeat the previous steps to clean the ink cartridge contacts.
If these steps resolved the issue, and the printer does not display an ink cartridge error, you do not need to continue troubleshooting.
Reset the printer
Resetting the printer can reset the connection with the ink cartridge and clear any error messages.
-
Turn the printer on, if it is not already on.
-
Wait until the printer is idle and silent before you continue.
-
With the printer turned on, disconnect the power cord from the rear of the printer.
-
Unplug the power cord from the wall outlet.
-
Wait at least 60 seconds.
-
Plug the power cord back into the wall outlet.
NOTE:
HP recommends connecting the printer power cord directly to the wall outlet.
-
Reconnect the power cord to the rear of the printer.
-
Turn on the printer, if it does not automatically turn on.
The printer might go through a warm-up period. The printer lights might flash, and the carriage might move.
-
Wait until the warm-up period finishes and your printer is idle and silent before you proceed.
If the issue persists, click here for further assistance.
Do get back to me as I have a few more tricks up my sleeve. Said that, if I have helped you resolve the issue.
Feel free to give me a virtual high-five by clicking the 'Thumbs Up' icon followed by clicking on 'Accepted as Solution'
Have a great day Ahead!
Raj1788
I am an HP Employee
3 REPLIES 3
02-16-2018 02:58 PM
HP Recommended
Thank you for joining HP Forums.
This is a great place to get support, find answers
I understand that you are facing issue with the cartridge.
No worries, I'll be glad to help you, that said, I'll need a few more details to dissect your concern & provide an accurate solution:
Make sure the ink cartridges are inserted correctly.
-
Press the Power button to turn on the printer, if it is not already on.
-
Open the ink cartridge access door.
The carriage moves to the center of the printer.
-
Make sure the letter on the ink cartridge label matches the letter on the carriage slot.
Figure : Properly installed ink cartridges
-
Push in on the front of the ink cartridge to release it, and then pull it toward you to remove it from its slot.
Figure : Removing the ink cartridge from its slot
-
Inspect the copper-colored ink cartridge contact for ink buildup or debris.
Figure : Copper-colored contact on the ink cartridge
-
Carefully reinsert the ink cartridge into its slot, making sure the letter on the ink cartridge matches the letter on the slot, and then push the ink cartridge forward until it clicks into place.
CAUTION:
Do not lift the latch handle on the carriage to insert ink cartridges. Doing so could cause the printhead or ink cartridges to be incorrectly seated, which could damage the print mechanism and cause printing problems.
Figure : Inserting the ink cartridge into its slot
-
Repeat these steps for other ink cartridges, if necessary.
-
Make sure no ink cartridge is sticking out farther than the other ink cartridges.
If an ink cartridge is sticking out, push it until it snaps into place.
-
Close the ink cartridge access door.
-
Check the control panel for any error messages.
If these steps resolved the issue, and the printer does not display an ink cartridge error, you do not need to continue troubleshooting.
Check the carriage latch
Make sure the carriage latch is down.
-
Open the ink cartridge access door.
The carriage moves to the center of the printer.
-
Make sure the carriage latch is down. If the carriage latch is up, press it down until it snaps into place.
Figure : Carriage latch is down
-
Close the ink cartridge access door.
If these steps resolved the issue, and the printer does not display an ink cartridge error, you do not need to continue troubleshooting.
Clean the ink cartridge contacts
Clean the ink cartridge contacts to remove debris that might be preventing an electrical connection.
CAUTION:
Clean the ink cartridges one at a time. Do not leave an ink cartridge outside of the printer for more than 10 minutes. Also, never turn off the printer when an ink cartridge is removed from its slot. Leaving ink cartridge slots empty might cause damage to the ink cartridge ink system.
-
Find a clean, lint-free cloth (eyeglass wipes or coffee filters work well) that you can use to clean the ink cartridge contacts.
-
Make sure the printer is turned on.
-
Open the ink cartridge access door.
The carriage moves to the center of the printer.
-
Push in on the front of the problem ink cartridge to release it, and then pull the ink cartridge toward you to remove it from its slot.
Figure : Remove the problem ink cartridge from its slot
-
With a clean, lint-free cloth (eyeglass wipes or coffee filters work well), wipe the copper-colored contact on the ink cartridge.
Figure : Copper-colored contact on the ink cartridge
-
Carefully reinsert the ink cartridge into its slot, making sure the letter on the ink cartridge matches the letter on the slot.
Figure : Insert the ink cartridge into its slot
-
Push the ink cartridge forward until it clicks into place.
-
Repeat these steps for the other ink cartridges, if necessary.
-
Close the ink cartridge access door.
-
Check the control panel for any error messages.
-
If the error message persists, repeat the previous steps to clean the ink cartridge contacts.
If these steps resolved the issue, and the printer does not display an ink cartridge error, you do not need to continue troubleshooting.
Reset the printer
Resetting the printer can reset the connection with the ink cartridge and clear any error messages.
-
Turn the printer on, if it is not already on.
-
Wait until the printer is idle and silent before you continue.
-
With the printer turned on, disconnect the power cord from the rear of the printer.
-
Unplug the power cord from the wall outlet.
-
Wait at least 60 seconds.
-
Plug the power cord back into the wall outlet.
NOTE:
HP recommends connecting the printer power cord directly to the wall outlet.
-
Reconnect the power cord to the rear of the printer.
-
Turn on the printer, if it does not automatically turn on.
The printer might go through a warm-up period. The printer lights might flash, and the carriage might move.
-
Wait until the warm-up period finishes and your printer is idle and silent before you proceed.
If the issue persists, click here for further assistance.
Do get back to me as I have a few more tricks up my sleeve. Said that, if I have helped you resolve the issue.
Feel free to give me a virtual high-five by clicking the 'Thumbs Up' icon followed by clicking on 'Accepted as Solution'
Have a great day Ahead!
Raj1788
I am an HP Employee
02-18-2018 06:05 AM
HP Recommended
One of the solutions suggested was to ensure the carriage latch was down. It looked down, but I raised it, then lowered it again. After that the problem when away. I assume the latch was not completely engaged.
Thanks!!
02-18-2018 02:34 PM - edited 02-18-2018 02:36 PM
HP Recommended
It looks like you were interacting with @Raj1788, but he is out for the day & I'll be glad to help you out,
I'm the sandytechy20 & I'm at your service.
Thanks for the reply.
I appreciate your time and effort.
Good to know that issue is resolved.
Feel free to contact us in feature if you need any assistance.
Cheers.
Sandytechy20
I am an HP Employee
Be alert for scammers posting fake support phone numbers and/or email addresses on the community.
If you think you have received a fake HP Support message, please report it to us by clicking on "Flag Post".
† The opinions expressed above are the personal opinions of the authors, not of HP. By using this site, you accept the Terms of Use and Rules of Participation.


Didn't find what you were looking for?
Ask the community
† The opinions expressed above are the personal opinions of the authors, not of HP. By using this site, you accept the <a href="https://www8.hp.com/us/en/terms-of-use.html" class="udrlinesmall">Terms of Use</a> and <a href="/t5/custom/page/page-id/hp.rulespage" class="udrlinesmall"> Rules of Participation</a>.