-
×InformationNeed Windows 11 help?Check documents on compatibility, FAQs, upgrade information and available fixes.
Windows 11 Support Center. -
-
×InformationNeed Windows 11 help?Check documents on compatibility, FAQs, upgrade information and available fixes.
Windows 11 Support Center. -
- HP Community
- Printers
- Printing Errors or Lights & Stuck Print Jobs
- no magenta colour even after cleaning print heads

Create an account on the HP Community to personalize your profile and ask a question
07-01-2019 06:28 AM
I have an Envy 5020 AIO printer and suddenly there is no Magenta colour during printing. I have aligned and cleaned the print heads twice but still no magenta colour in print quality diagnostics , The Colour cartridge is 25% and Black 90%
Solved! Go to Solution.
Accepted Solutions
07-03-2019 02:46 PM
Welcome to HP support community.
Manually clean the area around the ink nozzles
-
Gather the following materials:
-
A clean, lint-free cloth or a clean, dry cotton swab
-
Distilled or bottled water
CAUTION:
Do not use tap water because it might contain contaminants that can damage the printhead.
-
-
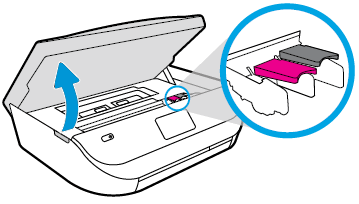
Gently grasp the handles on either side of the printer, and then raise the ink cartridge access door until it locks into place.
The carriage moves to the center of the printer.

-
Wait until the printer is idle and silent before you continue.
-
Lift up the lid on the ink cartridge slot, and then pull up on the ink cartridge to remove it from the slot.

-
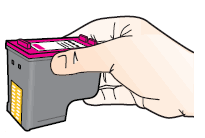
Hold the ink cartridge by its sides.

-
Lightly dampen a clean, lint-free cloth or swab with bottled or distilled water.
-
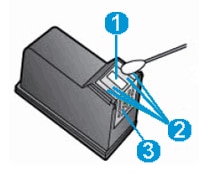
Clean the face and edges around the ink nozzle with the cloth or swab.
CAUTION:
Do not clean the ink nozzle plate.

-
Nozzle plate - Do not clean
-
Area surrounding ink nozzle - Do clean
-
Ink cartridge contacts - Do not clean
-
-
Wait for the cleaned area to dry before you continue (approximately 10 minutes).
-
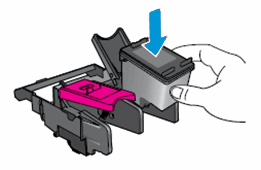
With the nozzles toward the printer, insert the ink cartridge into its slot until it snaps into place.
NOTE:
Install the color ink cartridge on the left and the black ink cartridge on the right.

-
Close the lid on the ink cartridge slot to secure the ink cartridge into place.
-
Repeat these steps to clean around the nozzles on the other ink cartridge.
-
Close the ink cartridge access door.
You can refer this HP document for more assistance:- Click here
Let me know how it goes.
To thank me for my efforts to help you, please mark my post as an accepted solution so that it benefits several others.
Cheers.
Sandytechy20
I am an HP Employee
07-03-2019 02:46 PM
Welcome to HP support community.
Manually clean the area around the ink nozzles
-
Gather the following materials:
-
A clean, lint-free cloth or a clean, dry cotton swab
-
Distilled or bottled water
CAUTION:
Do not use tap water because it might contain contaminants that can damage the printhead.
-
-
Gently grasp the handles on either side of the printer, and then raise the ink cartridge access door until it locks into place.
The carriage moves to the center of the printer.

-
Wait until the printer is idle and silent before you continue.
-
Lift up the lid on the ink cartridge slot, and then pull up on the ink cartridge to remove it from the slot.

-
Hold the ink cartridge by its sides.

-
Lightly dampen a clean, lint-free cloth or swab with bottled or distilled water.
-
Clean the face and edges around the ink nozzle with the cloth or swab.
CAUTION:
Do not clean the ink nozzle plate.

-
Nozzle plate - Do not clean
-
Area surrounding ink nozzle - Do clean
-
Ink cartridge contacts - Do not clean
-
-
Wait for the cleaned area to dry before you continue (approximately 10 minutes).
-
With the nozzles toward the printer, insert the ink cartridge into its slot until it snaps into place.
NOTE:
Install the color ink cartridge on the left and the black ink cartridge on the right.

-
Close the lid on the ink cartridge slot to secure the ink cartridge into place.
-
Repeat these steps to clean around the nozzles on the other ink cartridge.
-
Close the ink cartridge access door.
You can refer this HP document for more assistance:- Click here
Let me know how it goes.
To thank me for my efforts to help you, please mark my post as an accepted solution so that it benefits several others.
Cheers.
Sandytechy20
I am an HP Employee
