-
×InformationNeed Windows 11 help?Check documents on compatibility, FAQs, upgrade information and available fixes.
Windows 11 Support Center. -
-
×InformationNeed Windows 11 help?Check documents on compatibility, FAQs, upgrade information and available fixes.
Windows 11 Support Center. -
- HP Community
- Printers
- Printing Errors or Lights & Stuck Print Jobs
- officejet pro 8500 wireless printhead

Create an account on the HP Community to personalize your profile and ask a question
11-09-2018 01:10 PM
My printer keeps saying printhead has a problem with black/yellow.I replaced them with brand new ones and still says the samething.Any sugestions on what to try next
Solved! Go to Solution.
Accepted Solutions
11-10-2018 05:24 PM
Welcome to HP Forums,
This is a great place to get support, find answers and tips to your technical queries.
To provide you with an accurate solution, I'll need a few more details:
Are you using genuine HP Ink cartridge?
What's the exact error message?
Clean the electrical contacts
Follow these steps to clean the electrical contacts on the printhead and inside the product.
CAUTION:
Follow these steps carefully to avoid damaging the sensitive electrical components.
Step one: Clean the contacts on the printhead
Follow these steps to clean the contacts on the printhead.
NOTE:
The ink nozzles on the printheads might clog if you expose them to air for more than a few minutes. The ink nozzles also might clog if you do not use the product for long periods of time.
-
Make sure that the product is turned on.
-
Open the top cover of the product.
-
Press and hold the OK button for five seconds. The carriage moves to the left side of the product. Release the OK button.
CAUTION:
Proceed only if the carriage is on the left side of the product. If it is not, the printheads will be damaged when you install them. If the carriage does not move over, try turning the product off and on again
-
Wait until the carriage is idle and silent.
- Unplug the product power cord from the electrical outlet.
NOTE:
Do not turn the product off by pressing the Power button (
 ). This causes the carriage to move out of reach.
 -
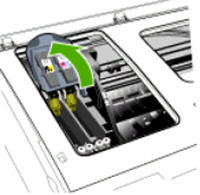
Lift the printhead latch.
Figure : Lift the printhead latch

-
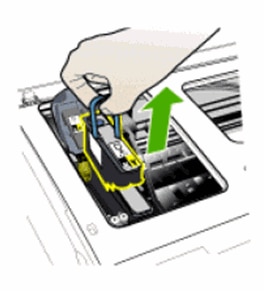
Lift the handle on the printhead that the error message indicates is missing or damaged, and then pull the printhead out of its slot.
Figure : Lift the handle to remove the printhead

- Use a dry, soft, lint-free cloth to remove any ink from the electrical contacts on the printhead.
CAUTION:
Wipe only the electrical contacts. Wiping the ink nozzles, located on the underside of the printhead, can damage the printhead. Do not touch the nozzles. Doing so permanently damages the ink nozzles, and the ink stains clothing.
Figure : Electrical contacts and ink nozzles

-
Electrical contacts
-
Ink nozzles
-
-
Wipe the electrical contacts with the swab until no ink residue remains.
-
Wipe the electrical contacts with a fresh cloth to dry them and remove lint.
-
After the electrical contacts on the printhead are clean and dry, place the printhead on a sheet of paper or a paper towel. Make sure that the ink nozzles face up and do not touch the paper.
Step two: Clean the contacts inside the product
Follow these steps to clean the contacts inside the product.
-
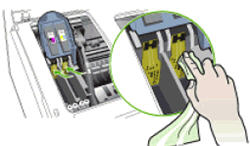
Use a fresh, dry, soft, lint-free cloth to clean the electrical contacts inside the product.
Figure : Clean the electrical contacts inside the product

-
Allow at least five minutes for the contacts to dry. Check the contacts for lint or debris, and then dry or clean the contacts again if needed.
Step three: Restart the product
Follow these steps to restart the product.
-
Plug the product power cord into the electrical outlet.
-
Press the Power button (
 ) to turn on the product. 'Printhead missing or damaged, replace the printhead' displays on the control panel.
 -
Insert the printhead into its color-coded slot. Press down firmly on the printhead to make sure that the electrical contacts touch.
- Pull the printhead latch all the way forward, and then press down to engage the latch.
NOTE:
You might have to press firmly to engage the latch.
-
If the error message indicates that both printheads are missing or damaged, repeat the steps in this procedure to clean the other printhead.
-
Close the top cover of the product. The product restarts and then prints an alignment page.
Keep me posted, how it goes!
If the information I've provided was helpful, give us some reinforcement by clicking the Accepted Solution and Kudos buttons, that'll help us and others see that we've got the answers!
Have a great day!
Cheers:)
Raj1788
I am an HP Employee
11-10-2018 05:24 PM
Welcome to HP Forums,
This is a great place to get support, find answers and tips to your technical queries.
To provide you with an accurate solution, I'll need a few more details:
Are you using genuine HP Ink cartridge?
What's the exact error message?
Clean the electrical contacts
Follow these steps to clean the electrical contacts on the printhead and inside the product.
CAUTION:
Follow these steps carefully to avoid damaging the sensitive electrical components.
Step one: Clean the contacts on the printhead
Follow these steps to clean the contacts on the printhead.
NOTE:
The ink nozzles on the printheads might clog if you expose them to air for more than a few minutes. The ink nozzles also might clog if you do not use the product for long periods of time.
-
Make sure that the product is turned on.
-
Open the top cover of the product.
-
Press and hold the OK button for five seconds. The carriage moves to the left side of the product. Release the OK button.
CAUTION:
Proceed only if the carriage is on the left side of the product. If it is not, the printheads will be damaged when you install them. If the carriage does not move over, try turning the product off and on again
-
Wait until the carriage is idle and silent.
- Unplug the product power cord from the electrical outlet.
NOTE:
Do not turn the product off by pressing the Power button (
 ). This causes the carriage to move out of reach.
 -
Lift the printhead latch.
Figure : Lift the printhead latch

-
Lift the handle on the printhead that the error message indicates is missing or damaged, and then pull the printhead out of its slot.
Figure : Lift the handle to remove the printhead

- Use a dry, soft, lint-free cloth to remove any ink from the electrical contacts on the printhead.
CAUTION:
Wipe only the electrical contacts. Wiping the ink nozzles, located on the underside of the printhead, can damage the printhead. Do not touch the nozzles. Doing so permanently damages the ink nozzles, and the ink stains clothing.
Figure : Electrical contacts and ink nozzles

-
Electrical contacts
-
Ink nozzles
-
-
Wipe the electrical contacts with the swab until no ink residue remains.
-
Wipe the electrical contacts with a fresh cloth to dry them and remove lint.
-
After the electrical contacts on the printhead are clean and dry, place the printhead on a sheet of paper or a paper towel. Make sure that the ink nozzles face up and do not touch the paper.
Step two: Clean the contacts inside the product
Follow these steps to clean the contacts inside the product.
-
Use a fresh, dry, soft, lint-free cloth to clean the electrical contacts inside the product.
Figure : Clean the electrical contacts inside the product

-
Allow at least five minutes for the contacts to dry. Check the contacts for lint or debris, and then dry or clean the contacts again if needed.
Step three: Restart the product
Follow these steps to restart the product.
-
Plug the product power cord into the electrical outlet.
-
Press the Power button (
 ) to turn on the product. 'Printhead missing or damaged, replace the printhead' displays on the control panel.
 -
Insert the printhead into its color-coded slot. Press down firmly on the printhead to make sure that the electrical contacts touch.
- Pull the printhead latch all the way forward, and then press down to engage the latch.
NOTE:
You might have to press firmly to engage the latch.
-
If the error message indicates that both printheads are missing or damaged, repeat the steps in this procedure to clean the other printhead.
-
Close the top cover of the product. The product restarts and then prints an alignment page.
Keep me posted, how it goes!
If the information I've provided was helpful, give us some reinforcement by clicking the Accepted Solution and Kudos buttons, that'll help us and others see that we've got the answers!
Have a great day!
Cheers:)
Raj1788
I am an HP Employee
