-
×InformationNeed Windows 11 help?Check documents on compatibility, FAQs, upgrade information and available fixes.
Windows 11 Support Center. -
-
×InformationNeed Windows 11 help?Check documents on compatibility, FAQs, upgrade information and available fixes.
Windows 11 Support Center. -
- HP Community
- Printers
- Printing Errors or Lights & Stuck Print Jobs
- printer alignment issue

Create an account on the HP Community to personalize your profile and ask a question
Your account also allows you to connect with HP support faster, access a personal dashboard to manage all of your devices in one place, view warranty information, case status and more.
Check some of the most frequent questions about Instant Ink: HP INSTANT INK, HP+ PLANS: INK AND TONER.
Check out our Black or Color Ink Not Printing, Other Print Quality Issues info about: Print quality and Cartridge Issues.

It has been a while since anyone has replied. Simply ask a new question if you would like to start the discussion again.
03-08-2018 07:41 AM
 HP Recommended
Product: OfficeJetPro 8500
Operating System: Microsoft Windows 10 (64-bit)
My officejet Pro 8500 was having a hard time printing so I replaced both printheads and all the ink cartridges. It now prints fine but everytime it runs a page, it wants to align the printhead. It prints the first alignment page but then fails to print the second one. When it fails it generates an alignment failure message. I have run through mutliple diagnostic processes from cleaning the printheads to running diagnostic pages. The only thing I can see is on the Diagnostic page Test Pattern 1 the lines in the square with the cross hairs in the middle do not align correctly. In Test Pattern 3 at the arrows, the gray bars are also ever so slightly off at the edges. Any ideas on how to align things?
3 REPLIES 3
03-09-2018 02:20 PM
HP Recommended
Thank you for joining HP Forums.
This is a great place to get support, find answers to your technical queries.
I understand that your facing print head failure issue on your
Was the alignment successful for the first time?
I suggest you do a Hard Reset
(1) Turn the printer on, if it is not already on.
(2) Wait until the printer is idle and silent before you continue.
(3) With the printer turned on, disconnect the power cord from the rear of the printer.
(4) Unplug the power cord from the wall outlet.
(5) Wait at least 60 seconds.
(6) Plug the power cord back into the wall outlet.
NOTE: HP recommends connecting the printer power cord directly to the wall outlet.
(7) Reconnect the power cord to the rear of the printer.
(8) Turn on the printer, if it does not automatically turn on.
The printer might go through a warm-up period. The printer lights might flash, and the carriage might move.
Wait until the warm-up period finishes and your printer is idle and silent before you proceed.
Follow these steps in the order presented to resolve the issue.
Step One: Check the alignment page
Follow these steps to check the alignment page that printed after the printhead installation.
NOTE:
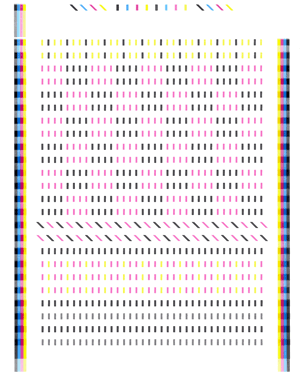
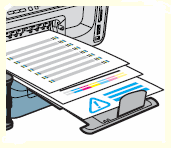
Newly installed printheads must be aligned to the product for best print quality. For successful alignment, a sharp, clear alignment page must be printed, and that requires unused, plain white paper. Colored paper, or paper that has already been printed on, even on the other side, can cause alignment to fail.
Figure : Example alignment page
-
If no paper was loaded, or the paper was previously printed on or colored, or if no alignment page printed, follow these step to retry the alignment.
-
Load plain white paper into the tray.
-
On the control panel, touch the Right Arrow (
 ) to display the second navigation screen.
 -
Touch Setup (
 ), and then touch Tools.
 -
Touch Align Printer, and then touch OK. The alignment process begins.
-
Wait while the product completes the alignment, and then touch OK.
-
Check the alignment page. For successful alignment, the patterns on the alignment page must be sharply printed.
-
If the alignment page prints and there is no error message, the issue is resolved, and you can stop troubleshooting.
-
If the page is obviously faded or streaked, skip to the next step in this document to Clean the printheads.
-
If you are not sure whether the alignment page printed correctly, skip to the step in this document to Print and evaluate a Print Quality Diagnostic page to see if the printheads are working correctly.
-
-
-
If unused, plain white paper was loaded, and an alignment page did print, check the alignment page. For successful alignment, the patterns on the alignment page must be sharply printed.
-
If the page is obviously faded or streaked, skip to the next step in this document to Clean the printheads.
-
If you are not sure whether the alignment page printed correctly, skip to the step in this document to Print and evaluate a Print Quality Diagnostic page to see if the printheads are working correctly.
-
Step two: Clean the printheads
Follow these steps to clean the printheads.
-
Load plain white paper into the tray.
-
On the control panel, touch the Right Arrow (
) to display the second navigation screen. -
Touch Setup (
), and then touch Tools. -
Touch Clean Printheads. The product cleans the printheads.
-
Wait while the product completes the printhead cleaning process, and then touch OK.
Step three: Print and evaluate a Print Quality Diagnostics page
After cleaning the printheads (or if you are not sure a cleaning is required), print and evaluate a Print Quality Diagnostics page.
-
Load plain white paper into the tray.
-
On the control panel, touch the Right Arrow (
) to display the second navigation screen. -
Touch Setup (
), touch the Down Arrow ( ), and then touch Reports.
 -
Touch Print Quality Report. The Print Quality Diagnostics page prints.
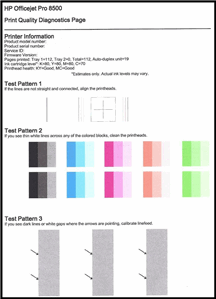
Figure : Example of a Print Quality Diagnostics page
-
Examine the page for defects:
-
If all the Test Patterns on the Print Quality Diagnostic page show no defects, the printheads are operating correctly and do not need to be replaced. Skip to the step in this document to Retry alignment.
-
Test Pattern 2
Figure : Example of white lines in Test Pattern 2

-
If there are white lines through any of the color blocks in Test Pattern 2, follow these steps to clean the printheads:
-
Load plain white paper into the tray.
-
On the control panel, touch the Right Arrow (
) to display the second navigation screen. -
Touch Setup (
), and then touch Tools. -
Touch Clean Printheads. The product cleans the printheads.
-
Wait while the product completes the printhead cleaning process, and then touch OK.
Repeated cleaning might eventually fix the printheads. However, if after repeated cleaning there are still white lines through the color blocks in Test Pattern 2 (but no lines in the gray blocks in Test Pattern 3), skip to the step in this document to Replace the problem printhead.
-
-
If there are white lines through ALL the color blocks in Test Pattern 2, and also white lines through the gray blocks in Test Pattern 3, then do not clean the printheads. Instead, skip to the step in this document to Calibrate linefeed.
-
-
Test Pattern 3
Figure : Example of white lines in Test Pattern 3
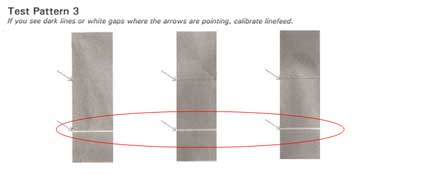
If any of the gray blocks in Test Pattern 3 show dark lines or white gaps where the arrows are pointing, skip to the next step toCalibrate linefeed.
-
Step four: Calibrate linefeed
If any of the gray blocks in Test Pattern 3 show dark lines or white gaps where the arrows are pointing, follow these steps to calibrate linefeed.
-
Load plain white paper into the tray.
-
On the control panel, touch the Right Arrow (
) to display the second navigation screen. -
Touch Setup (
), and then touch Tools. -
Touch Calibrate Linefeed. The product calibrates linefeed.
-
Wait while the product completes the calibration, and then touch OK.
-
Print another Print Quality Diagnostics page.
How to print a Print Quality Diagnostics page
-
If there are still dark lines or white gaps in Test Pattern 3, skip to the step in this document to Service the All-in-One.
-
If there are no dark lines or white gaps in Test Pattern 3, the issue is resolved and you can stop troubleshooting.
Step five: Retry alignment
Follow these steps to retry the alignment.
-
Load plain white paper into the tray.
-
On the control panel, touch the Right Arrow (
) to display the second navigation screen. -
Touch Setup (
), and then touch Tools. -
Touch Align Printer, and then touch OK. The alignment process begins.
-
Wait while the product completes the alignment, and then touch OK.
-
If the alignment page prints and there is no error message, the issue is resolved, and you can stop troubleshooting.
-
If the alignment page fails to print, or if the error message displays after the Print Quality Diagnostic page showed no streaks in the color blocks in Test Pattern 2, skip to the step in this document to Service the All-in-One.
-
Step six: Replace the problem printhead
Refer to the Print Quality Diagnostic page you printed previously to determine the problem printhead.
In general, if the product, its printheads, and its cartridges work correctly, all the color bars are present, unstreaked, and uniform in color across the width of the page. The black text on the page does not show ink streaks.
Review the following table for examples of defects that can exist on the Print Quality Diagnostic page. The following examples are not all inclusive, but represent the most common issues.
If, after repeated printhead cleaning, the Print Quality Diagnostic page shows white lines across the color blocks in Test Pattern 2 (but no white lines in the gray blocks in Test Pattern 3), one or both of the printheads will have to be replaced. The Print Quality Diagnostic page shows which printhead should be replaced.
Look at the color blocks labeled Test Pattern 2. Some of them should show white horizontal streaks (if none of the blocks are streaked, the printheads are okay).
-
Black block has lines – replace the Black/Yellow printhead.
-
Red block has lines – replace the Black/Yellow printhead.
-
Green block has lines – replace the Black/Yellow printhead.
Figure : Streaked black, red, or green color blocks - replace Black/Yellow Printhead

-
Cyan block has lines – replace the Magenta/Cyan printhead.
-
Magenta block has lines – replace the Magenta/Cyan printhead.
Figure : Streaked cyan or magenta color blocks - replace Cyan/Magenta Printhead

After you determine the problem printhead, follow these steps to install the replacement printhead.
-
Load plain white paper into the tray.
-
Open the carriage access door.
Figure : Open the carriage access door

-
Touch the Change Printhead button on the display. The carriage moves out of its station on the right and into the printhead access area on the far left side of the product.
-
Wait for the printhead to stop and become idle.
-
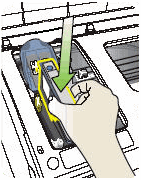
Lift the printhead latch.
Figure : Lift the printhead latch

-
Grasp the handle of the old printhead, and then lift upward to remove the printhead from its slot.
Figure : Remove the printhead from its slot

-
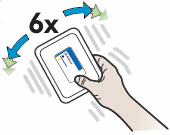
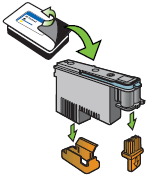
Without removing the replacement printhead from its packaging, rapidly shake it back and forth six times.
Figure : Shake the printhead six times
-
Remove the printhead from its packaging.
-
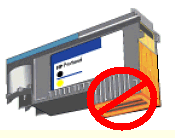
Remove the orange protective caps from the nozzles.
CAUTION:
Do not shake the printheads after removing the orange protective caps.
Figure : Remove the printhead and the protective caps
CAUTION:
Do not touch the nozzles on the printhead. Touching the nozzles can permanently damage the printhead.
Figure : Do not touch the printhead nozzles
-
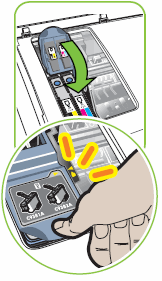
Insert the printhead into its color-coded slot. The label on the printhead must match the label on the printhead latch. Press down firmly on the printhead to ensure proper contact.
-
Insert the Black/Yellow printhead into the slot on the left.
-
Insert the Magenta/Cyan printhead into the slot on the right.
Figure : Insert the printhead into its slot
-
-
Repeat these steps if necessary to replace the other printhead.
NOTE:
Make sure to shake the other printhead back and forth six times before installing it.
-
Pull the printhead latch all the way forward, and then press down to make sure that the latch engages. You might have to apply some pressure to engage the latch.
Figure : Lower the printhead latch
-
Close the carriage access door.
Figure : Close the carriage access door

-
Wait while the product aligns the printheads and prints an alignment page, and then touch OK.
Figure : The product prints an alignment page
-
If these steps resolved the issue, there is no need to continue troubleshooting.
-
If the issue persists, phone support.
They might have multiple options to help you on this.
Please use the following link to create yourself a case number, then call and it may help speed up the call process:
Step 1. Open link: www.hp.com/contacthp
Step 2. Enter the product number or select to auto detect
Step 3. Scroll down to "Still need help? Complete the form to select your contact options"
Step 4. Scroll down and click: HP contact options - click on Get phone number and phone number appear.
They will be happy to assist you immediately.
Keep me posted on any other assistance. Hope that helps!
Have a great day ahead!
Cheers;)
Raj1788
I am an HP Employee
03-21-2018 01:32 PM
HP Recommended
I tried all the suggested ideas and my printer still fails at the alighment. It prints the first page with the small ink like dots and tries to print the 2nd one but it gets stuck. The only thing I can see is the gray boxes are ever so slightly out of alignment. It is less than a 32nd of an inch. The unit prints fine but after every page run it tries to aligh the unit.
thanks
03-22-2018 04:58 PM
HP Recommended
As @Raj1788, is out for the day I am responding on his behalf. It is wonderful to have you back and your patience and time are greatly appreciated. You've displayed excellent commitment and remarkable technical credentials to try and resolve the issue. Kudos to you for a job well done. 🙂
As the issue still persists, there is more to it than meets the eye.The printer might have a hardware issue. A one to one interaction with phone support in real time will keep you in good stead.The printer may need to be replaced as the issue looks hardware related. I am being honest about it by keeping your best interest in mind without beating around the bush.
HP Technical Support can be reached by clicking on the following link: http://hp.care/2moMFSc
(1) Once the support page opens please select the country in which you're located. Next, enter your HP model number on the right.
(2) Next, choose the 'Contact Support' tab at the top and scroll down to the bottom of the 'HP Support- Contact' page to fill out the form provided with your contact information.
(3) Once completed click the 'Show Options' icon on the bottom right.
(4) Lastly, scroll down to the bottom of the page and select 'Get phone number.' A case number and phone number will now populate for you.
They will be happy to assist you immediately.
If the unit is under warranty, the manufacturer’s warranty should take care of it for you.
Hope this helps. Let me know how it goes. To simply say thanks, please click the "Thumbs Up" button to give me a Kudos to appreciate my efforts to help. If this helps, please mark this as “Accepted Solution” as it will help several others with the same issue to get it resolved without hassles.
Take care and have a blessed week ahead. 🙂
Cheers!
DavidSMP
I am an HP Employee
Be alert for scammers posting fake support phone numbers and/or email addresses on the community.
If you think you have received a fake HP Support message, please report it to us by clicking on "Flag Post".
† The opinions expressed above are the personal opinions of the authors, not of HP. By using this site, you accept the Terms of Use and Rules of Participation.


Didn't find what you were looking for?
Ask the community
† The opinions expressed above are the personal opinions of the authors, not of HP. By using this site, you accept the <a href="https://www8.hp.com/us/en/terms-of-use.html" class="udrlinesmall">Terms of Use</a> and <a href="/t5/custom/page/page-id/hp.rulespage" class="udrlinesmall"> Rules of Participation</a>.