-
×InformationNeed Windows 11 help?Check documents on compatibility, FAQs, upgrade information and available fixes.
Windows 11 Support Center. -
-
×InformationNeed Windows 11 help?Check documents on compatibility, FAQs, upgrade information and available fixes.
Windows 11 Support Center. -
- HP Community
- Printers
- Printing Errors or Lights & Stuck Print Jobs
- printer tray won't go back in on hp envy 4500

Create an account on the HP Community to personalize your profile and ask a question
03-26-2020 12:32 PM
i opened the printer tray when setting up this printer yesterday, and it now seems to be completely jammed. it won't move. there is nothing in the way (i've checked a hundred times) and it just won't move. as a result, the door won't close. help?
03-29-2020 10:11 AM
Hi @csluck
Welcome to the HP Support Community. I'd be happy to assist you with the "Cannot close the tray after clearing paper jam" issue.
Let's check if there's anything at the bottom of the printer.
Follow the steps to clear paper jam on the printer-
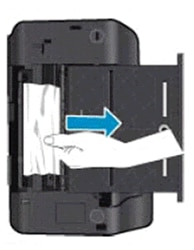
Remove any jammed paper that is accessible from the rear of the printer.
-
With the printer turned on, disconnect the power cord from the rear of the printer.
WARNING:
You must disconnect the power cord before reaching inside the printer to avoid the risk of injuries or electric shock.
-
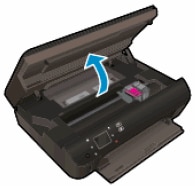
Open the cartridge access door.
-
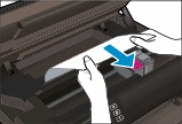
Remove any jammed paper from the cartridge access area, located toward the front of the printer. To avoid tearing any whole sheets of paper, pull the paper with both hands.
-
Use a flashlight to thoroughly check for torn pieces of paper that might remain inside the printer. If any torn pieces of paper remain inside the printer, more jams might occur.
-
Locate the paper path cover in the area behind the cartridge access area.
-
To remove the paper path cover, pinch the tabs together, and then lift up.
-
Pinch the tabs together
-
Lift up
-
-
Gently remove any jammed paper and bits of torn paper from the rear roller. To avoid tearing any whole sheets of paper, pull the paper with both hands.
NOTE:
Use a flashlight to thoroughly check for torn pieces of paper that might remain inside the printer. If any torn pieces of paper remain inside the printer, more jams might occur.
-
Locate the duplexer path cover, directly underneath the paper path cover.
-
Insert your finger into the opening at the rear of the cover, and then lift up. Lift until you hear the duplexer path cover click into the upright position.
-
Gently remove any jammed paper and bits of torn paper. To avoid tearing any whole sheets of paper, pull the paper with both hands.
NOTE:
Use a flashlight to thoroughly check for torn pieces of paper that might remain inside the printer. If any torn pieces of paper remain inside the printer, more jams might occur.
-
Lift the duplexer path cover
-
Remove any jammed paper
-
-
Gently push the duplexer path cover down until you hear it click into place.
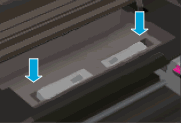
- Replace the paper path cover with the spring-loaded tabs facing toward the front of the printer. Gently press the cover down at the left and right edges. The cover clicks into place.
NOTE:
Make sure that both edges of the paper path cover are in place.
-
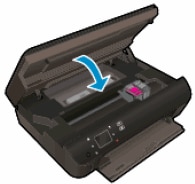
Close the cartridge access door.
Try to print. If the error persists, check for jammed paper in another area of the printer.
Clear jammed paper from the input tray
Remove any jammed paper that is accessible from the input tray area.
-
Pull out the input tray
-
Remove any loose sheets of paper from the tray.
-
Gently remove any jammed paper and bits of torn paper from the tray. To avoid tearing any whole sheets of paper, pull the paper with both hands.
-
Check for torn pieces of paper that might remain inside the tray. If any torn pieces of paper remain inside the printer, more jams might occur.
-
Grasp the front of the paper tray, and then push it back until you hear it click into place.
-
Remove the paper from the tray, and then turn off the printer.
-
Wait for 30 seconds, and then turn on the printer.
If you have checked and removed any jammed paper from each printer area and the error persists, continue to the next step.
Step 2: Make sure the printer is placed on a flat surface
-
Gently turn the printer onto its right side.
-
Check the surface directly under and around where the printer sits for the following:
-
Pieces of paper trapped in the input tray
-
Small, hard objects, such as cables, pens, pencils, and books
-
Soft or uneven surfaces, such as placemats or carpet-like material
-
-
Remove any obstructions that might remain.
-
Turn the printer to its normal position.
-
Reconnect the power cord to the rear of the printer, and then turn on the printer.
-
Touch OK to clear any messages on the printer control panel.
Try to print. If the error persists, continue to the next step.
Step 3: Clean the paper rollers behind the ink cartridge access area
Dust, paper fiber, and other debris might accumulate on the paper feed rollers and cause paper jams and paper feed issues. Clean the rollers inside the printer, and then try to print again.
-
Press the Power button to turn off the printer, if it is not off already.
-
Disconnect the power cord from the rear of the printer.
WARNING:
You must disconnect the power cord before reaching inside the printer to avoid risk of injuries or electric shock.
-
Open the cartridge access door.
-
Locate the paper path cover in the area behind the cartridge access area.
-
To remove the paper path cover, pinch the tabs together, and then lift up.
-
Pinch the tabs together
-
Lift up
-
-
Lightly dampen the swab with the water, and then squeeze any excess liquid from the swab.
-
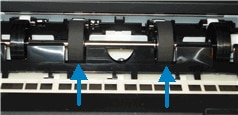
Press the swab against the rollers inside the printer, and then rotate the rollers upwards with your fingers. Apply a moderate amount of pressure to remove any dust or dirt buildup.
-
Allow the rollers to dry for 10 to 15 minutes.
-
Check the rollers on the underside of the paper path cover. Make sure that the rollers are not missing, that they turn easily, and that they are springy when you press them. If the rollers are damaged, replace the paper path cover with a new one.
- Replace the paper path cover with the spring-loaded tabs facing toward the front of the printer. Gently press the cover down at the left and right edges. The cover clicks into place.
NOTE:
Make sure that both edges of the paper path cover are in place.
Figure : Replace the paper path cover
-
Close the cartridge access door.
-
Reconnect the power cord to the rear of the printer, and then turn on the printer.
-
Press OK to clear any messages on the printer control panel.
Hope this helps! Keep me posted.
Please click “Accept as Solution” if you feel my post solved your issue, it will help others find the solution.
Click the “Kudos, Thumbs Up" on the bottom right to say “Thanks” for helping!
Have a great day!