-
×InformationNeed Windows 11 help?Check documents on compatibility, FAQs, upgrade information and available fixes.
Windows 11 Support Center. -
-
×InformationNeed Windows 11 help?Check documents on compatibility, FAQs, upgrade information and available fixes.
Windows 11 Support Center. -
- HP Community
- Printers
- Printing Errors or Lights & Stuck Print Jobs
- reinstall print head

Create an account on the HP Community to personalize your profile and ask a question
04-09-2018 03:44 PM
Thank you for joining HP Forums.
This is a great place to get support, find answers to your technical queries.
I understand that the printer has an error "Reinstall printhead"
Step 1: Reset the printer
Resetting the printing mechanism might resolve the error.
-
Turn the printer on, if it is not already on.
-
Wait until the printer is idle and silent before you continue.
-
With the printer turned on, disconnect the power cord from the rear of the printer.
-
Unplug the power cord from the wall outlet.
-
Wait at least 60 seconds.
-
Plug the power cord back into the wall outlet.
note:
HP recommends connecting the printer power cord directly to the wall outlet.
-
Reconnect the power cord to the rear of the printer.
-
Turn on the printer, if it does not automatically turn on.
-
Wait until the printer is idle and silent before you proceed.
Try to print. If these steps resolved the issue, you do not need to continue troubleshooting.
Step 2: Unseat the printhead
Unseat the printhead from the carriage, and then reseat the printhead.
note:
You do not need to remove the printhead from the carriage.
-
Open the ink cartridge access door.
-
Unplug the power cord from the rear of the printer. Unplugging the printer prevents the carriage from moving.
warning:
You must disconnect the power cord before reaching inside the printer to avoid risk of injuries or electric shock.
-
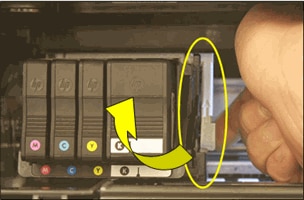
Lift the carriage latch.
Figure : Lift the carriage latch
-
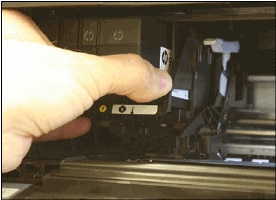
Grasp the sides of the printhead, and then slightly lift the printhead without fully removing it from the carriage.
Figure : Slightly lift the printhead
Step 3: Reseat the printhead, and then lower the carriage latch
Reseat the printhead to make sure the printhead and carriage contacts are positioned correctly.
-
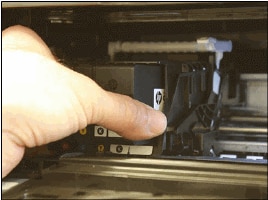
Reinsert the printhead into the carriage to reseat it. As you guide the printhead into the carriage, it settles into the carriage as it seats.
Figure : Reseat the printhead
-
Gently rock the printhead to the left and right to make sure the printhead fully seats in the carriage.
-
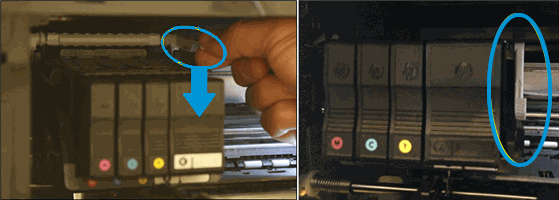
Lower the carriage latch.
Figure : Lower the carriage latch
-
Make sure the carriage latch is down.
Figure : Carriage latch positions
-
Carriage latch is up
-
Carriage latch is down
-
-
Close the ink cartridge access door.
-
Reconnect the power cord to the rear of the printer.
-
If the printer does not turn on by itself, press the Power button to turn it on.
-
Wait until the warm-up period finishes and your printer is idle and silent before you proceed.
Try to print. If these steps resolved the issue, you do not need to continue troubleshooting.
Step 4: Reseat the printhead up to three times
Sometimes error messages persist after inserting the printhead. To clear any error messages, repeat the previous steps to reseat the printhead up to three times.
Examples of error messages on the printer control panel:
 Problem with Ink System
 Printhead Problem
 Ink System Failure
 Printer Failure
 Carriage Jam
-
Try to print. If these steps resolved the issue, you do not need to continue troubleshooting.
-
If the error messages persist or change, continue to the next step.
Step 5: Remove the ink cartridges, and then check the error message
Removing the ink cartridges and checking for an error message can help diagnose the printer issue. Remove the ink cartridges, and then check for the error message.
-
Open the ink cartridge access door.
-
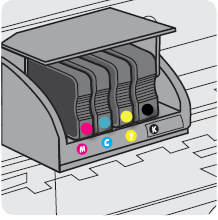
Make sure the colored dot and letter on the ink cartridge label matches the correct carriage slot.
Figure : The letter on the cartridge label should match its slot
-
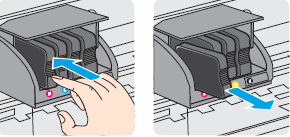
Push in on the front of the ink cartridge to release it, and then pull the ink cartridge toward you to remove it from its slot.
Figure : Removing the cartridge from its slot
-
Repeat these steps for the other ink cartridges.
-
Close the ink cartridge access door.
-
Look at the control panel.
-
If the printer displays a The printhead appears to be missing, not detected, or incorrectly installed. message on the control panel, then skip to the step to update the printer firmware.
-
If the message has changed to Replace [K/C/M/Y] Ink Cartridge then continue to the next step.
-
Step 6: Clean the ink cartridge contacts, and then check the error message
Cleaning the ink cartridge contacts, and replacing the ink cartridges one at a time can help determine if a specific ink cartridge is causing the error message.
-
Open the ink cartridge access door.
-
Lightly dampen a clean, lint-free cloth with bottled or distilled water.
-
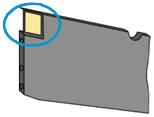
Gently wipe the copper-colored contact on the ink cartridge.
Figure : Copper-colored contact on the ink cartridge
-
Wipe the contact with a dry lint-free cloth.
-
Wait at least 10 minutes for the cartridge to dry before proceeding to the next step
-
Repeat the cleaning steps for all of the ink cartridges.
-
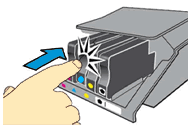
Carefully reinsert one of the ink cartridges into its slot, and then push the ink cartridge forward until it snaps into place.
Figure : Push the ink cartridge forward in the slot until it clicks into place
-
Close the ink cartridge access door.
-
Check the printer control panel to see if the error message persists.
-
If The printhead appears to be missing, not detected, or incorrectly installed. displays, replace the ink cartridge that was just reinstalled.
The test has determined that the reinstalled ink cartridge was causing the problem.
-
If the Replace [K/C/M/Y] Ink Cartridge displays, repeat steps 5-7 for the three remaining ink cartridges.
-
Use this link: https://support.hp.com/us-en/product/hp-officejet-pro-8710-all-in-one-printer-series/7902014/model/7... for further troubleshooting.
If the issue persists, I would personally suggest you contact our HP phone support for one on one interaction.
If your product is out of warranty, then remember to choose the paid options to get the tech support number.
They might have multiple options to help you on this.
Please use the following link to create yourself a case number, then call and it may help speed up the call process:
Step 1. Open link:www.hp.com/contacthp
Step 2. Sign in / sign in as a guest
Step 3. Enter the product number or select to auto detect
Step 4. Scroll down to "Still need help? Complete the form to select your contact options"
Step 5. Scroll down and click: HP contact options - click on Get phone number and phone number appear.
Keep me posted on further assistance. Hope that helps!
Have a great day ahead!
Cheers:)
Raj1788
I am an HP Employee
