-
×InformationNeed Windows 11 help?Check documents on compatibility, FAQs, upgrade information and available fixes.
Windows 11 Support Center. -
-
×InformationNeed Windows 11 help?Check documents on compatibility, FAQs, upgrade information and available fixes.
Windows 11 Support Center. -
- HP Community
- Printers
- Scanning, Faxing, and Copying
- HP 7612 - Problem with ink system - Check for leaks

Create an account on the HP Community to personalize your profile and ask a question
11-12-2018 10:25 PM
Hi all,
I have an issue with a new HP officejet 7612.
After unboxing and setting up the printer, i get this error:
"Problem with ink system
"Remove cartridges and inspect for leaks.
Do not use leaky cartridges. Re-install cartridges if okey.
Turn the printer off then on again."
I removed the cartridges and checked them, their was no leak. After re-inserting the cartridges and rebooting the device, i still get the error message. I even tried with a pair of new cartridges -From another device , new- but i still get the error message.
Before returning the device since it is still under warranty, is there any simple fix out there that can solve this isue?
Thanks
11-13-2018 03:23 PM
Welcome to HP Forums,
This is a great place to get support, find answers and tips,
Thank you for posting your query, I'll be more than glad to help you out 🙂
A 'Problem with Ink System' error message displays on the control panel or computer indicating an ink system failure, and the printer does not print. In this scenario remove cartridges and inspect for leaks. If there are no leaks, re-install cartridges and close the printer cover.
Don't worry as I'll be glad to help, however, to provide an accurate resolution, I need a few more details:
When was the last time it worked fine?
Have you made any hardware/software changes?
Did this happen after a recent window or software update?
Have you tried with different ink cartridges?
While you respond to that, I recommend you to perform the following steps to isolate the issue and arrive at a fix:
Use the automated tool to clean the printhead
-
Load unused, plain white paper into the input tray.
-
On the printer control panel, touch the Right Arrow to display additional options.
-
Touch Setup touch Tools, and then touch Clean Printhead.
-
Wait until the printhead cleaning sequence completes and the report prints.
Also, follow the document Resolving 'Problem with Ink System' Error ( Refer to the Step 4 and 5 )
Keep me posted,
If the information I've provided was helpful, give us some reinforcement by clicking the solution and kudos buttons,
that'll help us and others see that we've got the answers!
Good Luck.
ECHO_LAKE
I am an HP Employee
11-19-2018 11:18 AM
I see that you were interacting with @Echo_Lake. I'd like to help.
I am eager to know, did you try removing the cartridges and cleaning it.
If not, follow the below steps:
Clean the ink cartridges, and then check the error message
-
Gather the following materials:
-
A clean, lint-free cloth
-
A clean, dry cotton swab
-
Distilled or bottled water
CAUTION:
Do not use tap water because it might contain contaminants that can damage the printhead.
-
-
Lightly dampen a clean, lint-free cloth with bottled or distilled water.
-
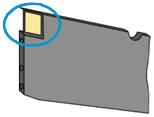
Gently wipe the copper-colored contact on one of the ink cartridges.
Figure : Wiping the copper-colored contact
-
Wipe the contact with a dry, lint-free cloth before proceeding to the next step.
-
Repeat these steps for the three remaining ink cartridges.
-
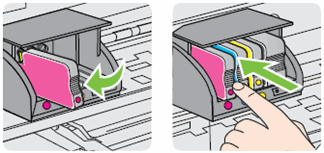
Carefully reinsert one of the ink cartridges into its slot, and then push the ink cartridge forward until it clicks into place.
Figure : Reinserting the ink cartridge
-
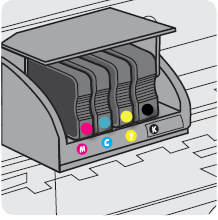
Make sure each colored dot on the ink cartridge label matches the colored dot on the print carriage.
Figure : Matching the colored dot on the print carriage
-
Close the ink cartridge access door.
-
Check the printer control panel to see if the error message persists.
-
If the message is to Replace the
,
,
, or
Ink Cartridge, remove the specified ink cartridge(s) and clean the copper-colored contact again, and then reinsert the ink cartridge(s).
-
Update the printer firmware
-
Make sure the printer is on and connected to the computer through your local network or USB cable.
-
If a Let's identify your product to get started page displays, click Printer.
-
Type your printer model number, and then click Submit.
The software results page for your printer displays with the default operating system selected.
-
If you need to change the version of Windows, click Change, select your version, and then click Change.
-
Click Firmware, and then click Download.
If a Firmware section is not listed, an update is not currently available for your printer.
-
Save the file to your computer.
-
Locate and then open the file to start the installation process.
-
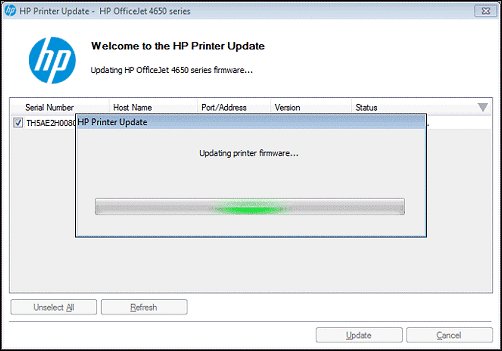
When the HP Printer Update window opens, see if the printer serial number displays.
-
If the serial number displays, select the checkbox next to it, and then click Update.
-
If the serial number displays but the status is 'not applicable' (grayed out), you do not need the firmware update. Click Cancel.
-
If the serial number does not display and your printer uses a network connection, connect a USB cable to the printer and computer. Wait 20 seconds, and then click Refresh. When the serial number displays, select the checkbox next to it, and then click Update.
-
-
When the update completes, click OK.
-
If you connected a USB cable to update your network printer, remove the USB driver installed by Windows.
-
Search Windows for control panel, and then click Control Panel in the results.
-
Click View Devices and printers.
-
Right-click the USB printer device that matches your printer model, and then select Remove Device.
-
Disconnect the USB cable from the printer and the computer, and then restart the computer.
-
Let me know if that helps.
To thank me for my efforts to help you, please mark my post as an accepted solution so that it benefits several others.
Cheers.
Sandytechy20
I am an HP Employee