-
×InformationNeed Windows 11 help?Check documents on compatibility, FAQs, upgrade information and available fixes.
Windows 11 Support Center. -
-
×InformationNeed Windows 11 help?Check documents on compatibility, FAQs, upgrade information and available fixes.
Windows 11 Support Center. -
- HP Community
- Printers
- Scanning, Faxing, and Copying
- Scan to email failed b/c of new password. how do i fix?

Create an account on the HP Community to personalize your profile and ask a question
Your account also allows you to connect with HP support faster, access a personal dashboard to manage all of your devices in one place, view warranty information, case status and more.
Common problems HP Solution Center not working : Adobe Flash Player Error and Unable to scan
We would like to share some of the most frequently asked questions about HP Solution Center not working : Adobe Flash Player Error and Unable to Scan.

It has been a while since anyone has replied. Simply ask a new question if you would like to start the discussion again.
13 REPLIES 13
02-24-2021 11:14 AM
 HP Recommended
I reviewed your post and I understand that scan to email is not working after changing the email password.
Don’t worry, I assure you I will try my best to get this sorted.
I recommend you follow the steps in the below article and update the password in scan to email authorization and check whether the issue is resolved.
https://support.hp.com/in-en/document/c05519493
Let me know how it goes and you have a great day!
P.S: Welcome to the HP Support Community 😊
If you wish to show appreciation for my efforts, mark my post as Accept as Solution. Your feedback counts!
Cheers!
Stay Home – Stay Safe
The_Fossette
I am an HP Employee
03-10-2021 12:42 PM
HP Recommended
I recommend you contact support to further diagnose the issue.
Here is how you can get in touch with support.
1)Click on this link – www.hp.com/contacthp/
2)Select the product type.
3)Enter the serial number of your device or select let HP detect your product option.
4)Select the country from the drop-down.
5)You should see the HP phone support number or Chat option listed.
Cheers!
The_Fossette
I am an HP Employee
03-21-2021 08:07 AM
HP Recommended
I recommend you reconfigure your email following the below steps.
Step 1: Set up Scan to Email
-
Locate the product’s IP address. The IP address can be found on the control panel:
-
Enter the product's IP address into a web browser address line. Press the Enter key on the computer keyboard.
Figure : Example of an IP address in a browser window

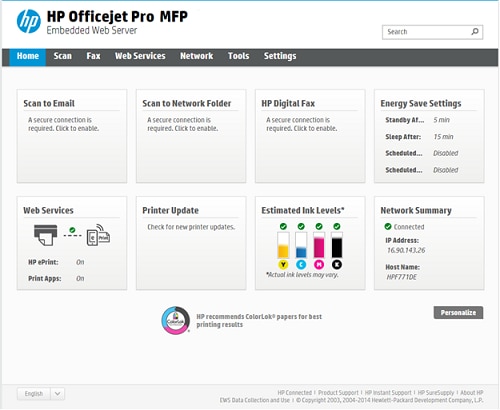
The product's Embedded Web Server (EWS) home page displays.
Figure : Example of EWS home page
-
Click the Scan tab.
Figure : Example of scan screen

-
On the left navigation pane, click Scan to Email Setup.
-
On the Redirecting to Secure Page dialog box, click OK.
The Redirecting to Secure Page dialog box indicates that the browser is being redirected to a secure Web page. The information on the secure Web page will be encrypted for protection and privacy purposes.
The Web browser might display a message about the Web site's security certificate. Since the Web page is secure, click Continue to this website.
-
Click on the Scan to Email Setup.
Figure : Example of Outgoing Email Profiles screen

-
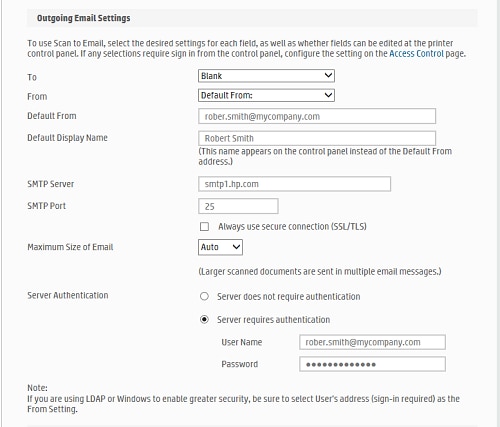
On the Scan to Email Setup screen, complete the following:
-
Default From: The email address that will display as the sender of the email.
Example: robert.smith@mycompany.com
-
Default Display Name: The name that will appear on the product control panel when the scan to email function is used.
Example: Robert Smith
-
SMTP Server: The SMTP server address for the network.
-
SMTP Port: The SMTP port number is set to 25 by default.
SMTP server addresses typically have this format: smtp.company.com or smtp.provider.com. SMTP server addresses may also contain a number or a geographic location.
NOTE:
If you are unsure of the SMTP server address, check with your IT department, Internet service provider, or email service provider.
NOTE:
The SMTP port number is set to 25 by default. You should not need to change it. However, if this setting if different from the default, your IT department or Internet service provider should be able to provide to correct setting.
-
Email Log-in Authentication: This information is required only if the email system or Internet service provider require additional security authentication. The User ID and password for email log-in authentication are encrypted. The product control panel will only display the sender's email address and the display name when the scan to email function is used.
Figure : Example of Outgoing Profiles screen completed:
-
To test the configuration, use the Outgoing Email Test feature at the button of the screen, add a destination email address, and then click on Save and Test.
Figure : Example of Outgoing Email Test

NOTE:If the test fails, make sure to have a DNS address in the printer network configuration, this can be checked by going into the Network menu either on the EWS or the printer's front panel.
Step 2: Use the Scan to Email feature
-
From the Home screen on the product control panel, touch Scan.
-
Touch Email.
-
Select the From address.
-
To add a subject line to the email, touch the Subject button. Use the keyboard displayed on the control panel to type the subject and then touch Done.
-
To enter the To address, touch the To button, and then:
-
Select the email address from the list of saved email addresses.
-
Touch New Email and use the keyboard displayed on the control panel to type the email address.
Touch Done.
-
-
Load the document onto the scanner glass or into the document feeder, and then touch Start Scan.
The email is sent once all pages have been scanned.
Let me know how it goes.
The_Fossette
I am an HP Employee
03-25-2021 06:55 PM
HP Recommended
Thanks. No matter what i try it says the smtp email and password don't match
Everything looks perfect but every time i type or paste my email password into the SMTP password field it turns red and won't even let me test it
Be alert for scammers posting fake support phone numbers and/or email addresses on the community.
If you think you have received a fake HP Support message, please report it to us by clicking on "Flag Post".
† The opinions expressed above are the personal opinions of the authors, not of HP. By using this site, you accept the Terms of Use and Rules of Participation.


Didn't find what you were looking for?
Ask the community
† The opinions expressed above are the personal opinions of the authors, not of HP. By using this site, you accept the <a href="https://www8.hp.com/us/en/terms-of-use.html" class="udrlinesmall">Terms of Use</a> and <a href="/t5/custom/page/page-id/hp.rulespage" class="udrlinesmall"> Rules of Participation</a>.