-
×InformationNeed Windows 11 help?Check documents on compatibility, FAQs, upgrade information and available fixes.
Windows 11 Support Center. -
-
×InformationNeed Windows 11 help?Check documents on compatibility, FAQs, upgrade information and available fixes.
Windows 11 Support Center. -
- HP Community
- Printers
- Printer Ink Cartridges & Print Quality
- Black ink leaks continously into corner of printer

Create an account on the HP Community to personalize your profile and ask a question
Your account also allows you to connect with HP support faster, access a personal dashboard to manage all of your devices in one place, view warranty information, case status and more.
Check some of the most frequent questions about Instant Ink: HP INSTANT INK, HP+ PLANS: INK AND TONER.
Check out our Black or Color Ink Not Printing, Other Print Quality Issues info about: Print quality and Cartridge Issues.

It has been a while since anyone has replied. Simply ask a new question if you would like to start the discussion again.
02-12-2018 11:20 PM
 HP Recommended
Product: Photosmart 5520 CX042A
Operating System: Microsoft Windows 10 (64-bit)
Printer won't print black ink. After reading similar/same product issues i noticed that the black ink has pooled in the right-most corner of the printer. Have replaced multiple black ink cartridges under the assumption that the cartridge was bad. Have run all the diagnostic options. Is there a fix for this issue?
.JPG")
.JPG")
.JPG")
Solved! Go to Solution.
1 ACCEPTED SOLUTION
Accepted Solutions
02-14-2018
06:55 AM
- last edited on
10-06-2021
12:25 PM
by
![]() AgathaV
AgathaV
HP Recommended
Hi! @MythOfFire, Welcome to HP forums.
I understand the black ink is continuously leaking into the corner of your printer.
Have you tried checking with a different ink cartridge?
Try using a different ink cartridge and check if it helps.
As you mentioned the black ink is continuously leaking into the corner of your printer.
It is NOT supposed to leak ink not from anywhere, It sounds like a hardware issue to me.
Please contact HP support for service options.
Clean the cartridge contacts
➡️ Follow these steps to clean the contacts on the cartridge and in the cartridge slot.
caution:
➡️ Clean the cartridges one at a time. Do not leave a cartridge outside the product for more than 30 minutes.
-
Gather the following materials:
-
Clean, lint-free swabs that will not come apart or leave fibers
-
A sheet of paper to place the cartridges on
-
-
Press the Power button (
 ) to turn on the product.
 -
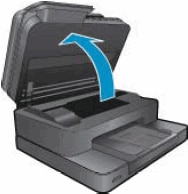
Open the cartridge access door. The carriage moves to the access area.
Figure : Open the cartridge access door
-
Disconnect the power cord from the rear of the product.
-
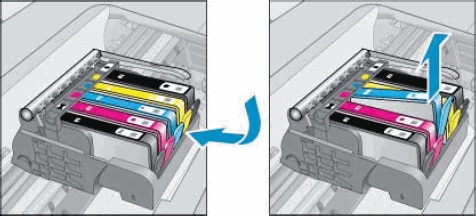
Press the tab on the front of the cartridge in to release it, and then pull up on the cartridge to remove it from the slot.
Figure : Remove the cartridge from the slot
-
Hold the cartridge by its sides, and then find the electrical contacts on the bottom of the cartridge. The electrical contacts are four small rectangles of copper-colored metal.
Figure : Cartridge contacts
-
Cartridge contacts
-
-
Inspect the contacts for ink and debris buildup.
-
Wipe the contacts with a swab until no debris remains on them.
caution:
Be careful to wipe only the contacts. Do not smear any ink or debris elsewhere on the cartridge.
-
Turn the cartridge on its side, and then place it onto the sheet of paper.
-
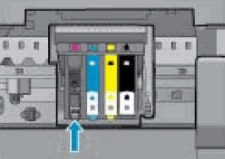
Locate the electrical contacts in the cartridge slot. The contacts are four copper-colored pins.
Figure : Location of the cartridge slot contacts
-
Wipe the contacts with a swab until no debris remains on them.
-
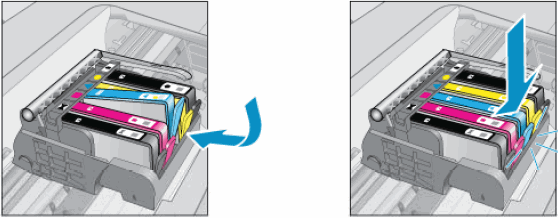
With the contacts facing down, slide the cartridge into its slot. Press down on the cartridge until it clicks into place.
Figure : Insert the cartridge
-
Repeat these steps to clean and reinsert any of the other cartridges.
-
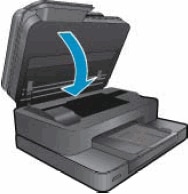
Close the cartridge access door.
Figure : Close the cartridge access door
-
Reconnect the power cord to the rear of the product.
-
Press the Power button (
) to turn on the product if it does not turn on automatically.
⚠️ If necessary you can check the drivers updates: Software and Driver Downloads
Link to contact HP.
If the solution provided worked for you, please mark accepted solution for this post.
Let me know if this helps!
Have a beautiful day ahead! 🙂
Please click “Accept as Solution” if you feel my post solved your issue, it will help others find the solution.
Click the “Kudos, Thumbs Up" on the bottom right to say “Thanks” for helping!
A4Apollo
I am an HP Employee
4 REPLIES 4
02-14-2018
06:55 AM
- last edited on
10-06-2021
12:25 PM
by
![]() AgathaV
AgathaV
HP Recommended
Hi! @MythOfFire, Welcome to HP forums.
I understand the black ink is continuously leaking into the corner of your printer.
Have you tried checking with a different ink cartridge?
Try using a different ink cartridge and check if it helps.
As you mentioned the black ink is continuously leaking into the corner of your printer.
It is NOT supposed to leak ink not from anywhere, It sounds like a hardware issue to me.
Please contact HP support for service options.
Clean the cartridge contacts
➡️ Follow these steps to clean the contacts on the cartridge and in the cartridge slot.
caution:
➡️ Clean the cartridges one at a time. Do not leave a cartridge outside the product for more than 30 minutes.
-
Gather the following materials:
-
Clean, lint-free swabs that will not come apart or leave fibers
-
A sheet of paper to place the cartridges on
-
-
Press the Power button (
) to turn on the product. -
Open the cartridge access door. The carriage moves to the access area.
Figure : Open the cartridge access door
-
Disconnect the power cord from the rear of the product.
-
Press the tab on the front of the cartridge in to release it, and then pull up on the cartridge to remove it from the slot.
Figure : Remove the cartridge from the slot
-
Hold the cartridge by its sides, and then find the electrical contacts on the bottom of the cartridge. The electrical contacts are four small rectangles of copper-colored metal.
Figure : Cartridge contacts
-
Cartridge contacts
-
-
Inspect the contacts for ink and debris buildup.
-
Wipe the contacts with a swab until no debris remains on them.
caution:
Be careful to wipe only the contacts. Do not smear any ink or debris elsewhere on the cartridge.
-
Turn the cartridge on its side, and then place it onto the sheet of paper.
-
Locate the electrical contacts in the cartridge slot. The contacts are four copper-colored pins.
Figure : Location of the cartridge slot contacts
-
Wipe the contacts with a swab until no debris remains on them.
-
With the contacts facing down, slide the cartridge into its slot. Press down on the cartridge until it clicks into place.
Figure : Insert the cartridge
-
Repeat these steps to clean and reinsert any of the other cartridges.
-
Close the cartridge access door.
Figure : Close the cartridge access door
-
Reconnect the power cord to the rear of the product.
-
Press the Power button (
) to turn on the product if it does not turn on automatically.
⚠️ If necessary you can check the drivers updates: Software and Driver Downloads
Link to contact HP.
If the solution provided worked for you, please mark accepted solution for this post.
Let me know if this helps!
Have a beautiful day ahead! 🙂
Please click “Accept as Solution” if you feel my post solved your issue, it will help others find the solution.
Click the “Kudos, Thumbs Up" on the bottom right to say “Thanks” for helping!
A4Apollo
I am an HP Employee
02-14-2018 05:23 PM
HP Recommended
Thank you for the response,
I moved the printer from one room to another that provided more office space. This is the only change. Prior to the move the printer worked as normal. It was several weeks before I tried printing in the new location, but it hasn't worked since.
I have installed all the current software and drivers, and have reinstalled them since this issue began.
It doesn't matter what application i print from, the black ink doesn't work.
I only use HP certified new catridges and have never used a refilled ink cartridge in this printer.
I have replaced the black ink cartridge three times. I have one more new cartridge but it seems wasteful to install it just to have it leak out.
The printer is several years old, but still in excellent physical condition, aside from the ink leak. It is no longer under a warranty.
I have cleaned the cartridge contacts but this did not correct the problem as far as the currently installed ink catridge is concerned.
02-15-2018 01:22 PM - edited 02-15-2018 01:22 PM
HP Recommended
@MythOfFire, Thanks for your response and time.
I appriciate your efforts for trying out the steps.
As you mentioned the issue still persists after trying out the steps.
The printer should not leak ink from anywhere by design.
So it certainly looks to be a hardware issue with your printer. And it's time to upgrade your printer.
Please contact HP support for service options.
Link to contact HP.
Have a great day ahead!
Take Care! 🙂
Please click “Accept as Solution” if you feel my post solved your issue, it will help others find the solution.
Click the “Kudos, Thumbs Up" on the bottom right to say “Thanks” for helping!
A4Apollo
I am an HP Employee
Be alert for scammers posting fake support phone numbers and/or email addresses on the community.
If you think you have received a fake HP Support message, please report it to us by clicking on "Flag Post".
† The opinions expressed above are the personal opinions of the authors, not of HP. By using this site, you accept the Terms of Use and Rules of Participation.


Didn't find what you were looking for?
Ask the community
† The opinions expressed above are the personal opinions of the authors, not of HP. By using this site, you accept the <a href="https://www8.hp.com/us/en/terms-of-use.html" class="udrlinesmall">Terms of Use</a> and <a href="/t5/custom/page/page-id/hp.rulespage" class="udrlinesmall"> Rules of Participation</a>.