-
×InformationNeed Windows 11 help?Check documents on compatibility, FAQs, upgrade information and available fixes.
Windows 11 Support Center. -
-
×InformationNeed Windows 11 help?Check documents on compatibility, FAQs, upgrade information and available fixes.
Windows 11 Support Center. -
- HP Community
- Printers
- Printer Setup, Software & Drivers
- Re: Hp deskjet 2652 tricolor light blinking

Create an account on the HP Community to personalize your profile and ask a question
Your account also allows you to connect with HP support faster, access a personal dashboard to manage all of your devices in one place, view warranty information, case status and more.
Check some of the most frequent questions about Instant Ink: HP INSTANT INK, HP+ PLANS: INK AND TONER.
Check out our WINDOWS 11 Support Center info about: OPTIMIZATION, KNOWN ISSUES, FAQs AND MORE.

It has been a while since anyone has replied. Simply ask a new question if you would like to start the discussion again.
06-09-2020 11:11 AM - edited 06-09-2020 11:13 AM
 HP Recommended
Product: Hp deskjet 2652
Operating System: Microsoft Windows 10 (32-bit)
need help ive tried to fix this issue for days now and nothing is helping. Went to replace my ink for my printer and after I installed the ink correctly the tricolor light started to blink and the alignment page did not print like it has before. Tried to install an updated driver for it and it keeps saying failed I followed the steps to try it again and still says failed
9 REPLIES 9
06-12-2020 05:10 PM
HP Recommended
@Gabe910 Welcome to HP Community!
I understand that the tricolor light is blinking.
Do not worry. I will try to fix the issue.
Step one: Restart the printer
-
Press the Power button (
 ) to turn off the product. If the product does not turn off, continue to the next solution.
 -
Wait 60 seconds.
-
Press the Power button to turn on the product.
note:
The product might go through a brief warm-up period. Wait until the warm-up period completes before you continue.
Step two: Print a self-test report
Print a self-test report to make sure that the hardware functions correctly.
-
Make sure that plain white paper is loaded in the input tray.
-
Press and hold the Power button (
), and then press the Cancel button ( ).
). -
Release both buttons. The self-test report prints.
-
If these steps resolved the issue, and the test page prints, there is no need to continue troubleshooting.
-
If the issue persists, continue with the next solution.
-
If the test page does not print, continue with the next solution.
Solution two: Clear any paper jams
Follow these steps to clear any jammed paper from the product. Always clear jammed paper from the rear of the product first, and then from the front.
Step one: Remove any loose paper from the tray
Remove any loose sheets of paper from the input tray and the output tray.
caution:Do not remove jammed paper at this stage. Trying to clear jammed paper from the front of the product can damage the print mechanism.
Step two: Clear the jam from the rear of the printer.
-
Press the Power button (
) to turn off the product. -
Disconnect the power cord from the rear of the product.
-
Disconnect the USB cable from the rear of the product.
-
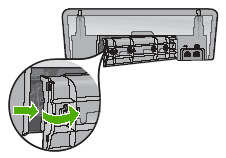
Remove the rear access door. Press the door latch to the right, and then pull out the door.
Figure : Remove the rear access door
-
Carefully remove any jammed paper and bits of torn paper from the rollers inside the product. Use both hands to pull whole sheets of paper to avoid tearing them.
note:
Use a flashlight to thoroughly check the rollers and wheels for torn pieces of paper. If any torn pieces of paper remain inside the product, more jams are likely to occur.
-
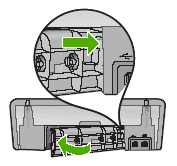
Reattach the rear access door. Insert the right side of the door into the rear of the product, and then push the door inward until it snaps into place.
Figure : Reattach the rear access door
Step three: Clear the jam from the front of the printer
Follow these steps to clear any jammed paper from the front of the product.
-
Open the front access door.
Figure : Open the front access door

-
Carefully remove any jammed paper and bits of torn paper from the rollers inside the product. Use both hands to pull whole sheets of paper to avoid tearing them.
note:
Use a flashlight to thoroughly check the rollers and wheels for torn pieces of paper. If any torn pieces of paper remain inside the product, more jams are likely to occur.
-
Close the front access door.
Figure : Close the front access door

-
Reconnect the power cord to the rear of the product.
-
Press the Power button (
) to turn on the product.
Step four: Print a self-test report
Print a self-test report to make sure that the hardware functions correctly.
How to print a self-test report
-
Make sure that plain white paper is loaded in the input tray.
-
Press and hold the Power button (
), and then press the Cancel button (). -
Release both buttons. The self-test report prints.
-
If these steps resolved the issue, and the test page prints, there is no need to continue troubleshooting. Reconnect the USB cable, and then try to print again.
-
If the issue persists, continue with the next solution.
-
If the test page does not print, continue with the next solution.
Solution three: Make sure that the carriage moves freely
Follow these steps to make sure that the carriage moves freely.
Step one: Check the carriage path
-
Open the front access door. The carriage might move to the center of the product. Wait until it is idle and silent before proceeding.
Figure : Open the front access door
-
With the product turned on, disconnect the power cord from the rear of the product.
warning:
You must unplug the power cord to move the carriage by hand to avoid the risk of electrical shock.
-
Carefully remove any paper or objects that might be restricting the carriage.
note:
Use a flashlight to thoroughly check the inside of the product. If any torn pieces of paper remain inside the product, more jams are likely to occur.
-
Reach inside the product, and then manually move the carriage.
-
If the carriage is on the right side, move the carriage to the left side of the product.
-
If the carriage is on the left side, move the carriage to the right side of the product.
-
If the carriage is in the middle, move the carriage to the right side of the product.
-
-
Make sure that the carriage can move freely across the width of the product by gently pushing the carriage to the left, and then to the right.
-
Close the front access door.
Figure : Close the front access door
-
Reconnect the power cord to the rear of the product.
-
Press the Power button (
) to turn on the product.
Step two: Print a self-test report
Print a self-test report to make sure that the hardware functions correctly.
How to print a self-test report
-
Make sure that plain white paper is loaded in the input tray.
-
Press and hold the Power button (
), and then press the Cancel button (). -
Release both buttons. The self-test report prints.
-
If these steps resolved the issue, and the test page prints, there is no need to continue troubleshooting. Reconnect the USB cable, and then try to print again.
-
If the issue persists, continue with the next solution.
-
If the test page does not print, continue with the next solution.
Solution four: Remove and reinsert the cartridges
One or both of the cartridges might not have full electrical contact with the carriage. Follow these steps to remove and reinsert the cartridges.
Step one: Remove and reinsert the cartridges
-
Press the Power button (
) to turn on the product. -
Open the front access door. Wait until the carriage moves to the center of the product and is idle and silent before proceeding.
Figure : Open the front access door
-
Press down on the cartridge to release it, and then pull it toward you to remove it from the slot.
Figure : Remove the cartridge

-
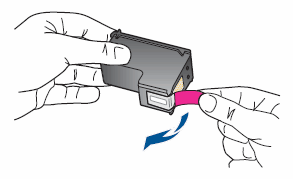
Inspect the cartridge. Make sure that no protective tape remains on the contacts or the nozzles.
Figure : Remove any protective tape from the cartridge
-
Hold the cartridge so that the nozzles face down and the contacts face toward the carriage.
caution:
Do not touch the copper-colored contacts or the ink nozzles. Touching these parts can result in clogs, ink failure, and bad electrical connections.
-
Slide the cartridge at a slight upward angle into its slot, and then gently push it forward until it snaps into place.
Figure : Insert the cartridge

-
Repeat these steps to remove and reinsert the other cartridge, if necessary.
-
Close the front access door.
Figure : Close the front access door
Step two: Print a self-test report
Print a self-test report to make sure that the hardware functions correctly.
How to print a self-test report
-
Make sure that plain white paper is loaded in the input tray.
-
Press and hold the Power button (
), and then press the Cancel button (). -
Release both buttons. The self-test report prints.
-
If these steps resolved the issue, and the test page prints, there is no need to continue troubleshooting. Reconnect the USB cable, and then try to print again.
-
If the issue persists, continue with the next solution.
-
If the test page does not print, continue with the next solution.
Solution five: Plug the printer directly into a wall outlet
Follow these steps to make sure that the power source functions correctly.
Step one: Plug the printer into a wall outlet
Follow these steps to plug the product into a wall outlet. If the product is already plugged into a wall outlet, skip to the next solution.
-
Disconnect the power cord from the rear of the product.
-
Unplug the power cord from any power strip or surge suppressor, and then plug it directly into a wall outlet.
-
Reconnect the power cord to the rear of the product.
-
Press the Power button (
) to turn on the product.
Step two: Print a self-test report
Print a self-test report to make sure that the hardware functions correctly.
How to print a self-test report
-
Make sure that plain white paper is loaded in the input tray.
-
Press and hold the Power button (
), and then press the Cancel button (). -
Release both buttons. The self-test report prints.
-
If these steps resolved the issue, and the test page prints, there is no need to continue troubleshooting. Reconnect the USB cable, and then try to print again.
-
If the issue persists, continue with the next solution.
-
If the test page does not print, continue with the next solution.
Solution six: Reset the printer
Follow these steps to reset the product, and then print a self-test report.
Step one: Reset the printer
-
With the printer turned on, disconnect the power cord from the rear of the printer.
-
Unplug the power cord from the wall outlet.
-
Wait at least 15 seconds.
-
Plug the power cord back into the wall outlet.
-
Reconnect the power cord to the printer.
-
Turn the printer on.
Step two: Print a self-test report
Print a self-test report to make sure that the hardware functions correctly.
How to print a self-test report
-
Make sure that plain white paper is loaded in the input tray.
-
Press and hold the Power button (
), and then press the Cancel button (). -
Release both buttons. The self-test report prints.
-
If these steps resolved the issue, and the test page prints, there is no need to continue troubleshooting. Reconnect the USB cable, and then try to print again.
Keep us posted,
If you would like to thank us for our efforts to help you,
Give us a virtual high-five by clicking the 'Thumbs Up' icon below, followed by clicking on the "Accept as solution" on this post,
Have a great day!
06-15-2020 08:18 AM
HP Recommended
I understand your concerns.
In that case, I would suggets you contact our phone support and check for the support option. They will help you.
Here is how you can get in touch with phone support.
1)Click on this link - www.hp.com/contacthp/
2)Select the product type.
3)Enter the serial number of your device or select let HP detect your product option.
4)Select the country from the drop-down.
5)You should see the HP phone support number or Chat option listed.
We are experiencing longer than expected wait times to reach an agent due to the CoViD-19 impact and there might have been issues in you getting the expected resolution on the issue.
Have a nice day!!
06-16-2020 02:32 PM
HP Recommended
I signed in entered all the information needed and do not see a support phone number unless I click contact us in which case ive clicked the phone number before called it and it asks for a case ID ive tried to get one from the virtual assistant but I do not get one
06-16-2020 05:26 PM
HP Recommended
I understand your concerns.
We are experiencing longer than expected wait times to reach an agent due to the CoViD-19 impact and there might have been issues in you getting the expected resolution on the issue.
Please try one more time it will show the phone support number.
Have a nice day!!
06-17-2020 12:57 PM
HP Recommended
You can contact HP service center to fix this issue.
Here is a link to contact HP Service Centers, by Country/Region: Click here
Cheers.
Sandytechy20
I am an HP Employee
06-20-2020 08:51 AM
HP Recommended
I understand your concern and I have brought your issue to the attention of an appropriate team within HP.
They will likely request information from you in order to look up your case details or product serial number.
Please look for a private message from an identified HP contact.
Additionally, keep in mind not to publicly post personal information (serial numbers and case details).
If you are unfamiliar with how the Community's private message capability works, you can learn about that here.
Thank you for visiting the HP Support Community.
Be alert for scammers posting fake support phone numbers and/or email addresses on the community.
If you think you have received a fake HP Support message, please report it to us by clicking on "Flag Post".
† The opinions expressed above are the personal opinions of the authors, not of HP. By using this site, you accept the Terms of Use and Rules of Participation.


Didn't find what you were looking for?
Ask the community
† The opinions expressed above are the personal opinions of the authors, not of HP. By using this site, you accept the <a href="https://www8.hp.com/us/en/terms-of-use.html" class="udrlinesmall">Terms of Use</a> and <a href="/t5/custom/page/page-id/hp.rulespage" class="udrlinesmall"> Rules of Participation</a>.