-
×InformationNeed Windows 11 help?Check documents on compatibility, FAQs, upgrade information and available fixes.
Windows 11 Support Center. -
-
×InformationNeed Windows 11 help?Check documents on compatibility, FAQs, upgrade information and available fixes.
Windows 11 Support Center. -
- HP Community
- Printers
- Printing Errors or Lights & Stuck Print Jobs
- Can't change paper size

Create an account on the HP Community to personalize your profile and ask a question
Your account also allows you to connect with HP support faster, access a personal dashboard to manage all of your devices in one place, view warranty information, case status and more.
Check some of the most frequent questions about Instant Ink: HP INSTANT INK, HP+ PLANS: INK AND TONER.
Check out our Black or Color Ink Not Printing, Other Print Quality Issues info about: Print quality and Cartridge Issues.

It has been a while since anyone has replied. Simply ask a new question if you would like to start the discussion again.
03-22-2017 04:57 PM
 HP Recommended
Product: Officejet 3830
Operating System: Microsoft Windows 10 (64-bit)
When I go to the Control Panel and hit the Settings button, the paper size is always set at 4x6. It won't allow me to change the paper size to 8x11 What is the problem. I moved the paper size on back of the printer and even reloaded the printer software.
Solved! Go to Solution.
1 ACCEPTED SOLUTION
17 REPLIES 17
03-22-2017 05:37 PM
HP Recommended
Thanks for your feedback.
I am happy to assist you on the issue.
I hope your have adjusted the width TRIGGER as shown below and restart the printer.

If above step doesn't work, then
If the printer is connected to network, then go to your PC and launch the IE or chrome browser
Type the network IP address of you printer. It will launch the printer web page
go to Settings-Preference (left)->Paper settings
There you can change paper size setting
Hope it will help you.
thanks
Click on the "Thumbs up"button on the bottom to say "Thanks"
Please mark the post that solves your problem as "Accepted Solution"
(Although I am employed by HP, I am speaking for myself and not for HP)
Please mark the post that solves your problem as "Accepted Solution"
(Although I am employed by HP, I am speaking for myself and not for HP)
03-22-2017 08:26 PM
HP Recommended
Hello Jemf,
I do not think it's required to manually set the paper size in control panel.
The printer is with paper size sensor built in whereby once you load the paper to the input tray, the sensor will detect & promt the user on paper size & paper type setting. Set accordingly from there.
Get some physical paper to try 🙂
Thanks
Regards
Although I am an HP employee, I am speaking for myself and not for HP.
03-23-2017 09:36 AM
HP Recommended
Hi Jemf,
I would like to suggest the following ways to assist you in troubleshooting:-
Step 1: Check the Default Printer Preferences of your printer
- Under Control Panel\Hardware and Sound\Devices and Printers, right click on the default printer that you are using, Select "Printer preferences"
- Click on "Advanced..." button located at the bottom right
- Under "Paper Size:" field, click on the down button and Select the correct media size that you will be printing
- Click "OK" x2 times
- Proceed to print your document/image.
If the issue persists, continue to the next step.
Step 2: Adjust the paper size setting
Check the paper size setting to make sure it matches the paper you want to print.
NOTE:Some printers have an option to ignore the error and continue printing. If you choose to ignore the error, the margins on your printout might not be proportional to the edges of the paper.
- In the program you want to print from, click File, and then click Print.
- Make sure your printer is in the Name or Printers drop-down list box, and then click Properties, Printer Properties or Preferences.
- Click the Paper/Quality tab.
- Click Advanced, if necessary, and then click Paper Size.Figure : Selecting the correct paper size
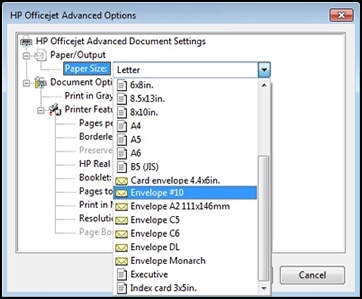
- Select the paper size that matches the size and type of paper loaded in the printer tray, and then click OK. If there are no matching paper sizes, select the size from the list that is closest to the size of the paper loaded in the tray.
- Click OK, and then try to print.
NOTE:
If you are printing envelopes, you might need to change the mail settings of the program you are printing from in addition to adjusting print settings in the driver. For information on changing envelope settings in Microsoft Word, see How do I adjust the envelope settings in Microsoft Word? in the FAQ section of this document.
If the issue persists, continue to the next step.
Step 3: Check the paper source setting
Remove and reload the paper in the input trays, and then check the paper source setting.
- Remove all the paper from all the printer input trays.
- Reload the paper, and then adjust the paper width guides so they gently rest against the edge of the paper stack.
- In the program you want to print from, click File, and then click Print.
- Make sure your printer is in the Name or Printers drop-down list box, and then click Properties, Printer Properties or Preferences.
- Click the Paper/Quality tab, and then click Paper Source to select the correct tray.
- Click OK, and then try to print.
If the issue persists, continue to the next step.
Step 4: Reset the printer
Reset the printer to clear any hardware issues or error states.
- Turn the printer on, if it is not already on.
- Wait until the printer is idle and silent before you continue.
- With the printer turned on, disconnect the power cord from the rear of the printer.
- Unplug the power cord from the wall outlet.
- Wait at least 60 seconds.
- Plug the power cord back into the wall outlet.
NOTE:
HP recommends connecting the printer power cord directly to the wall outlet. - Reconnect the power cord to the rear of the printer.
- Turn on the printer, if it does not automatically turn on.The printer might go through a warm-up period. The printer lights might flash, and the carriage might move.
Wait until the warm-up period finishes and your printer is idle and silent before you proceed.
Do let me know if you need any clarifications on the above methods. Hope that it can resolved your issue.
Regards.
Click "Thumbs up"button on the bottom to say "Thanks/Give Encouragement"
Appreciate if you mark the post that solves your problem as "Accepted Solution"
(Although I am employed by HP, I am speaking for myself and not for HP)
Appreciate if you mark the post that solves your problem as "Accepted Solution"
(Although I am employed by HP, I am speaking for myself and not for HP)
03-23-2017 07:13 PM
HP Recommended
Hi Jemf,
I understand your frustrations, I would like to recommend you to go to HP service support center
HP Support and Care as it is highly likely to be a hardware issue within the printer.
Do select your country 1st which is located towards the right bottom though.
Appreciate the time and efforts which you have spend to go through all the recommended troubleshooting procedures, which is of great help to have a better understanding to your printing issue.
Evin
Click "Thumbs up"button on the bottom to say "Thanks/Give Encouragement"
Appreciate if you mark the post that solves your problem as "Accepted Solution"
(Although I am employed by HP, I am speaking for myself and not for HP)
Appreciate if you mark the post that solves your problem as "Accepted Solution"
(Although I am employed by HP, I am speaking for myself and not for HP)
03-27-2017 12:53 AM
HP Recommended
Hi Jemf,
You would have to go into the HP Warranty or HP Out of Warranty Supports which is nearer to you.
If your printer is already out of warrnty do take note of the following:-
Out of warranty paid service is also available at our Service Drop off location.
An evaluation rate of XXX (Country dependable rates) (before GST) will be applicable for out of warranty product diagnostics; evaluation fee will be waived when you accept the repair quotation.
Labor fees apply for software support not under warranty.
You can check your warranty staus @ Warranty Check
Regards
Click "Thumbs up"button on the bottom to say "Thanks/Give Encouragement"
Appreciate if you mark the post that solves your problem as "Accepted Solution"
(Although I am employed by HP, I am speaking for myself and not for HP)
Appreciate if you mark the post that solves your problem as "Accepted Solution"
(Although I am employed by HP, I am speaking for myself and not for HP)
Be alert for scammers posting fake support phone numbers and/or email addresses on the community.
If you think you have received a fake HP Support message, please report it to us by clicking on "Flag Post".
† The opinions expressed above are the personal opinions of the authors, not of HP. By using this site, you accept the Terms of Use and Rules of Participation.


Didn't find what you were looking for?
Ask the community
† The opinions expressed above are the personal opinions of the authors, not of HP. By using this site, you accept the <a href="https://www8.hp.com/us/en/terms-of-use.html" class="udrlinesmall">Terms of Use</a> and <a href="/t5/custom/page/page-id/hp.rulespage" class="udrlinesmall"> Rules of Participation</a>.