-
×InformationNeed Windows 11 help?Check documents on compatibility, FAQs, upgrade information and available fixes.
Windows 11 Support Center. -
-
×InformationNeed Windows 11 help?Check documents on compatibility, FAQs, upgrade information and available fixes.
Windows 11 Support Center. -
- HP Community
- Printers
- Printing Errors or Lights & Stuck Print Jobs
- Can't print duplex on A5 paper

Create an account on the HP Community to personalize your profile and ask a question
05-11-2020 12:33 PM
I am trying to print pages for my planner (A5 size paper). I've been printing these for over a year with the same computer and printer. After doing a OS update, I could no longer pint double sided. Did some reading and it sounded like it had to do with not having a 64bit driver which the new operating systems require, so I downloaded the HP Smart App like suggested and it will now print double-sided, but not on A5 sized paper. I get this message: "The Two-Sided option, Long-edge binding, is not available when the destination paper size is set to A5 Borderless."
It makes no sense that something I was able to do last week with the same printer and computer is no longer possible. Do I need to change a setting somewhere? Why would it no longer let you do something with only a certain size paper? I'm pretty good with technology, but I've tried it a bunch of different ways and nothing seems to work, and I'm really sick of wasting paper and ink trying to figure it out.
05-12-2020 06:02 AM
A
05-19-2020 09:34 AM
Welcome to the HP Support Community. I'd be happy to assist you
Due to the current global COVID-19 situation, we're seeing an influx of customers coming in for support. We appreciate your patience.
Create a custom paper size from the Page Setup menu
Create a custom paper size using the Page Setup option on the File menu of your application, and then select the new custom size for the print job.
-
Load the custom-size paper into the paper input tray.
-
Open the item you want to print.
-
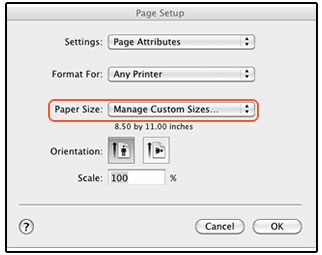
Click File, and then select Page Setup.
-
In Paper Size, select Manage Custom Sizes.
The Custom Paper Sizes window displays.

-
In the Custom Paper Sizes window, click the plus sign
 to create a new paper size, double-click the default untitled name, and then type a new name for the custom paper size.
NOTE:
Use a different, unique name for the new custom paper size. Do not use an existing paper size name for any new custom paper size names because it overrides the existing preset. For example, if a custom paper size is named A4, then the existing A4 paper size is no longer available as a choice.

-
In the Paper Size section, type the dimensions of the custom paper in the Width and Height text boxes, and then set the margins, if desired.
-
Paper Size
-
Margins
-
-
Click OK.
-
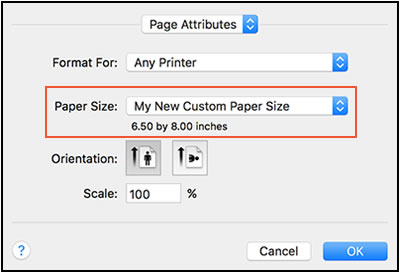
In the Page Setup window, select the new custom paper size, and then click OK.

-
Click File, and then select Print.
-
Change print settings, if desired, and then click OK or Print to print the document.
Refer to - How to Print on Both Sides of the Paper (Duplex) (Mac)
and also - Creating Custom Paper Sizes
Hope this helps! Keep me posted.
Please click “Accept as Solution” if you feel my post solved your issue, it will help others find the solution.
Click the “Kudos, Thumbs Up" on the bottom right to say “Thanks” for helping!
Have a great day!
