-
×InformationNeed Windows 11 help?Check documents on compatibility, FAQs, upgrade information and available fixes.
Windows 11 Support Center. -
-
×InformationNeed Windows 11 help?Check documents on compatibility, FAQs, upgrade information and available fixes.
Windows 11 Support Center. -
- HP Community
- Printers
- Printing Errors or Lights & Stuck Print Jobs
- Re: Clean print head

Create an account on the HP Community to personalize your profile and ask a question
Your account also allows you to connect with HP support faster, access a personal dashboard to manage all of your devices in one place, view warranty information, case status and more.
Check some of the most frequent questions about Instant Ink: HP INSTANT INK, HP+ PLANS: INK AND TONER.
Check out our Black or Color Ink Not Printing, Other Print Quality Issues info about: Print quality and Cartridge Issues.

It has been a while since anyone has replied. Simply ask a new question if you would like to start the discussion again.
12-28-2018 02:08 AM
 HP Recommended
Product: HP 6978
Is there a way to cleant print head on an HP 6978. I tried the clean print head option. Didn't work.
I would like to remove it and clean it with alchohol. Dont know how.
Question: is there a way?
Is it fixable or better buy a new printer?
Solved! Go to Solution.
1 ACCEPTED SOLUTION
Accepted Solutions
12-29-2018 01:20 PM
HP Recommended
Welcome to the HP Forums 🙂 I would like to take a moment and thank you for using this forum, it is a great place to find answers.
It's not advisable to clean the printhead using alcohol. Please do let us know the issue you're facing with the Printer so that we can help you with some troubleshooting steps.
However, you can clean the cartridge and printhead contacts:
Remove the ink cartridges to clean the ink cartridge and printhead contacts and then reinstall the ink cartridges into the printer.
CAUTION:Clean the ink cartridges one at a time. Do not leave an ink cartridge outside of the printer for more than 30 minutes. Also, never turn off the printer when an ink cartridge is removed from its slot. Leaving ink cartridge slots empty might cause damage to the ink cartridge ink system.
-
Gather the following materials:
-
A clean, lint-free cloth
-
A clean, dry cotton swab
-
Distilled or bottled water
CAUTION:
Do not use tap water, platen cleaners, or alcohol because they might contain contaminants that can damage the contacts.
-
-
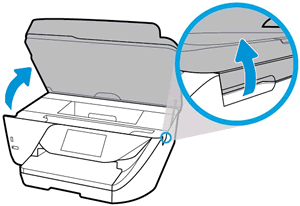
Open the ink cartridge access door.
The carriage moves to the left side of the printer.
NOTE:
If the scanner lid is open, the ink cartridge access door does not open.
Figure : Opening the ink cartridge access door
-
Wait until the printer is idle and silent before you proceed.
-
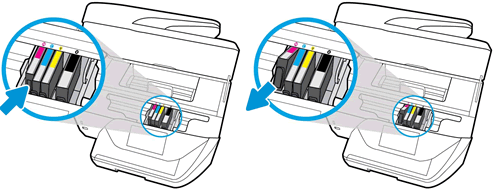
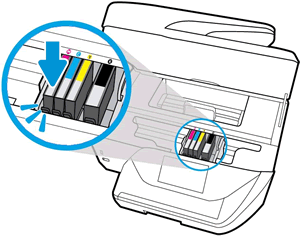
Press the tab inward on the front of the ink cartridge to release it, and then pull up on the ink cartridge to remove it from the slot.
Figure : Pushing the ink cartridge inward and then pulling up to remove it
-
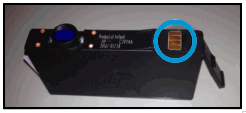
Lightly dampen a clean, lint-free cloth with bottled or distilled water.
Figure : Copper-colored ink cartridge contact
-
Place the cartridge to the side, with the contacts facing upwards.
-
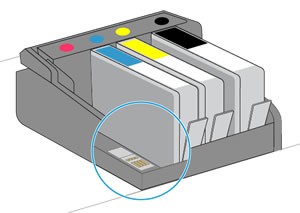
Moisten the cotton swab, and then wipe the contacts inside the printhead.
Figure : Clean the printhead contacts
-
Carefully reinsert the ink cartridge into its slot, and then press down on the ink cartridge until it clicks into place.
Figure : Reinserting the ink cartridge
NOTE:
Make sure you insert the ink cartridge into the slot that has the same colored letter as the color you are installing.
-
Repeat these steps for other ink cartridges, if necessary.
-
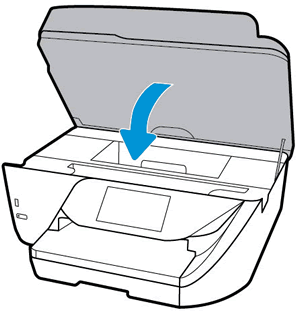
Close the ink cartridge access door.
Figure : Closing the ink cartridge access door
Let me know if this helps.
If the information I've provided was helpful, give us some reinforcement by clicking the Accepted Solution button, that'll help us and others see that we've got the answers!
Thanks!
Have a great day!
I am an HP Employee
3 REPLIES 3
12-29-2018 01:20 PM
HP Recommended
Welcome to the HP Forums 🙂 I would like to take a moment and thank you for using this forum, it is a great place to find answers.
It's not advisable to clean the printhead using alcohol. Please do let us know the issue you're facing with the Printer so that we can help you with some troubleshooting steps.
However, you can clean the cartridge and printhead contacts:
Remove the ink cartridges to clean the ink cartridge and printhead contacts and then reinstall the ink cartridges into the printer.
CAUTION:Clean the ink cartridges one at a time. Do not leave an ink cartridge outside of the printer for more than 30 minutes. Also, never turn off the printer when an ink cartridge is removed from its slot. Leaving ink cartridge slots empty might cause damage to the ink cartridge ink system.
-
Gather the following materials:
-
A clean, lint-free cloth
-
A clean, dry cotton swab
-
Distilled or bottled water
CAUTION:
Do not use tap water, platen cleaners, or alcohol because they might contain contaminants that can damage the contacts.
-
-
Open the ink cartridge access door.
The carriage moves to the left side of the printer.
NOTE:
If the scanner lid is open, the ink cartridge access door does not open.
Figure : Opening the ink cartridge access door
-
Wait until the printer is idle and silent before you proceed.
-
Press the tab inward on the front of the ink cartridge to release it, and then pull up on the ink cartridge to remove it from the slot.
Figure : Pushing the ink cartridge inward and then pulling up to remove it
-
Lightly dampen a clean, lint-free cloth with bottled or distilled water.
Figure : Copper-colored ink cartridge contact
-
Place the cartridge to the side, with the contacts facing upwards.
-
Moisten the cotton swab, and then wipe the contacts inside the printhead.
Figure : Clean the printhead contacts
-
Carefully reinsert the ink cartridge into its slot, and then press down on the ink cartridge until it clicks into place.
Figure : Reinserting the ink cartridge
NOTE:
Make sure you insert the ink cartridge into the slot that has the same colored letter as the color you are installing.
-
Repeat these steps for other ink cartridges, if necessary.
-
Close the ink cartridge access door.
Figure : Closing the ink cartridge access door
Let me know if this helps.
If the information I've provided was helpful, give us some reinforcement by clicking the Accepted Solution button, that'll help us and others see that we've got the answers!
Thanks!
Have a great day!
I am an HP Employee
12-30-2018 08:16 AM
HP Recommended
It's great to have you back and your patience is greatly appreciated.
It looks like you were interacting with @Betty0610, but he is out for the day & I'll be glad to help you out,
I'm the Jeet_Singh & I'm at your service.
After reviewing your post thoroughly, I understand you would like to know how to clean the printhead. Don't worry I'll be glad to help you.
To clean the printhead from the printer display
a. Load Letter, A4, or legal unused plain white paper into the input tray.
b. From the printer control panel, touch or swipe down the tab at the top of the screen to open the
Dashboard, and then touch (Setup).
c. Touch Printer Maintenance, select Clean Printhead, and then follow the onscreen instructions.
7. If cleaning the printhead does not solve the problem, contact HP support. Go to www.support.hp.com.
This website provides information and utilities that can help you correct many common printer
problems. If prompted, select your country/region, and then click All HP Contacts for information on
calling for technical support.
For cleaning automatically from HP software:
To automatically clean the printhead:
a. Load Letter or A4 plain, white paper in the paper tray.
b. Open HP Utility.
NOTE: HP Utility is located in the HP folder in the Applications folder at the top level of the hard
disk.
c. Select your printer from the list of devices at the left of the window.
d. Click Clean Printheads.
e. Click Clean and follow the onscreen instructions.
CAUTION: Clean the printhead only when necessary. Unnecessary cleaning wastes ink and
shortens the life of the print head.
NOTE: If print quality still seems poor after you complete cleaning, try aligning the printhead. If
print quality problems persist after cleaning and aligning, contact HP support.
f. Click All Settings to return to the Information and Support pane.
For more details, please go through the User guide of this printer, Click here Chapter 10. Solve a problem page number 113 & 114.
Please try the steps suggested from the previous post and get back to us with the results of the troubleshooting as this will help me in further assisting you.
Hope this answers your question.
Good luck and keep me posted about the developments. Thank you and have a great week ahead. 🙂
Jeet_Singh
I am an HP Employee
Be alert for scammers posting fake support phone numbers and/or email addresses on the community.
If you think you have received a fake HP Support message, please report it to us by clicking on "Flag Post".
† The opinions expressed above are the personal opinions of the authors, not of HP. By using this site, you accept the Terms of Use and Rules of Participation.


Didn't find what you were looking for?
Ask the community
† The opinions expressed above are the personal opinions of the authors, not of HP. By using this site, you accept the <a href="https://www8.hp.com/us/en/terms-of-use.html" class="udrlinesmall">Terms of Use</a> and <a href="/t5/custom/page/page-id/hp.rulespage" class="udrlinesmall"> Rules of Participation</a>.