-
×InformationNeed Windows 11 help?Check documents on compatibility, FAQs, upgrade information and available fixes.
Windows 11 Support Center. -
-
×InformationNeed Windows 11 help?Check documents on compatibility, FAQs, upgrade information and available fixes.
Windows 11 Support Center. -
- HP Community
- Printers
- Printing Errors or Lights & Stuck Print Jobs
- Error Code 0x83c0000a NOS_Loader_APP

Create an account on the HP Community to personalize your profile and ask a question
02-17-2019 10:56 AM
This error popped up a few weeks ago. We have tried unplugging the printer and restarting it, per the recommendations given to other threads on this same issue. It didn't work for us, either.
We also tried following the instructions to troubleshoot errors for other "0X-" codes, however, when we open the printer, the ink catridge holder does not slide over like normal, making it impossible to remove the ink cartridges.
I hope this "community" forum can offer some guidance.
02-19-2019 09:15 AM
Hi! @sahill1, Thanks for stopping by the HP Support Community!
Do you have the printer power cable plugged into a Power Bar or a Power Strip? If so, please plug the power cable directly into a wall outlet and check if it helps.
Replace low, empty or faulty ink cartridges on the printer.
Please share the printer model name to assist you better.
Try updating the printer firmware to the latest version and check if it helps.
Update the printer firmware using this link. Click Here
Try few steps recommended below.
In some cases, removing the ink cartridges and resetting the printer can clear the error message.
Turn on the printer.
Wait until the printer is idle and silent before you continue.
Disconnect the USB cable from the rear of the printer. If your printer has a network or wireless connection, leave it connected.
Remove the ink cartridges from the printer.
With the printer turned on, disconnect the power cord from the rear of the printer and from the wall outlet or power strip.
Wait at least 60 seconds.
Plug the power cord back into the wall outlet.
NOTE:
HP recommends connecting the printer power cord directly to a wall outlet.
Reconnect the power cord to the rear of the printer.
Turn on the printer, if it does not automatically turn on.
The printer might go through a warm-up period. The printer lights might flash, and the carriage might move.
Wait until the warm-up period finishes and your printer is idle and silent before you proceed.
Reinsert the ink cartridges, and then close the ink cartridge access door.
If you receive a prompt to print a calibration page, do so.
If you disconnected the USB cable, reconnect it to the rear of the printer.
Try to print.
Refer the instructions below to know more information about replacing the ink cartridges.
Replace one or both ink cartridges indicated by the ink cartridge status on the front panel.
NOTE:If you are enrolled in the Instant Ink program, you receive special Instant Ink cartridges. Instant Ink cartridges are larger than standard cartridges, but they fit in the carriage in the same way.
Figure : Standard and Instant Ink cartridges
-
Standard ink cartridge
-
Instant Ink cartridge
-
Press the Power button to turn on the printer, if it is not already on.
-
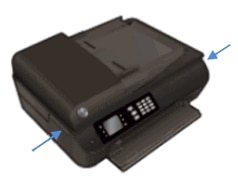
Locate the slots on the left and right sides of the printer.

-
Slide your fingers into the two slots, and then gently lift up to open the ink cartridge access door. The carriage moves to the ink cartridge access area. Wait until the carriage is idle and silent before continuing.
-
To release the ink cartridge, lift the lid on the ink cartridge slot, and then gently push the lid back until it stops.
-
Pull up on the ink cartridge to remove it from the slot.
-
Lift the lid
-
Gently push the lid back
-
Pull up on the ink cartridge
-
-
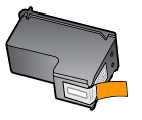
Remove the new ink cartridge from its packaging, and then pull the tab to remove the plastic tape.

-
Hold the ink cartridge at a slight upward angle with the ink cartridge contacts facing the rear of the printer, and then slide the ink cartridge into the empty slot.
-
Close the lid on the ink cartridge slot to secure the ink cartridge into place.
NOTE:
Insert the color ink cartridge in the slot on the left. Insert the black ink cartridge in the slot on the right.
-
Insert the ink cartridge
-
Close the lid
-
The color ink cartridge is on the left, and the black ink cartridge is on the right
-
-
Repeat the previous steps to install the other ink cartridge, if necessary.
-
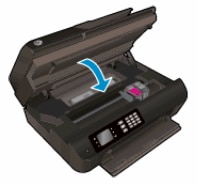
Close the ink cartridge access door.

Also, try checking with a different cartridge on your printer.
Refer this article to know more information about 0xc errors on your printer.
If the issue still persists after trying out the steps it is a hardware issue with your printer.
Please contact HP support for service options.
Contact HP support using this link. Click Here
Have a pleasant day ahead! 🙂
Please click “Accept as Solution” if you feel my post solved your issue, it will help others find the solution.
Click the “Kudos, Thumbs Up" on the bottom right to say “Thanks” for helping!
A4Apollo
I am an HP Employee
02-19-2019 11:18 AM
The printer is plugged in to the wall outlet directly. As mentioned in the original post, I cannot change the ink cartridges because the ink carrier does not move when we open the printer. Contacted via customer service phone line (which I couldn't find on the HP website, interestingly) and they said the printer is not fixable. Just like HP laptops, it seems that this product is designed to fail after a few years. Will avoid purchasing HP products in the future.
02-19-2019 01:24 PM
I have brought your issue to the attention of an appropriate team within HP. They will likely request information from you in order to look up your case details or product serial number. Please look for a private message from an identified HP contact. Additionally, keep in mind not to publicly post personal information (serial numbers and case details).
If you are unfamiliar with how the Community's private message capability works, you can learn about that here.
Thank you for visiting the HP Support Community.
Regards
A4Apollo
A4Apollo
I am an HP Employee
