• ×
    Information
    Need Windows 11 help?
    Check documents on compatibility, FAQs, upgrade information and available fixes.
    Windows 11 Support Center.
  • post a message
  • ×
    Information
    Need Windows 11 help?
    Check documents on compatibility, FAQs, upgrade information and available fixes.
    Windows 11 Support Center.
  • post a message
Guidelines
Experiencing 'Printer Blocked' or 'Printer Error' message? Click here for more information.
Check some of the most frequent questions about Instant Ink: HP INSTANT INK, HP+ PLANS: INK AND TONER.


Check out our Black or Color Ink Not Printing, Other Print Quality Issues info about: Print quality and Cartridge Issues.
HP Recommended
HP Deskjet Ink Advantage 3835
macOS 10.13 High Sierra
  • I recently downloaded the prompted software for this model and since doing this I have continuously received the error message that tells me that my printer cartridges are incompatible and I am forced to agree by pressing the "ok" button ...there is no other choice.
  • The printer cartridges are the genuine article and the correct models for my printer
  • They also worked perfectly well up until I had downloaded the shiny new software
  • I have rebooted the machine ... and this used to at least allow me to print one page before again receiving the error message.
  • I have removed the cartridges according to the directions given and cleaned the terminals and reinserted them ... this has no effect either.

I am at a total loss of what to do next to try to resolve this issue ....if anyone can help I will be really grateful


5 REPLIES 5
HP Recommended

@Lindsay5


Welcome to HP Forums, 

This is a great place to get support, find answers and tips to your technical queries.


I understand the that the printer is in error state, need not worry I'll be glad to help you.


Are you facing this issue after any hardware changes?

Did you try with a different cartridge?

Check if the printer works with the single cartridge mode.


I suggest you do a Hard Reset


(1) Turn the printer on, if it is not already on.

(2) Wait until the printer is idle and silent before you continue.

(3) With the printer turned on, disconnect the power cord from the rear of the printer.

(4) Unplug the power cord from the wall outlet.

(5) Wait at least 60 seconds.

(6) Plug the power cord back into the wall outlet.NOTE: HP recommends connecting the printer power cord directly to the wall outlet.

(7) Reconnect the power cord to the rear of the printer.

(8) Turn on the printer, if it does not automatically turn on.


The printer might go through a warm-up period. The printer lights might flash, and the carriage might move.

Wait until the warm-up period finishes and your printer is idle and silent before you proceed.


Clean the ink cartridge contacts

If the ink cartridge contacts are dirty, the printer might display an ink cartridge error.

   CAUTION:

Clean the ink cartridges one at a time. Do not leave an ink cartridge outside the printer for more than 30 minutes.

  1. Gather the following materials:

    • Dry foam-rubber swabs, lint-free cloth, or any soft material that does not come apart or leave fibers (coffee filters work well)

    • Distilled, filtered, or bottled water (tap water might contain contaminants that can damage the ink cartridges)

         CAUTION:

      Do not use platen cleaners or alcohol to clean the ink cartridge contacts. These can damage the ink cartridge or the printer.

  2. Press the Power button to turn on the printer.

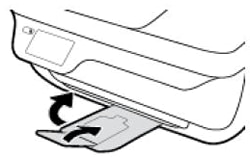
  3. Close the output tray extender, and then push the output tray back into the printer.

    Figure: Close the output tray extender, and then push the output tray into the printer

    Image: Close the output tray and extender
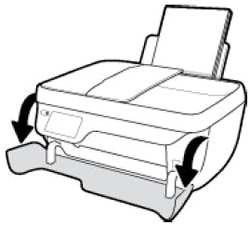
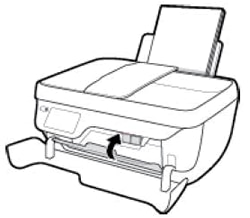
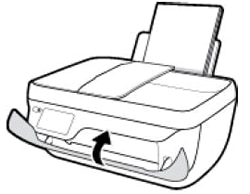
  4. Open the exterior door.

    Figure: Open the exterior door

    Image: Open the exterior door
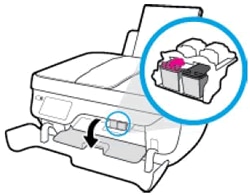
  5. Open the ink cartridge access door.

    The carriage moves to the center of the printer.

    Figure: Open the ink cartridge access door

    Image: Open the ink cartridge access door
  6. Wait until the carriage is idle and silent before continuing.

  7. Disconnect the power cord from the rear of the printer.

  8. Disconnect the USB cable, unless your printer is connected to a wireless network.

  9. Press down on the ink cartridge to release it, and then pull the ink cartridge out to remove it from its slot.

    Figure: Remove the ink cartridge

    Image: Remove the ink cartridge

       CAUTION:

    Do not remove both ink cartridges at the same time. Remove and then clean each ink cartridge one at a time. Do not leave an ink cartridge outside the printer for more than 30 minutes.

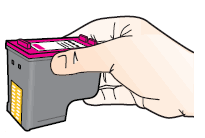
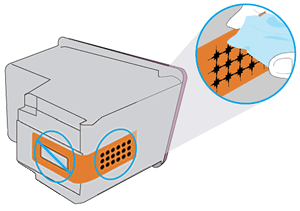
  10. Hold the ink cartridge by its sides.

    Figure: Hold the ink cartridge by its sides

    Image:  Hold the ink cartridge by its sides
  11. Inspect the contacts for ink and debris buildup.

  12. Wipe the contacts with a dry swab or other lint-free material until no debris remains on them.

       CAUTION:

    Be careful to wipe only the contacts. Do not smear any ink or debris elsewhere on the ink cartridge.

  13. Dip a clean foam-rubber swab or lint-free cloth into distilled water, and then squeeze any excess water from it.

  14. Clean only the copper-colored contacts, and then allow the ink cartridge to dry for approximately 10 minutes.

    Figure: Clean the contacts

    Image: Clean the contacts
  15. Lightly moisten another foam-rubber swab with distilled water, and then squeeze any excess water from the swab.

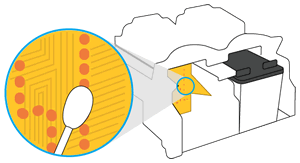
  16. Use the swab to clean the electrical contacts in the carriage, located inside the printer.

  17. Clean the contacts in the carriage.

    Figure: The carriage contacts

    Image: The carriage contacts
  18. Either let the ink cartridge sit for 10 minutes to allow the cleaned area to dry, or use a new swab to dry it.

       NOTE:

    Make sure that the ink cartridge is not left out of the printer for more than 30 minutes.

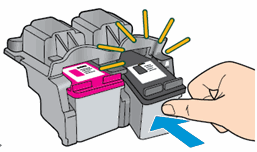
  19. Hold the ink cartridge by its sides with the nozzles toward the printer, and then insert the ink cartridge into its slot. Make sure that the ink cartridge is inserted in the correct slot.

    Figure: Insert the ink cartridge into the slot

    Image: Snap the ink cartridge into place
  20. Push the ink cartridge forward into its slot until it snaps into place.

  21. Repeat these steps to clean and then reinsert the other ink cartridge.

  22. Close the ink cartridge access door.

    Figure: Close the ink cartridge access door

    Image: Close the ink cartridge access door
  23. Close the exterior door.

    Figure: Close the exterior door

    Image: Close the exterior door
  24. Reconnect the power cord to the rear of the printer.

  25. Reconnect the USB cable, unless your printer is connected to a wireless network.

  26. Press the Power button to turn on the printer if it does not turn on automatically.

Keep me posted, how it goes! 

If the information I've provided was helpful, give us some reinforcement by clicking the solution and kudos buttons, that'll help us and others see that we've got the answers!


Have a great day!

Cheers:)

Raj1788
I am an HP Employee 

HP Recommended

Hi Raj1788, Thank you very much for your response.


I have now done the Hard Reset as suggested and have also cleaned the contacts of the ink cartridges but unfortunately the printer still boots up straight into the error message " Incompatible Cartridges" ....this is despite the cartridges being the genuine article !


The problem definitely arose after I installed the suggested software upgrade as prompted by the printer.


If you have any other ideas I'd be happy to hear them.


Kind regards @Lindsay5

HP Recommended


@Lindsay5,


It looks like you were interacting with @Raj1788, but he is out for the day & I'll be glad to help you out, 
I'm the Jeet_Singh & I'm at your service. 


As I understand you have followed the steps suggested and still having the issue. Don't worry as I have a few suggestions, which should help you resolve this issue.


If your printer connected wirelessly, make sure to temporary connect the device with USB and then follow the link to check for the latest firmware update, using this link: http://ftp.hp.com/pub/softlib/software13/printers/dj3830/DJ3830_R1804A.dmg Once done, restart the Printer.


If the issue persists, I would suggest here is to use an old set of cartridges and check, If the issue with the cartridges or the printer itself.


Could you please respond to this post with the details as this will help me in further assisting issue.


Eagerly waiting for your response!

I hope you have a good day ahead,

And Feel free to ask your queries as this forum has some of the best people in the world available and ready to help.

Regards,

Jeet_Singh
I am an HP Employee

HP Recommended

I am having the same problem with a brand new printer. The same thing happened with another model of HP printer I purchased and used for only one month. We don't have the time to be figuring basic stuff like these out. Why should an update break the cartridge compactibility. I won't be buying another product from HP again. 

HP Recommended

@otuyano1


Welcome to the HP Support Community.


This situation will need some additional support from our internal teams in HP. For that to happen, we will give you additional instructions/information via Private Message.


Please do check your inbox on the forums page for the private message.


If the information I've provided was helpful, give us some reinforcement by clicking the Accepted Solution button, that'll help us and others see that we've got the answers!


Thanks!

Have a great day!


I am an HP Employee

† The opinions expressed above are the personal opinions of the authors, not of HP. By using this site, you accept the <a href="https://www8.hp.com/us/en/terms-of-use.html" class="udrlinesmall">Terms of Use</a> and <a href="/t5/custom/page/page-id/hp.rulespage" class="udrlinesmall"> Rules of Participation</a>.