• ×
    Information
    Need Windows 11 help?
    Check documents on compatibility, FAQs, upgrade information and available fixes.
    Windows 11 Support Center.
  • post a message
  • ×
    Information
    Need Windows 11 help?
    Check documents on compatibility, FAQs, upgrade information and available fixes.
    Windows 11 Support Center.
  • post a message
Guidelines
Experiencing 'Printer Blocked' or 'Printer Error' message? Click here for more information.
Check some of the most frequent questions about Instant Ink: HP INSTANT INK, HP+ PLANS: INK AND TONER.


Check out our Black or Color Ink Not Printing, Other Print Quality Issues info about: Print quality and Cartridge Issues.
HP Recommended
HP Envy Photo 7155 printer
Microsoft Windows 10 (64-bit)

I am attempting to print photos from Photoshop Elements on my new printer. 

Printer works flawlessly with letter paper, but if when I ask it to print on 4x6 paper in the photo tray, it makes some weird grinding noise and then tells me that there is no paper in the paper tray.  There is no obvious jam or other obstruction to paper path.

Is there some hidden packing material I may have missed when setting it up?  Is there some trick to loading the photo paper?  It's seated well in the tray, and the gauges on the sides are holding the paper correctly in place.  There is not too much paper in the tray.

Printer is connected to computer via USB.  I was not able to set up the wireless printing, apparently because I have the USB connection established. 

Help would be greatly appreciated!

1 REPLY 1
HP Recommended

Hi @seesawsue


Welcome to the HP Support Community. 


Here are steps to know how to load photo paper -


Load smaller photo paper and card sizes in the photo paper tray.

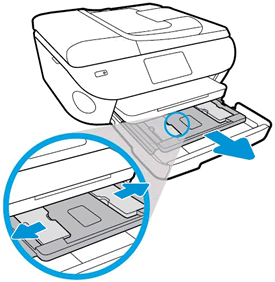
  1. Pull out the main paper tray and the photo tray, and then slide the paper-width guides outward.

    Pulling out the photo paper tray, and then sliding the photo paper-width guides outward

  2. Load a stack of photo paper or cards print side down until it stops at the back of the tray.

  3. Slide the paper-width guides in until they lightly rest against the edges of the paper.

    Loading photo paper or cards print side down in the photo paper tray

  4. Push the photo paper tray back in, and then push the main paper tray back in.

  5. Select or confirm the paper size you loaded on the control panel display.

Print the photo


Open the print window and document properties to set up the print job.

  1. Before printing, edit the photo to improve colors, brightness, contrast and any other appearance settings.

  2. Right-click the photo, select Open with, and then select Windows Photo Viewer or Paint.

    NOTE: 

    For Windows 10, open the photo with Paint to use these steps. Windows Photo Viewer does not come with Windows 10 and was replaced by the Photos app.

  3. Click Print, File, or the menu icon  (Paint), then click Print.

    The Print or Print Pictures window opens with general print job settings.

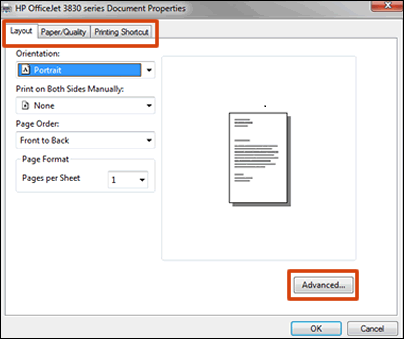
  4. Open the printer Document Properties window to access more print settings.

    • In the Print Pictures window in Windows Photo Viewer, click Options..., and then click Printer Properties....

    • In the Print window in Paint, click Preferences.

    HP Document Properties window with settings tabs and the Advanced settings button

  5. Find and use print job settings for photos in the Document Properties window. Menu names and available print settings vary by printer.

    NOTE: 

    If the Document Properties window has a Printing Shortcut tab, select a shortcut with your preferred settings.

Tips for printing quality photos

Read these tips and recommendations for printing the best pictures with your HP printer.

  • Use HP photo paper: HP photo papers are optimized for use with inkjet printers and provide quality prints for craft projects or framing.

  • Take high resolution photos: Higher resolution photographs result in clearer, more vibrant prints.

  • Edit photos before printing: Before printing, use photo editing tools to improve colors, brightness, contrast, and any other appearance settings.

  • Check the computer display: If your computer monitor displays colors inaccurately, printed photo quality might be unsatisfactory. Try changing to the monitor's default color settings or use a calibration tool to confirm the color accuracy.

  • Use Best or Max DPI quality in print settings: Higher print quality settings provide best results.


Hope this helps! Keep me posted. 


Please click “Accept as Solution” if you feel my post solved your issue, it will help others find the solution.

Click the “Kudos, Thumbs Up" on the bottom right to say “Thanks” for helping

† The opinions expressed above are the personal opinions of the authors, not of HP. By using this site, you accept the <a href="https://www8.hp.com/us/en/terms-of-use.html" class="udrlinesmall">Terms of Use</a> and <a href="/t5/custom/page/page-id/hp.rulespage" class="udrlinesmall"> Rules of Participation</a>.