-
×InformationNeed Windows 11 help?Check documents on compatibility, FAQs, upgrade information and available fixes.
Windows 11 Support Center. -
-
×InformationNeed Windows 11 help?Check documents on compatibility, FAQs, upgrade information and available fixes.
Windows 11 Support Center. -
- HP Community
- Printers
- Printing Errors or Lights & Stuck Print Jobs
- Re: Printer cartridge issue

Create an account on the HP Community to personalize your profile and ask a question
03-06-2018 06:27 AM
"The indicated cartridges are not intended for use in this printer"
This message is showing for the black cartridge.
I have had this issue before and after contacting HP support they ended up saying it was a faulty cartridge, sent a new one and it was fine.
I am still using that same cartridge but now have the same error.
It seems to show this error when I am at the end of my HP INSTANT INK term. Not sure if it is related.
When I check the status via http://hpec8eb5f5c414.local/#hId-pgDevInfo
I get the following:
Solved! Go to Solution.
Accepted Solutions
03-09-2018 09:12 AM
Thanks for the reply,
However, to provide accurate details, I need a few more details:
I have sent you a private message, for more details that cannot be shared in a public post.
Can you please check your inbox on the forums page for the private message.
Eagerly waiting for your reply!
Cheers!
Raj1788
I am an HP Employee
03-07-2018 01:10 PM
Welcome to HP Forums,
This is a great place to get support, find answers and tips to your technical queries.
Are you using genuine HP ink cartridge?
Are the cartridge seated properly?
Please follow the below steps that could resolve the issue.
Step one: Remove, inspect, and reseat the cartridges
The print cartridge may not have full electrical contact with the product. Removing and reinstalling the cartridge might help.
NOTE:
HP cannot guarantee the quality of remanufactured or refilled cartridges. Use genuine HP print cartridges to ensure good quality.
-
Make sure the product is on. Press the Power button if it is not lit.
-
Open the product cover, then wait until the print carriage is idle and silent.
-
Press down lightly on the end of the problem cartridge to release it.
Figure : Releasing the problem cartridge

-
Slide the cartridge out, and inspect it.
CAUTION:
Do not touch the copper electrical contacts or the ink nozzles.
Figure : Electrical contacts and nozzles
-
Copper electrical contacts
-
Nozzles
-
Check the electrical contacts for debris. If any debris is evident, proceed to step two.
-
Make sure all the clear nozzle protective tape has been removed.
CAUTION:
Do not attempt to remove the copper electrical strip.
Figure : Removing the clear nozzle protective tape

-
Look at the number on the print cartridge label, and make sure it is compatible with the product. Compatible print cartridges are listed in the Printer Reference Guide supplied with the product.
-
-
If the cartridge is compatible, reinstall it.
-
Cartridges marked with a triangle, go into the left carriage slot.
-
Cartridges marked with a square or pentagon, go into the right carriage slot.
Figure : Sliding the cartridge into the carriage

Figure : Pushing the cartridge into place

-
-
Close the product cover.
-
Try to print again. If the issue persists, continue to the next step.
Step two: Clean the cartridge contacts
-
Gather the following items to clean the ink cartridge and carriage:
-
Clean distilled water. Use bottled or filtered water if distilled water is not available. Tap water can contain contaminants that damage the ink cartridge.
-
Clean cotton swabs or any soft, lint-free material that will not stick to the ink cartridges (coffee filters work well).
-
Sheets of paper or a paper towel to rest the ink cartridge on during cleaning.
-
-
Open the ink cartridge access door and wait until the carriage is idle and silent.
-
Disconnect the power cord from the back of the printer.
-
Remove the ink cartridge and place it on a piece of paper with the nozzle plate facing up.
NOTE:
Do not leave the ink cartridges outside of the printer for more than 30 minutes. If the ink cartridge is outside of the printer for too long, the ink can dry and clog the nozzles.
-
Dip a clean foam-rubber swab or lint-free cloth into distilled water, and then squeeze any excess water from it.
-
Clean only the copper-colored contacts
Figure : Cleaning the contacts
-
Copper-colored contacts
-
Ink nozzles (do not clean)
-
-
Repeat these steps for the other ink cartridge.
-
Lightly moisten another cotton swab with distilled water, and then squeeze any excess water from the swab.
-
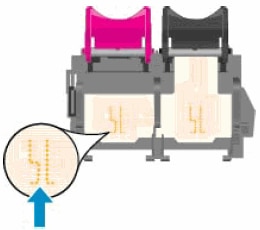
Use the swab to clean the electrical contacts in the carriage, located inside the printer on the carriage slots.
Figure : The electrical contacts in the ink cartridge slots

-
Wait 10 minutes to allow the ink cartridge and carriage electrical contacts to dry.
-
Reinstall the ink cartridges.
-
Close the ink cartridge access door.
-
Reconnect the power cord to the back of the printer.
-
Press the Power button to turn on the printer.
-
Try to print a page.
-
If you are still unable to print, repeat these steps to clean and reseat the ink cartridges. Multiple cleanings might be necessary to restore printing.
Let me know if this helps you.
Keep me posted.
Have a great day!
Cheers;)
Raj1788
I am an HP Employee
03-09-2018 09:12 AM
Thanks for the reply,
However, to provide accurate details, I need a few more details:
I have sent you a private message, for more details that cannot be shared in a public post.
Can you please check your inbox on the forums page for the private message.
Eagerly waiting for your reply!
Cheers!
Raj1788
I am an HP Employee


