-
×InformationNeed Windows 11 help?Check documents on compatibility, FAQs, upgrade information and available fixes.
Windows 11 Support Center. -
-
×InformationNeed Windows 11 help?Check documents on compatibility, FAQs, upgrade information and available fixes.
Windows 11 Support Center. -
- HP Community
- Printers
- Printing Errors or Lights & Stuck Print Jobs
- Printer refuses to print on 6 x 9 envelopes

Create an account on the HP Community to personalize your profile and ask a question
10-19-2016 11:05 AM
Printer prints OK on #5 and #6 envelopes but insists that there is a paper mismatch when attempting to print on 6" x 9" envelopes. Page setup for the program lists a custom size of 6" width and 9" height for default tray.
Solved! Go to Solution.
Accepted Solutions
10-20-2016 12:37 PM
Hey @KenVail, welcome to the HP Forums!
I see form your description that you can print on #5 and #6 envelopes but you cannot print on a 6" x 9" envelope. I'm not sure I've understood your description entirely though; do you have the 6 x 9 set as a customer paper size? According to the Printer Specifications 6 x 9 is not a supported envelope size.
Please complete the following steps and let me know the outcome of your efforts.
Step 1: Create the new custom paper size
To set up the new custom paper size, create the new size in the printer software.
Navigate to the Control Panel, and open Devices and Printers,Printers, or Printers and Faxes.
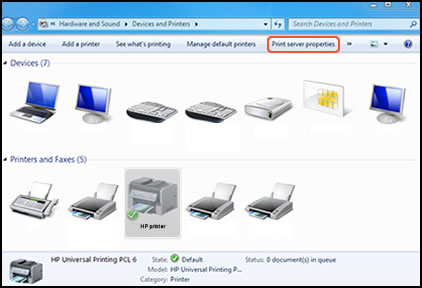
Click the icon for your printer, then click Print server properties.
Figure : Location of Print server properties
 NOTE:
NOTE:If Print server properties does not display, right-click an empty area in the Printers window, select Run as administrator from the drop-down menu, and then selectServer Properties.
If the User Account Control window displays, click Continue.
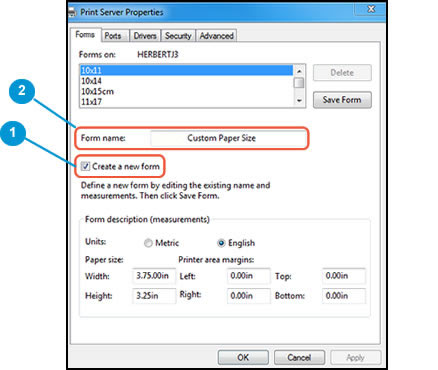
On the Forms tab, select the Create a new form check box, and then type a name for the new paper size in Form name.
Figure : Forms tab in Print Server Properties

Create a new form
Form name
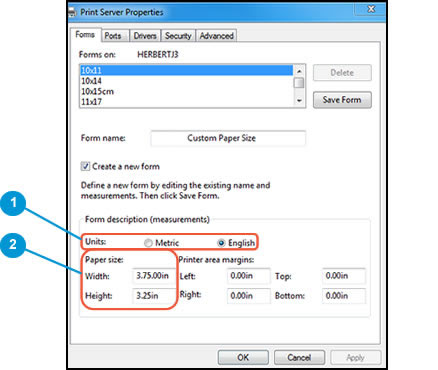
Select Metric or English, then type the dimensions of your custom paper in the Width and Height text boxes.
Figure : Forms tab in Print Server Properties

Metric or English
Width and Height
Leave the Printer area margins set at 0.00.
Click Save Form, then click OK or Close.
NOTE:
Supported paper sizes vary by printer. If you input custom dimensions that your printer does not support, the new custom paper size does not display when you attempt to print. Check the printer specifications for your printer for more information on supported paper sizes.
Step 2: Select the new custom paper size in the printer software
To begin printing on the custom paper size, select the new size in the printer software.
In the Devices and Printers window you opened in the previous step, right-click the icon for your printer, and then selectPrinting Preferences.
On the Paper/Quality tab, click Advanced.
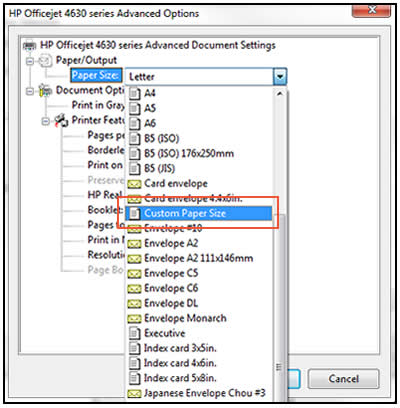
In Paper Size, select the name of the new custom paper size.
Figure : Paper Size with new custom paper size selected

Click OK.
The custom paper size is now the default paper size for all printing on your computer. You can change the default paper size by returning to Printing Preferences and selecting the desired size.
If this resolves the issue, please be sure to mark your post as solved by clicking the Accept as Solution button below. If you require further assistance let me know and I will do all I can to help.
Sunshyn2005
I work on behalf of HP
If you found this post helpful, you can let others know by clicking the “Accept as Solution” button. You can also show your appreciation, with a kudos, by clicking the “thumbs up" button!
10-20-2016 12:37 PM
Hey @KenVail, welcome to the HP Forums!
I see form your description that you can print on #5 and #6 envelopes but you cannot print on a 6" x 9" envelope. I'm not sure I've understood your description entirely though; do you have the 6 x 9 set as a customer paper size? According to the Printer Specifications 6 x 9 is not a supported envelope size.
Please complete the following steps and let me know the outcome of your efforts.
Step 1: Create the new custom paper size
To set up the new custom paper size, create the new size in the printer software.
Navigate to the Control Panel, and open Devices and Printers,Printers, or Printers and Faxes.
Click the icon for your printer, then click Print server properties.
Figure : Location of Print server properties
 NOTE:
NOTE:If Print server properties does not display, right-click an empty area in the Printers window, select Run as administrator from the drop-down menu, and then selectServer Properties.
If the User Account Control window displays, click Continue.
On the Forms tab, select the Create a new form check box, and then type a name for the new paper size in Form name.
Figure : Forms tab in Print Server Properties

Create a new form
Form name
Select Metric or English, then type the dimensions of your custom paper in the Width and Height text boxes.
Figure : Forms tab in Print Server Properties

Metric or English
Width and Height
Leave the Printer area margins set at 0.00.
Click Save Form, then click OK or Close.
NOTE:
Supported paper sizes vary by printer. If you input custom dimensions that your printer does not support, the new custom paper size does not display when you attempt to print. Check the printer specifications for your printer for more information on supported paper sizes.
Step 2: Select the new custom paper size in the printer software
To begin printing on the custom paper size, select the new size in the printer software.
In the Devices and Printers window you opened in the previous step, right-click the icon for your printer, and then selectPrinting Preferences.
On the Paper/Quality tab, click Advanced.
In Paper Size, select the name of the new custom paper size.
Figure : Paper Size with new custom paper size selected

Click OK.
The custom paper size is now the default paper size for all printing on your computer. You can change the default paper size by returning to Printing Preferences and selecting the desired size.
If this resolves the issue, please be sure to mark your post as solved by clicking the Accept as Solution button below. If you require further assistance let me know and I will do all I can to help.
Sunshyn2005
I work on behalf of HP
If you found this post helpful, you can let others know by clicking the “Accept as Solution” button. You can also show your appreciation, with a kudos, by clicking the “thumbs up" button!
10-21-2016 02:27 PM
I've been working with this off and on for the past several and finally seem to have solved the problem. Per one of your suggestions, I went online to chase down the printer's paper specs and discovered a provision for a C5 envelope which is 6.38 inches wide and 9.02 inches high. Apparently, the printer's capability to detect paper sizes is not specific enough to detect differences of fractions of an inch and it prints the 6" x 9" fiorm very well using the C5 envelope specs.
MANY THANKS!
