-
×InformationNeed Windows 11 help?Check documents on compatibility, FAQs, upgrade information and available fixes.
Windows 11 Support Center. -
-
×InformationNeed Windows 11 help?Check documents on compatibility, FAQs, upgrade information and available fixes.
Windows 11 Support Center. -
- HP Community
- Printers
- Printing Errors or Lights & Stuck Print Jobs
- Printer says ink or printer system is not working

Create an account on the HP Community to personalize your profile and ask a question
Your account also allows you to connect with HP support faster, access a personal dashboard to manage all of your devices in one place, view warranty information, case status and more.
Check some of the most frequent questions about Instant Ink: HP INSTANT INK, HP+ PLANS: INK AND TONER.
Check out our Black or Color Ink Not Printing, Other Print Quality Issues info about: Print quality and Cartridge Issues.

It has been a while since anyone has replied. Simply ask a new question if you would like to start the discussion again.
12-29-2014 12:28 PM - edited 12-29-2014 12:32 PM
 HP Recommended
Operating System: Windows 7
The HP Officejet Pro 8600 All-in-one printer is on our home wireless network. My wife and I both have laptops with Windows 7. We print wirelessly. The printer will not print, but gives us a message on the printer and on our computer screens:
"Printer failure. There is a problem with the printer or ink system."
It tells us to reset by unplugging. We have reset several times by unplugging and turning the system off and on. I have run the HP Print and Scan Doctor and troubleshooting tools. I have uninstalled and re-installed the HP software. I have downloaded all available drivers.
I have also taken the printhead out and reinserted it as instructed to check for clotting ink, etc. I have also searched inside for paper jams.
It scans ok from the computer HP assistant. Can't get it to copy because we can't get past the error message on the printer screen.
Solved! Go to Solution.
1 ACCEPTED SOLUTION
Accepted Solutions
12-31-2014 08:28 AM
HP Recommended
Did everything but replace the printhead. Nothing worked. Printhead is $120, so I'm buying a new printer for about that price. Thx for your good help.
15 REPLIES 15
12-30-2014
01:39 PM
- last edited on
03-13-2017
06:00 PM
by
![]() OscarFuentes
OscarFuentes
HP Recommended
Hello @Tallgrayguy,
I would like to work with you today with resolving the 'Printer Failure' message you're getting on your HP Officejet Pro 8600 e-All-in-One Printer. I understand that you have already uninstalled/reinstalled, ran the Print and Scan Doctor, reseated the printhead and checked for jams to no avail. At this point I'm going to have you run some additional troubleshooting steps.
To start, please click here to access the appropriate troubleshooting steps for this error. When the website opens select the drop down for 'The 'Printer Failure' message does not include an error code'. Please run through the following steps:
- Solution one: Reset the printer
- Solution two: Update the printer firmware : You may click here for the latest Firmware for your printer.
- Solution three: Check the cartridges for leaks
- Solution four: Remove and reinsert the printhead : This has to be done at least 3 times.
- Solution five: Replace the printhead : If your product is covered under the HP Manufacturers Warranty or the HP Extended Warranty the printhead is a covered replacement.
Please let me know if these troubleshooting steps resolve your Printer Failure. Thanks for reaching out to the HP Support Forums. Best of luck! ![]()
X-23
I work on behalf of HP
If you found this post helpful, you can let others know by clicking the “Accept as Solution” button. You can also show your appreciation, with a kudos, by clicking the “thumbs up" button!
01-20-2015 10:52 AM
HP Recommended
Thank you for your kind attention. Your process and an online tech helped me. apparently it was the non-HP ink cartridges, and once I replaced them with HP products and rebooted the printer, it worked. Again many thanks. You don't know how valuable a printer is unti you don't have one.
04-29-2015 02:16 PM
HP Recommended
I bought the printhead for $107 because I believe it's better to repair than replace. It came with 4 ink cartridges: black, cyan, yellow and magenta, which is approximately $94. Making the cost $13.
It works like a charm!
10-08-2015 01:47 PM
HP Recommended
Hey @Janet19,
Welcome to the thread! 🙂
I see that your Officejet Pro 8600 e-All-in-One Printer is reporting a "Printer Failure: There is a problem with the printer or ink system. Turn printer off, then on." I'd like to assist you today with resolving this error. Let's try the steps below. Be aware that the front panel error state on your printer may prevent you from completing the Firmware Update, etc. Should the front panel be unresponsive, due to the error, simply skip the step and proceed to the next step.
- Solution one: Reset the printer:
- Turn the printer on, if it is not already on.
- Wait until the printer is idle and silent before you continue.
- With the printer turned on, disconnect the power cord from the rear of the printer.
- Unplug the power cord from the wall outlet.
- Wait at least 60 seconds.
- Plug the power cord back into the wall outlet. HP recommends connecting the printer power cord directly to the wall outlet.
- Reconnect the power cord to the rear of the printer.
- Turn on the printer, if it does not automatically turn on.
- The printer might go through a warm-up period. The printer lights might flash, and the carriage might move.
- Wait until the warm-up period finishes and your printer is idle and silent before you proceed.
- If these steps resolved the issue, you do not need to continue troubleshooting.
- If the issue persists, continue to the next solution.
- Solution two: Update the printer firmware:
Check for the latest printer updates.
- From the home screen on the printer control panel, touch the ePrint icon (
 ).
). - Wait for the printer to connect to the ePrint server. The ePrint status displays.
- Touch Settings on the bottom left corner of the screen.
- Touch Printer Update, and then touch Check for Update Now.
- If these steps resolved the issue, you do not need to continue troubleshooting.
- If the issue persists, continue to the next solution.
- Solution three: Check the cartridges for leaks:
1. Press the Power button to turn on the printer, if it is not already on.
2. Slip your fingers into the slot on the left side of the printer, and then pull forward to open the cartridge access door. The carriage moves to the left side of the printer. Wait until the carriage is idle and silent before proceeding.
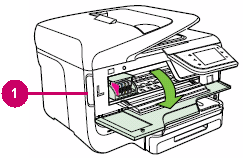
- (1) Slot on the left side of the printer
3. Press the front of the first cartridge to release it, and then pull it out of the carriage.
4. Check the cartridge for leaking ink. Be careful not to get ink on your skin or clothing.
- If the cartridge is leaking, replace the cartridge.
- If the cartridge is not leaking, continue to the next step.
NOTE: If you see a small amount of ink on the ring where the ink exits the cartridge, the cartridge is not leaking.
5. Slide the cartridge back into its color-coded slot, and then gently push it forward until it clicks into place.

6. Repeat these steps to check the other cartridges for leaking ink.
7. Close the cartridge access door.
- If these steps resolved the issue, you do not need to continue troubleshooting.
- If the issue persists, continue to the next solution.
- Solution four: Remove and reinsert the printhead:
A poor electrical contact between the printhead and the printer might cause this issue. Removing and reinserting the printhead can help.
- Step one: Remove the printhead:
1. Press the Power button to turn on the printer, if it is not already on. Wait until the warm-up period finishes and your printer is idle and silent before you proceed.
2. Place your fingers into the slot on the left side of the printer, and then pull to open the cartridge access door. Allow the carriage to move to the cartridge access area, and the carriage stops moving.
3. Disconnect the power cord from the rear of the printer. Unplugging the printer prevents the carriage from moving.
NOTE: You must disconnect the power cord before reaching inside the printer to avoid risk of injuries or electric shock.
4. Lift the carriage latch.
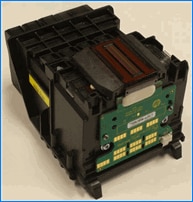
5. Grasp the sides of the printhead, gently lift and remove the printhead from the carriage.
NOTE: Do not remove the cartridges from the printhead. You can safely remove the printhead with all of the cartridges inserted.

CAUTION: The nozzle area on the bottom of the printhead is fragile! Make sure that the bottom of the printhead does not bump or rub on the printer. Do not touch the nozzles or electrical contacts. Touching these areas can cause electrical failures or print quality problems.
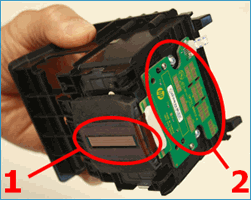
- (1) Nozzles
- (2) Electrical contacts
6. Place the printhead assembly (with the cartridges still installed) upside down on a clean sheet of paper.
NOTE: Do not leave the printhead assembly outside of the printer for an extended period. Doing so can result in damage to the printhead or the printer.
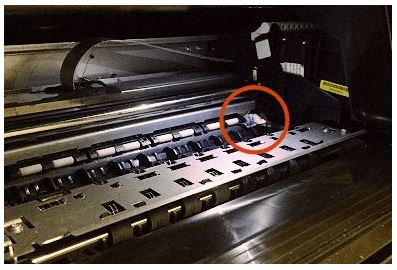
- Step two: Inspect the carriage path inside the printer:
Inside the printer, look for and remove any obstructions from the printhead compartment. If necessary, use a flashlight to thoroughly check for any obstructions.
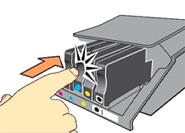
- Step three: Reinsert the printhead, and then lower the carriage latch:
1. Grasp the sides of the printhead and turn it right side up with the nozzles facing down and the electrical contacts facing away from you.
2. On the front of the printer, insert the printhead into the carriage, ensuring that the electrical contacts face the inside of the printer. As you guide the printhead into the carriage, it lowers into the carriage as it seats.
NOTE: The nozzle area on the bottom of the printhead is fragile! Make sure that the bottom of the printhead does not bump or rub on the printer. Do not touch the nozzles or electrical contacts. Touching these areas can cause electrical failures or print quality problems.
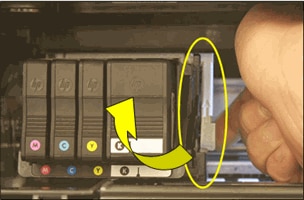
3. Gently rock the printhead to the left and right to make sure that the printhead fully seats in the carriage.
4. Carefully lower the carriage latch to secure the printhead.
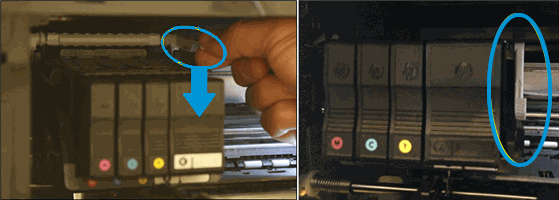
5. Verify that the carriage latch is down.
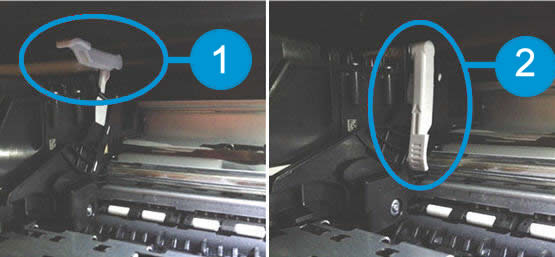
- (1) Carriage latch is up
- (2) Carriage latch is down
6. Close the cartridge access door.
7. Reconnect the power cord to the rear of the printer.
8. If the printer does not turn on by itself, press the Power button to turn it on.
NOTE: The printer might go through a warm-up period. The printer lights might flash, and the carriage might move.
9. Wait until the warm-up period finishes and your printer is idle and silent before you proceed.
- If these steps resolved the issue, skip to the step to clean the printhead.
- If the issue persists, or an error message displays on the printer, see the next step.
- Step four: Reseat the printhead up to three times:
Sometimes error messages can still display after reinserting the printhead. To clear any error messages, try to reseat the printhead up to three times.
Example error messages that might display on the printer:
♦ Missing or failed printhead
♦ Ink System Failure
♦ Carriage Jam
♦ Printer Failure
♦ Problem with Ink System
- If these steps resolved the error message, continue with the next step.
- If the error message persists, skip to the next solution.
- Step five: Use the automated tool to clean the printhead:
- Load unused, plain white paper into the input tray.
- On the printer control panel, touch the Right Arrow (
 ) to display additional options.
 - Touch Setup (
 ), touch Tools, and then touch Clean Printhead.
 - Wait until the printhead cleaning sequence completes and the report prints.
- If these steps resolved the issue, you do not need to continue troubleshooting.
- If the issue persists, the Printhead mechanism in your printer may need to be replaced.
Please respond to this post with the result of your troubleshooting. To simply say "thanks for responding," click the Thumbs up below. I look forward to hearing from you. Good luck! 🙂
X-23
I work on behalf of HP
If you found this post helpful, you can let others know by clicking the “Accept as Solution” button. You can also show your appreciation, with a kudos, by clicking the “thumbs up" button!
10-10-2015 05:11 PM
HP Recommended
X-23 - Thanks for your help. We have followed most of your suggestions. We can't complete them because at the end of them all is still the same message on the screen "Printer Failure" and we can't get back to the regular screen - for instance, to use the tools.
We are thinking of just going ahead and ordering a new printhead. Not sure what else to do.
Thank you.
Janet
10-12-2015 02:09 PM
HP Recommended
Do it! Order the new printerhead. You will be so relieved! I'm glad I did. And be sure you update your printer software, too.
Also, use the ink that comes with it. They are labeled setup cartridges. I put in the still good ones from my old printer head. I thought i'd use them up and then use the set up cartridges. But, it won't let me use the set up cartridges. Still have to contact HP to figure out why.
Be alert for scammers posting fake support phone numbers and/or email addresses on the community.
If you think you have received a fake HP Support message, please report it to us by clicking on "Flag Post".
† The opinions expressed above are the personal opinions of the authors, not of HP. By using this site, you accept the Terms of Use and Rules of Participation.


Didn't find what you were looking for?
Ask the community
† The opinions expressed above are the personal opinions of the authors, not of HP. By using this site, you accept the <a href="https://www8.hp.com/us/en/terms-of-use.html" class="udrlinesmall">Terms of Use</a> and <a href="/t5/custom/page/page-id/hp.rulespage" class="udrlinesmall"> Rules of Participation</a>.